

Honestly, figuring out how to get truly crispy chicken wings at home without drowning them in oil used to feel impossible! I tried everything—steaming them first, drying them for days—and they still came out soggy or steamed inside. It drove me mad, especially when we were planning big game nights. That’s why I spent nearly a year testing every variable until I cracked the code. This recipe guarantees you get those amazing, restaurant-quality, extra crispy chicken wings in your regular oven. No fryer required, just amazing flavor and crunch! If you need something faster on those crazy weeknights, check out my guide to easy weeknight dinners, but for wings, you need this focused method.
- Why This is the Best Recipe for Crispy Chicken Wings
- Gathering Ingredients for Your Easy Chicken Wing Recipe
- Step-by-Step Instructions for Oven Baked Wings
- Flavor Variations for Your Party Chicken Wings
- Tips for Success Making Homemade Chicken Wings
- Serving Suggestions for Game Day Wings
- Storage and Reheating Instructions for Leftover Chicken Wings
- Frequently Asked Questions About Crispy Chicken Wings
- Nutritional Estimate for These Chicken Wings
Why This is the Best Recipe for Crispy Chicken Wings
If you’ve ever been disappointed by soggy oven wings, I want you to trust me on this—we are changing that right now! This method isn’t just throwing seasoning on and hoping for the best. We are employing a little bit of kitchen chemistry to make sure every single one of these chicken wings comes out perfectly golden and totally crisp, while still keeping the inside delightfully juicy. That’s the magic trifecta every wing lover wants!
- Healthier! You skip all that deep-frying oil.
- Way less mess than managing a deep fryer in your kitchen.
- Guaranteed, crackly crisp skin every single time.
If you already own an air fryer, you can certainly check out my guide on air fryer wings, but for those of us who need to cook a big batch for a party, the oven is the way to go, and this technique makes it foolproof.
The Secret to Truly Crispy Chicken Wings Without Frying
So, how do we make crispy chicken wings without the grease? It all comes down to our dry rub, specifically that humble ingredient: baking powder. Don’t panic, you won’t taste it! When you add baking powder—and trust me, try to find aluminum-free if you can—you are subtly raising the pH level of the chicken skin. This encourages far faster and better browning, drying out the skin surface so it gets that satisfying crunch. It’s the key to knowing exactly how to make crispy wings using just heat. It’s simple science, Ellie style!
Gathering Ingredients for Your Easy Chicken Wing Recipe
Okay, gathering what you need for this easy chicken wing recipe is the simplest part, I promise. We aren’t asking for anything fancy, just a few pantry staples plus the star of the show: your wings! Since we are aiming for a bigger batch—perfect for a crowd or making sure you have leftovers for lunch tomorrow—this recipe calls for a good 3 pounds of chicken wings. Buying them pre-separated into flats and drumettes saves time, but if you get whole wings, just take a minute to cut them apart at the joints.
Ingredient Clarity and Preparation for Perfect Chicken Wings
When you look at the list, the baking powder is non-negotiable for that ultimate crisp texture, so grab the aluminum-free baking powder if you happen to have it! That’s 1 tablespoon of the powder mixed with 1 teaspoon of kosher salt, pepper, garlic powder, and paprika. This light coating is what dries out the skin beautifully. Oh, and if you plan on saucing them up later, make sure you have about ¼ cup of your favorite sauce ready to go. That’s it—you’re set to go!
Step-by-Step Instructions for Oven Baked Wings
Now we get down to the fun part! This is where the magic happens to turn simple chicken wings into truly fantastic oven baked wings. Before you do anything else, preheat your oven. We’re going to use a two-part temperature system, and getting the oven hot first is important. I tested these temperatures until I found the absolute sweet spot that gets you that crunchy exterior without drying out the inside meat. Don’t skip the prep work, though—it’s essential for success!
Setting Up Your Baking Sheet for Maximum Crisp
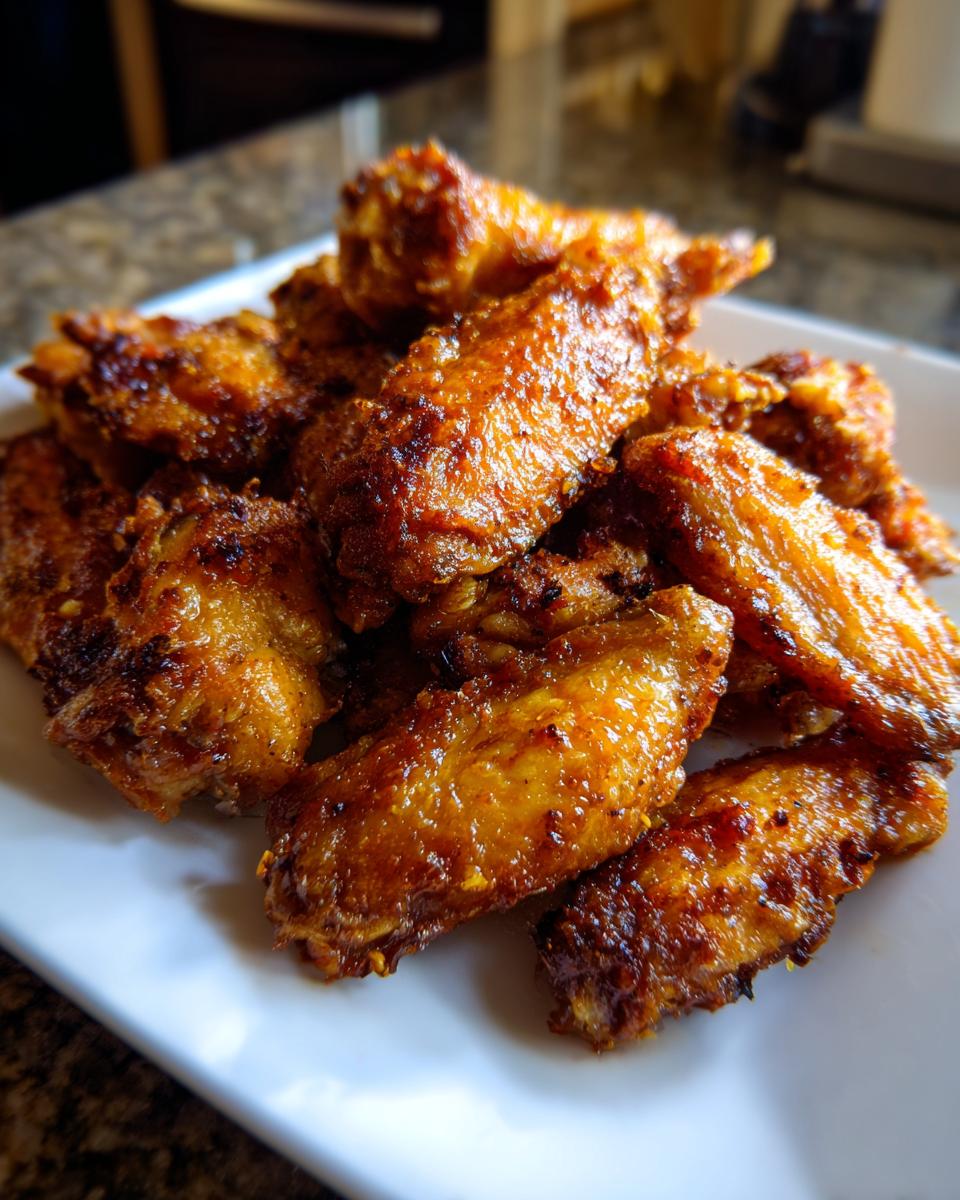
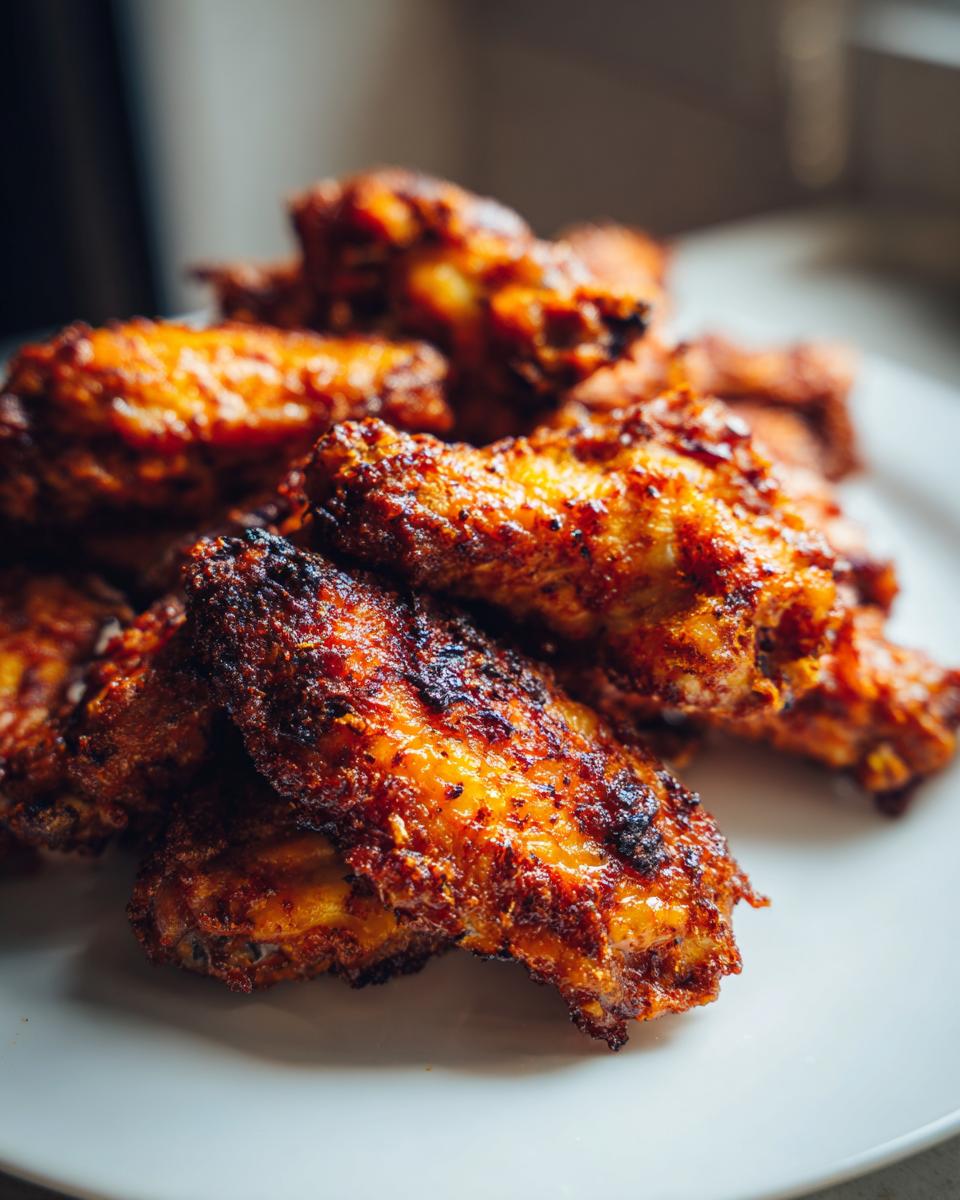
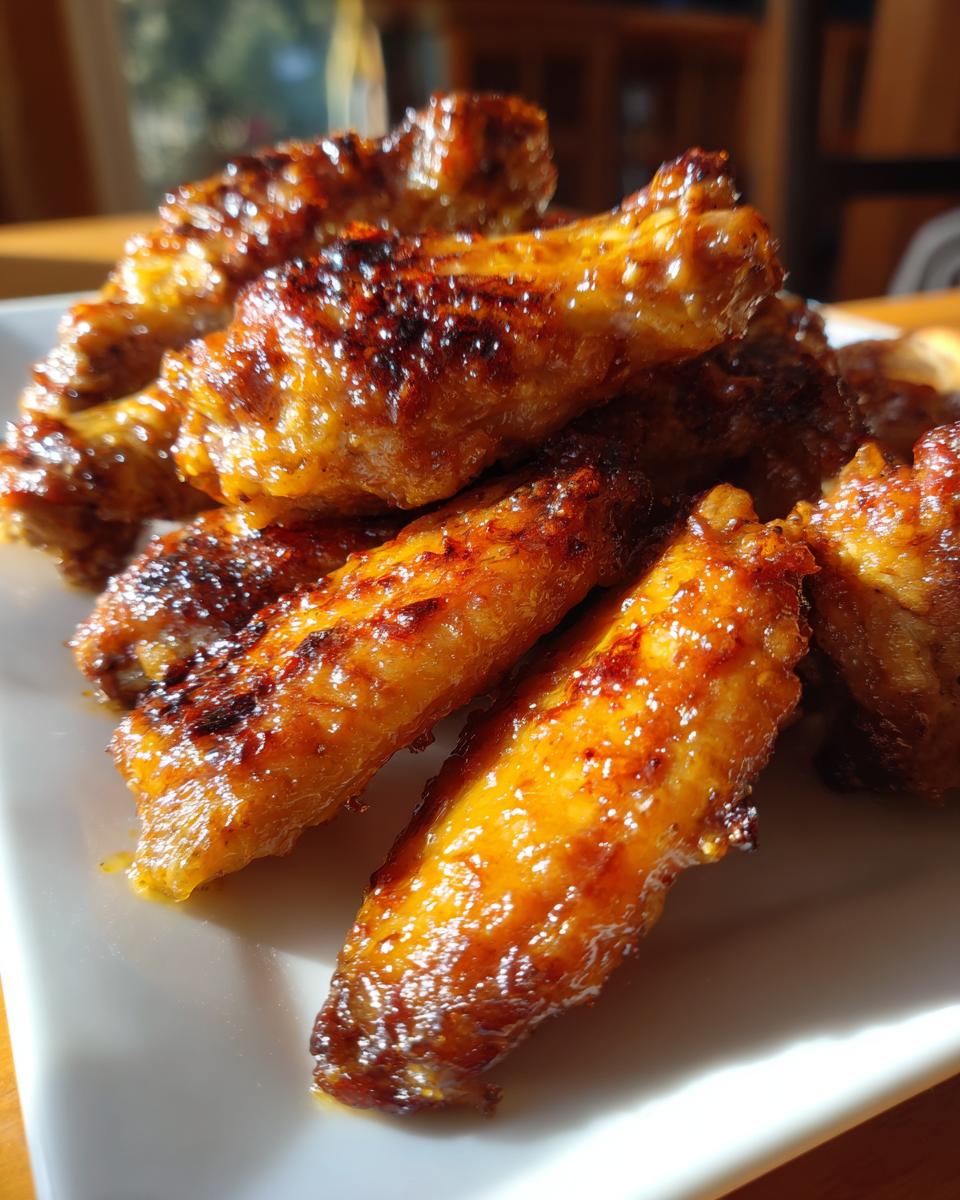
First things first: Line a large baking sheet with some aluminum foil. This catches all those pesky drips, saving your life on cleanup later. Then, you need a wire cooling rack to go right on top of that foil. Why the rack? Because we want air circulating all around the chicken wings! If the wings sit directly on the pan, the bottoms steam instead of crisping up. Elevating them is the absolute key to getting those all-over crispy chicken wings you see in pictures. Seriously, don’t skip the rack!
The Two-Temperature Baking Method for Juicy Wings
Once your wings are seasoned and sitting on that rack, they go into the 425°F oven for a solid 25 minutes. This initial bake renders out a good amount of fat and starts the drying process. Next—and this is where things get exciting—you take them out, flip every single wing over carefully, and then crank that oven up to 450°F. We bake them at this higher heat for another 20 to 25 minutes. That second blast of high heat is what seals the deal and makes them golden brown and wonderfully crunchy. It just guarantees you get those juicy wings every time!
Flavor Variations for Your Party Chicken Wings
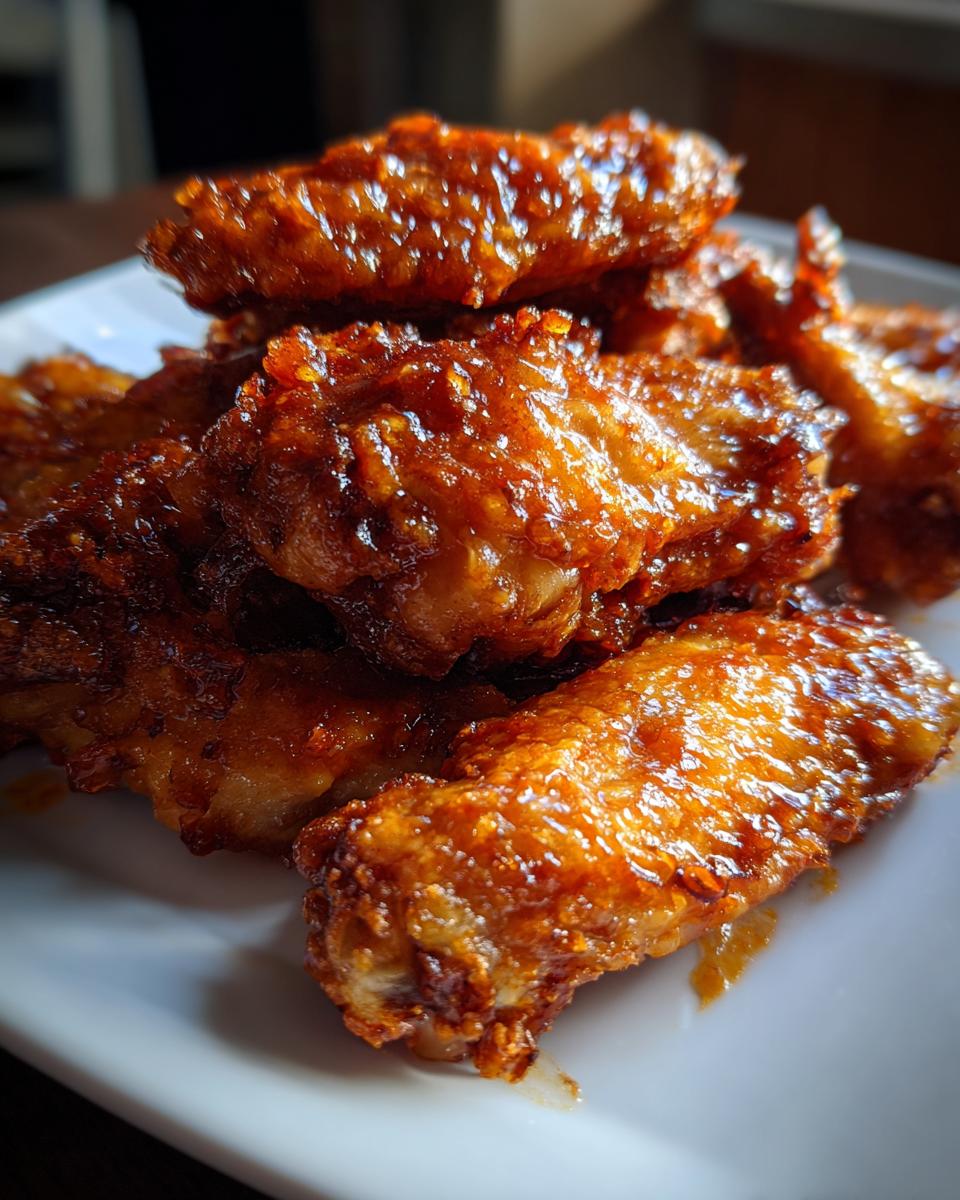
The beauty of this dry-rub method is that it acts as the perfect, non-soggy base for whatever flavor you’re craving! Since we baked these to crisp perfection, we want to treat them gently when we add any sauce. These are your ultimate party chicken wings, and nobody wants a sauce-soaked mess halfway through the big game! I love having a few options ready so everyone can customize their plate.
While the wings are baking, get your sauces ready. Whether you love a classic Buffalo kick or are going for something sticky like Honey Garlic, have about a quarter cup handy. If your sauce seems really thick, try adding a teaspoon of water or vinegar to thin it slightly. This small step helps the sauce spread over the crispy skin beautifully instead of just glopping on one spot.
Saucing Your Baked Wings After Cooking
As soon as those wings come out of the oven—and I mean *immediately*—toss them into a nice, big, clean bowl. This is crucial! The residual heat helps the sauce adhere and warm up beautifully. Drizzle on your chosen flavor! If you are making a BBQ batch, I’ve got a recipe for an easy homemade honey BBQ sauce that works wonders here. Toss gently but thoroughly until every beautiful wing is coated. Serve them right away while they are sizzling hot!
Tips for Success Making Homemade Chicken Wings
Even with the absolute best recipe, sometimes our ovens act a little strange, right? That’s okay! These tips are what I use when I’m trying to troubleshoot my homemade chicken wings to ensure they hit that perfect crisp level every time. If you followed the steps and things aren’t quite golden, don’t worry, we have a safety net!
First, remember that dry skin is your best friend. If you think you patted them dry enough, go back and pat them again! Moisture is the enemy of crunch. If, after that final 450°F bake, they look *almost* there but still need a little help, here’s my game-changing move.
Try the broil trick! Carefully move your wings up to a rack closer to your oven’s broiler element. Turn the broiler on medium and watch them like a hawk—I mean it, don’t walk away! This usually only takes 1 to 2 minutes. That intense heat gives you that final, beautiful, blistered crunch without drying out the inside. It works wonders for that extra crispy finish!
Also, never overcrowd the pan! If your wings are touching, they steam. If you have too many, just use two baking sheets. Honestly, the results are always better when they have their own space to breathe and crisp up. It’s worth the extra dish to wash later, trust me!
Sometimes I rely on simple, satisfying recipes, like these mini meatloaf muffins, but wings deserve this level of attention!
Serving Suggestions for Game Day Wings
Okay, you’ve got your perfect batch of crispy, slightly spicy, or savory wings—now how do we present these stunners for your next big social event? These are destined to be your new favorite game day wings! Presentation really matters here, because we want them to look as tempting as they taste. Don’t just dump them on a plate; give them some structure!
The absolute must-haves alongside these oven baked wings are cool, creamy dips. I always put out big bowls of homemade Ranch and classic Blue Cheese dressing; the cool tang is the perfect foil for the heat. Also, make sure you have plenty of celery sticks and some crisp carrot sticks ready. They aren’t just for dipping, they give your guests something fresh to munch on between those crunchy bites. If you need a more substantial side dish, my baked potato salad is always a huge hit too!
Storage and Reheating Instructions for Leftover Chicken Wings
It is truly rare that we have leftovers when I make these homemade chicken wings because everyone dives in headfirst! But if you are smart enough to save some—or if you made a huge batch for a party—you need to know the right way to store them if you want them to stay great for tomorrow.
First, and this is vital, let the wings cool down slightly before you put them away. Don’t put a hot dish of wings directly into the fridge, or you risk raising the temperature of everything else in there. Then, get them into an airtight container and into the refrigerator as soon as you can—ideally within two hours of coming out of the oven.
Now, for reheating: please, please, please skip the microwave! That’s how you turn your beautiful, crispy texture into rubbery steamed sadness. The best way to bring these back to life is going right back into the oven. I reheat mine at 400°F for about 8 to 10 minutes, which crisps up the skin again beautifully. If you’re only reheating a few, the air fryer works like a charm too, usually at 375°F for about 5 minutes. This trick works just as well as my method for reviving crispy mashed potato cakes!
Frequently Asked Questions About Crispy Chicken Wings
I know you’ve got questions! When you’re aiming for the best crispy chicken wings, details matter. I get asked all the time about little swaps you can make, especially if you’re looking for quick chicken wing ideas when the pantry is looking a bit bare. Trust me, I’ve tested these common substitutions myself while perfecting this recipe for game nights. Here are the answers to the questions I hear most often about getting your oven baked wings just right.
Can I make these chicken wings in the air fryer instead?
Absolutely, you can! If you have an air fryer, it’s a fantastic alternative, especially if you aren’t cooking a huge batch for a party. The principle is the same: dry skin is key! If you need to convert this recipe, try placing the seasoned wings in a single layer in your air fryer basket. Cook them at about 380°F for about 18 to 20 minutes, flipping them halfway through. They’ll still get wonderfully crispy, though I always find baking a big batch is easier on my countertop space!
What if I don’t have a wire rack for my oven baked wings?
If you’re making these homemade chicken wings and suddenly realize your rack is missing or in the dishwasher, don’t stress! That rack is there to keep the bottoms from steaming, so we need to replicate that air flow. You can carefully take a second, clean baking sheet and flip it upside down, placing your foil right on top of the inverted sheet. You can also roll up small balls of heavy-duty foil (about the size of a quarter) and place those strategically under the wings to elevate them. It’s not quite as effective as a proper wire rack, but it stops them from sitting in their own grease. I still suggest trying to find a rack for the best results, though!
If you’re looking for some other great appetizer recipes to round out your spread, my easy chicken pot pie casserole can also be made in small bowls as cute little individual servings!
Nutritional Estimate for These Chicken Wings
Okay, since these are truly the best chicken wings, I know some of you are curious about how they stack up nutritionally compared to the greasy ones we used to get. Remember, Ellie is all about transparency, so you need to know what you’re diving into! This is a much healthier option because we ditched all that frying oil, but because chicken skin has natural fat, these aren’t exactly ‘diet food,’ are they? Plus, if you choose to douse them in a sweet sauce, that changes things, of course!
The numbers below are estimates based strictly on the dry rub mix—four wings per serving size, which is pretty generous if you ask me! These estimates reflect the base recipe before any optional Buffalo or Honey Garlic coating is added. We achieved these values using the specific ingredients listed in the recipe details, factoring in the skin and bone weight, so keep that in mind!
- Serving Size: 4 wings
- Calories: 350
- Fat: 24g (Saturated Fat: 7g)
- Protein: 30g
- Carbohydrates: 1g
- Sodium: 450mg (This will increase significantly if you add a salty sauce!)
Please know that these figures are estimates! They’re calculated based on standard ingredient measurements and the exact methodology we used here. If you swap out kosher salt for table salt, or if your drumettes are much meatier than mine were, the numbers will shift slightly. But overall, this gives you a fantastic benchmark for your next game night snack!
PrintExtra Crispy Oven Baked Chicken Wings (No Frying Needed)

Make the best homemade chicken wings that rival restaurant quality. This easy oven baked wings recipe uses a simple technique to guarantee crispy skin and juicy meat every time you cook them. Perfect for game day or your next party.
- Prep Time: 15 min
- Cook Time: 50 min
- Total Time: 65 min
- Yield: 4 servings 1x
- Category: Appetizer
- Method: Baking
- Cuisine: American
- Diet: Gluten Free
Ingredients
- 3 lbs chicken wings (flats and drumettes separated)
- 1 tablespoon baking powder (aluminum-free preferred)
- 1 teaspoon kosher salt
- 1/2 teaspoon black pepper
- 1/2 teaspoon garlic powder
- 1/4 teaspoon paprika
- Optional: 1/4 cup of your favorite sauce (Buffalo, Honey Garlic, or BBQ)
Instructions
- Preheat your oven to 425 degrees Fahrenheit. Line a large baking sheet with aluminum foil and place a wire cooling rack on top of the foil. This setup helps air circulate for crispier results.
- Pat the chicken wings completely dry using paper towels. This step is crucial for achieving crispy chicken wings.
- In a large bowl, combine the baking powder, kosher salt, black pepper, garlic powder, and paprika. This is your dry rub.
- Add the dried chicken wings to the bowl. Toss well until every piece is evenly coated with the dry rub mixture.
- Arrange the seasoned wings in a single layer on the wire rack. Do not let the wings touch each other.
- Bake for 25 minutes.
- Flip the wings over. Increase the oven temperature to 450 degrees Fahrenheit.
- Bake for another 20 to 25 minutes, or until the wings are golden brown and very crispy.
- If you are using a sauce, remove the wings from the oven. Place them in a clean, large bowl. Drizzle with your chosen sauce and toss quickly to coat.
- Serve your easy chicken wings immediately with dipping sauces.
Notes
- For the crispiest wings, ensure the baking powder is fresh and you pat the chicken completely dry before seasoning.
- If you want a saucy finish, toss the wings immediately after removing them from the oven while they are hot.
- For an even crispier texture, you can broil the wings for the last 1 to 2 minutes, watching closely to prevent burning.
Nutrition
- Serving Size: 4 wings
- Calories: 350
- Sugar: 1
- Sodium: 450
- Fat: 24
- Saturated Fat: 7
- Unsaturated Fat: 17
- Trans Fat: 0
- Carbohydrates: 1
- Fiber: 0
- Protein: 30
- Cholesterol: 110