
Summer heat or birthday celebrations absolutely require a show-stopping dessert that doesn’t make you sweat over a hot oven. That’s exactly why I developed this recipe—it’s my secret weapon for impressive results with zero fuss! Forget complicated assembly; we are making the Ultimate Easy No-Bake Cookies and Cream Ice Cream Cake. As someone who believes the best food comes from kitchens full of life, not stress, I can guarantee this layered frozen dessert is reliable. It’s truly the best ice cream cake you’ll ever put together, and it all comes together effortlessly, just like my family expects from me! If you love layered desserts, you should also check out my recipe for easy tiramisu for another no-fuss crowd-pleaser.
- Why This Easy No-Bake Ice Cream Cake Works So Well
- Ingredients Needed for Your Cookies and Cream Ice Cream Cake
- Step-by-Step Instructions for Your No Bake Ice Cream Cake
- Tips for Making the Best Ice Cream Cake Ever
- Variations for Your Simple Frozen Cake Ideas
- Make Ahead Frozen Treats and Storage Instructions
- Serving Suggestions for This Frozen Dessert Recipe
- Frequently Asked Questions About Making an Ice Cream Cake
- Share Your Homemade Ice Cream Cake Creations
Why This Easy No-Bake Ice Cream Cake Works So Well
I’ve made plenty of desserts that required three different bowls and an afternoon of babysitting the oven. This one? Not so much! That’s why this incredible ice cream cake is always in my rotation for last-minute parties. It’s the definition of reliable, delicious effortlessness. If you’re looking for other simple, reliable recipes for colder weather, stick around for my super moist pumpkin bread recipe!
- Absolutely no baking is required—just some freezer time!
- The flavors are universally loved; who doesn’t adore cookies and cream?
- It looks stunning when you finally spring it from the pan!
Simple Components for a Perfect Ice Cream Cake
The magic here is relying on incredible store-bought components. You’re just assembling them beautifully. We use slightly softened commercial ice cream—it spreads like frosting—and crushed sandwich cookies for that perfect textural crunch. It’s truly as simple as layering, waiting, and enjoying the beautiful final result.
Ingredients Needed for Your Cookies and Cream Ice Cream Cake
When gathering supplies for your Oreo Ice Cream Cake, you’ll notice we keep the list focused. Since this is a no-bake dream, most of the heavy lifting is already done for us! I’ve grouped them by purpose—crust, filling, and topping—so you don’t miss a thing when you’re packing up from the store. Remember, the quality of the ice cream really shines through here, so grab your favorite pints!
You need ingredients for three sections:
- For the Crust:
1 cup chocolate sandwich cookies (like Oreos), finely crushed
1/2 cup melted butter
- For the Layers:
1.5 quarts vanilla ice cream, softened slightly
1.5 quarts cookies and cream ice cream, softened slightly
- For the Topping:
1 cup heavy whipping cream
2 tablespoons powdered sugar
1 teaspoon vanilla extract
1/4 cup chocolate fudge sauce, warmed (for drizzling)
1/4 cup crushed chocolate sandwich cookies, for final topping
Before starting, take a peek at my guide on making a flaky butter pie crust—even though we aren’t baking one, the principle of marrying fat and flour applies to our cookie base!
Step-by-Step Instructions for Your No Bake Ice Cream Cake
Alright, let’s get down to the assembly! This is where the magic happens, but trust me, it’s more relaxing than actual baking. We are building this beauty in layers, and the freezer is our true best friend here. Pay close attention to those freezing times because they keep our gorgeous ice cream cake standing tall and proud when it comes time to serve!
Creating the Crunchy Cookie Crust Base
First things first, grab that 9-inch springform pan. I always line the bottom with parchment paper first—a little insurance never hurt anyone, especially when dealing with frozen treats! In a bowl, mix up your finely crushed cookies with the melted butter. You want it looking like wet sand, nicely saturated crumb. Press this mixture down very, very firmly into the bottom of the pan. Use the bottom of a measuring cup or a flat glass to really compact it. Pop that base into the freezer for about 15 quick minutes to set up.
Layering the Ice Cream for the Ultimate Ice Cream Cake
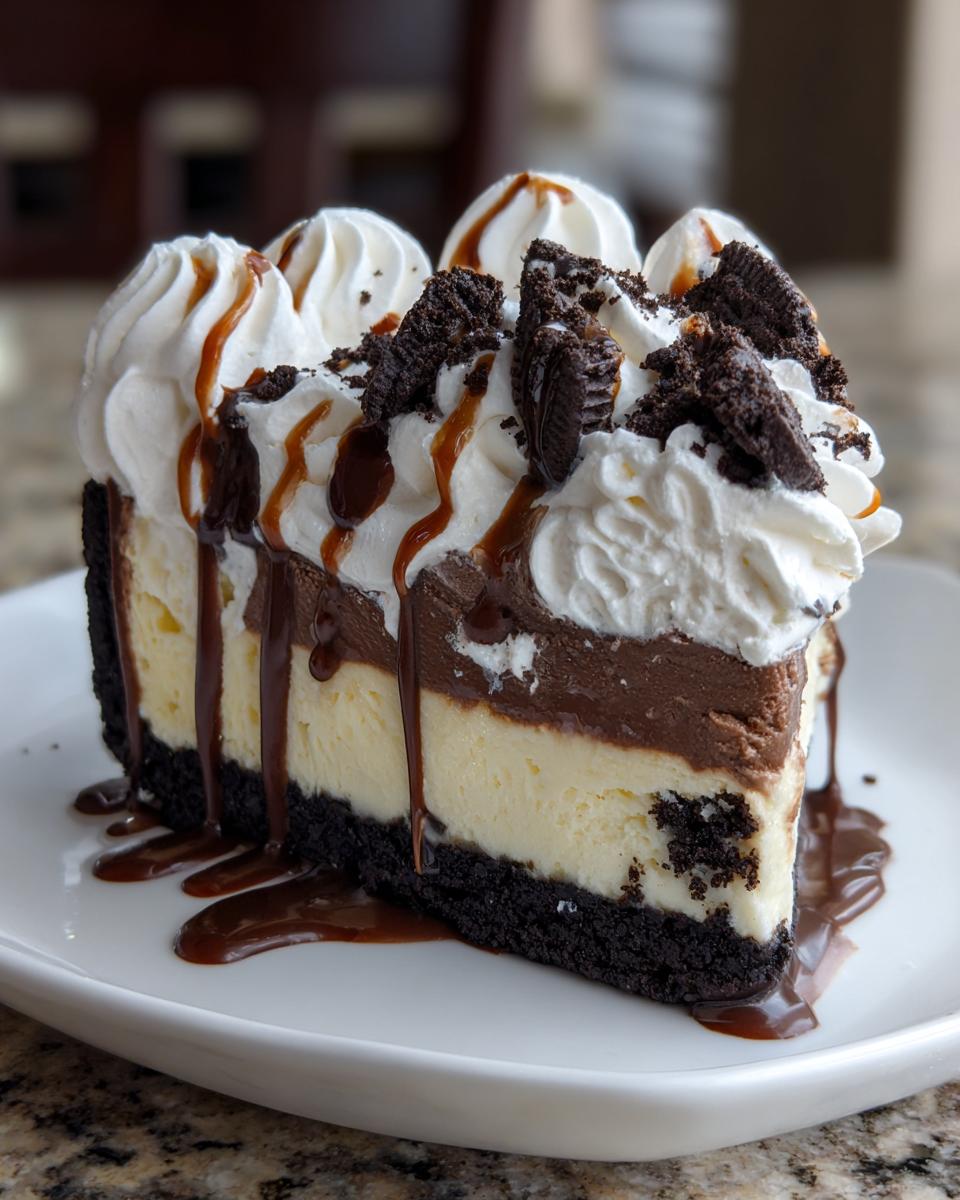
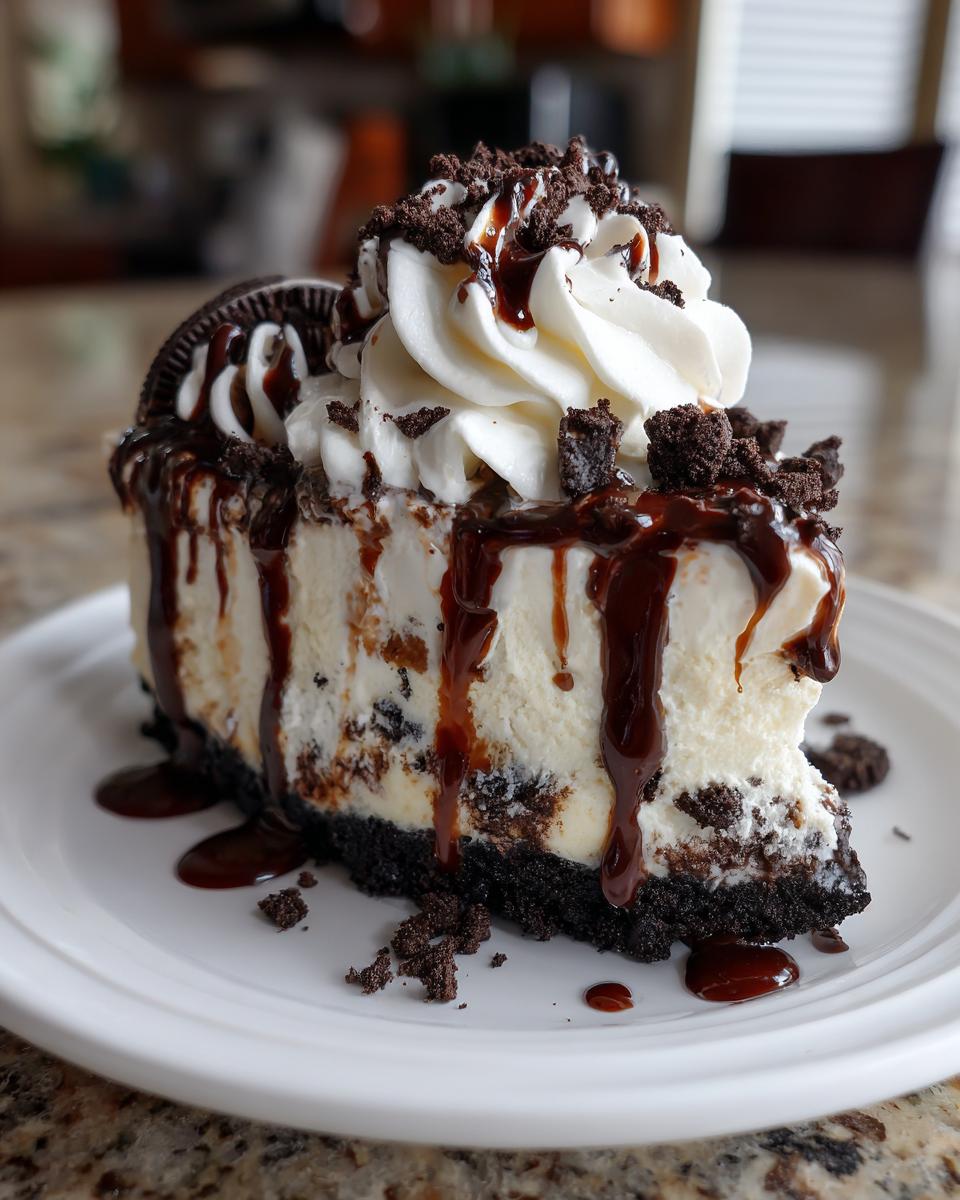
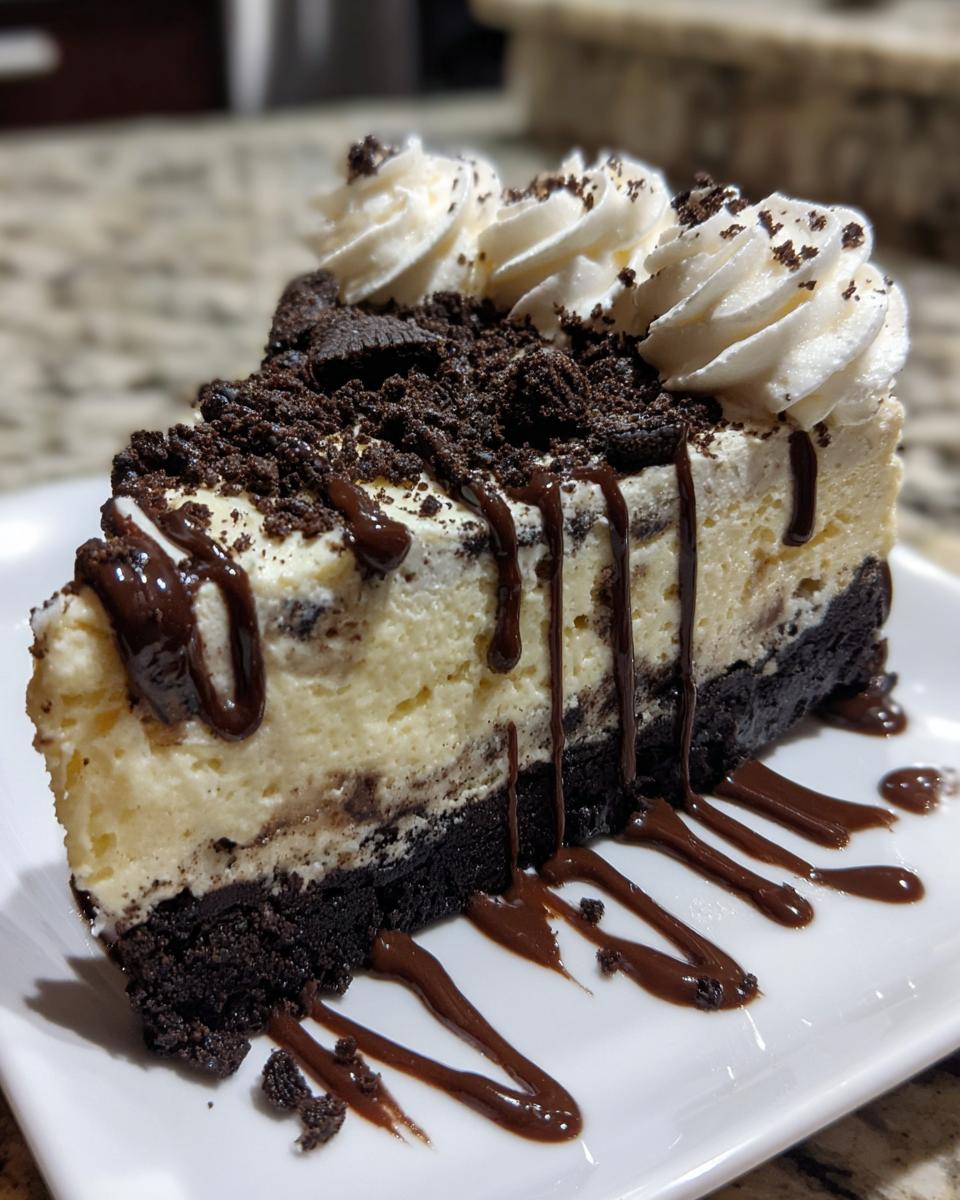
Now for the filling! Take your vanilla ice cream out just long enough for it to soften up a little—we want spreadable, not soup! Scrape it right over that chilled crust and use an offset spatula to get it totally flat and even. Back into the freezer it goes for at least an hour until that layer is rock solid. Once that vanilla layer is firm, repeat the process with your cookies and cream ice cream. Smooth it out beautifully; this will be the top layer of your Layered Ice Cream Dessert. Freeze this second layer for a good two to three hours, or until it’s completely solid for serving later.
Preparing the Whipped Cream Topping Dessert
While that cake firms up, we make the topping light and fluffy! In a separate, clean bowl, whip your heavy whipping cream. Start slow, then add in the powdered sugar and vanilla extract. You’re whipping until you hit those stiff peaks—you know the ones, where the peak stands straight up when you lift the whisk. Don’t overmix it into butter, just until it holds its shape perfectly. This stable topping is what makes the final presentation just stunning! If you ever need a tutorial on getting toppings and frostings just right, my guide for easy cookie icing has great tips on achieving perfect texture.
Tips for Making the Best Ice Cream Cake Ever
Look, I know the hardest part of a frozen dessert isn’t the mixing—it’s the serving! A lot of people struggle when they try to saw through a perfectly frozen dream, ending up with a crumbled mess instead of a beautiful slice. But I promise you, nailing that presentation is all about timing and technique. Follow these little secrets, and you’ll look like a seasoned pro when you serve up your Best Ice Cream Cake Ever!
A major bonus of this recipe is that it tastes even better the next day, so it’s the perfect make-ahead frozen treat. If you have leftovers, make sure you are keeping them safely wrapped tight. For more flavor inspiration, check out some ideas when you look at my guide for easy tiramisu!
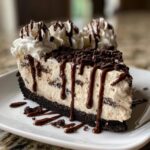
Slicing Your Homemade Ice Cream Cake Cleanly
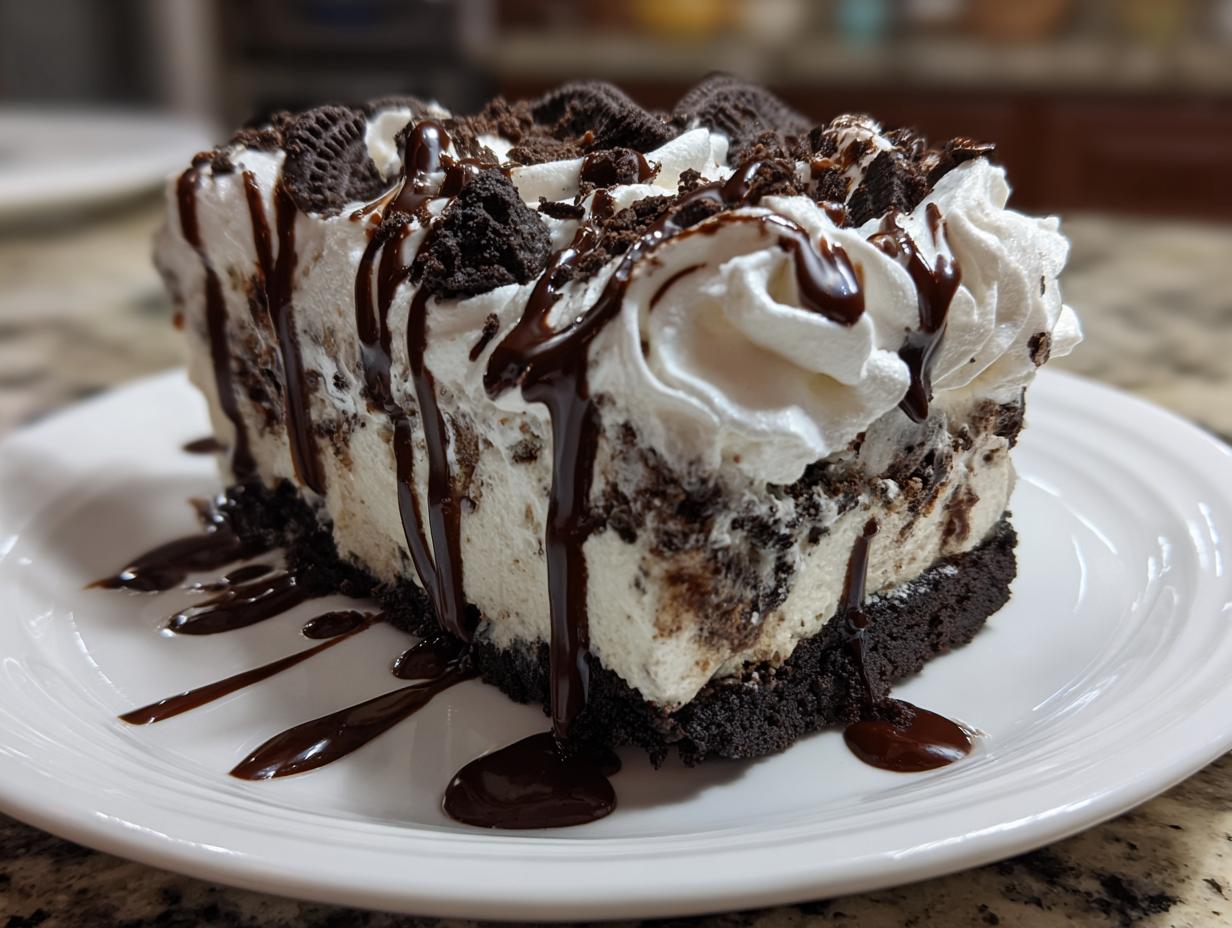
This is the golden rule for any frozen cake, trust me. Once you’ve applied your topping and sprinkled the final crumbs, return the whole thing to the freezer for about 30 minutes—just long enough for the whipped cream to firm up a bit. Then, grab your sharpest chef’s knife. Here’s the trick: dip that knife completely into a tall glass of very hot water. Pull it out, wipe the blade completely dry with a towel, and then slice! That warm blade cuts right through the hard ice cream like it was soft butter. Wipe and reheat the knife between every single slice. It makes the world of difference!

Variations for Your Simple Frozen Cake Ideas
I love that this base recipe for an ice cream cake is basically a blank canvas, just waiting for you to play around with your favorite flavors! Since we aren’t baking anything, the assembly is just too easy to resist customizing it for the next party. You absolutely don’t have to stick to just cookies and cream, even though it’s a classic winner.
For instance, if you’re a huge chocolate lover, swap that vanilla ice cream layer for a deep, rich chocolate flavor. Or maybe you prefer something fruity? Try swirling in some strawberry ice cream or folding in a layer of crushed pound cake if you have some leftover. I’ve seen people swap the Oreos in the crust for shortbread cookies, which gives it a lovely, buttery snap!
If you want to try a pie version instead of a cake, don’t forget to check out my blueberry pie recipe for inspiration on crust construction—the filing technique is totally different, but the spirit of getting that base right is the same for any great dessert!
Make Ahead Frozen Treats and Storage Instructions
This is, without a doubt, one of the best Make Ahead Frozen Treats you can assemble! Because this whole thing requires significant time in the deep freeze anyway, you might as well make it the day before your party. Once the cake is completely set and you’ve applied that lovely whipped cream topping, you need to protect it from freezer burn and those rogue smells in the kitchen.
Wrap it tightly. I mean really tightly! First, cover the top and sides directly with plastic wrap, making sure it doesn’t touch the topping if you can avoid it, then cover the whole thing again in aluminum foil. Keep it tucked away in the back of the freezer for up to a week. If you need to transport these delicious frozen desserts, keep it in the springform pan base until the last possible minute!
For inspiration on other meals you can prep ahead of time, you might enjoy my recipe for the easy chicken pot pie casserole; that one freezes beautifully too!
Serving Suggestions for This Frozen Dessert Recipe
Now that you have this epic, perfectly frozen construction sitting pretty in your kitchen, we need accompaniments! Even though the cookies and cream flavor is fantastic all on its own, adding just one little extra touch can make it feel restaurant-quality, especially for a big birthday ice cream cake situation.
The richness of the cream and chocolate filling loves a little bit of brightness. I almost always have a bowl of fresh raspberries or sliced strawberries nearby. The tartness cuts through the sweetness so beautifully. It’s such a simple addition that makes the plate look beautiful, too. Plus, I have a fantastic citrus salad recipe on the blog that uses a light honey dressing—if you made that ahead of time, the zest would actually be amazing sprinkled over the top!
If you need something richer, though, you can never go wrong with more chocolate! The recipe calls for drizzling warm chocolate fudge sauce on top, but why stop there? Serve extra warm sauce on the side for dipping or drizzling seconds. And if you’re looking for another great sheet-style treat inspiration that travels well to parties, take a peek at the genius over at Fresh April Flours for their ideas on sheet cake presentation.
Frequently Asked Questions About Making an Ice Cream Cake
I totally get it—when you try something completely new (especially something frozen!), you usually have a few little worries before you start. Don’t let that stop you! Most questions about this ice cream cake boil down to timing and texture, which we’ve worked hard to iron out here. I want you to succeed, so let’s cover the few things that always pop up when building this dessert.
If you’re looking for fantastic, everyday meals that save time, my recipe for the easy farro salad is another great ‘set-it-and-forget-it’ option!
Can I use a different size pan for this ice cream cake?
Yes, you certainly can! If you use a larger 9×13 baking dish instead of a 9-inch springform pan, you’ll have a shallower ice cream cake, meaning it will need much less freezing time between layers—maybe only 30 minutes instead of an hour. If you use a deeper pan, just know that the freezing time needed to reach the center will increase significantly. Always check that the layer above it is totally firm before adding the next one, regardless of the size you choose!
What is the best way to soften ice cream for layering?
This is key! Ice cream that is too hard will crack when you try to spread it, and ice cream that’s too melted will seep into your crust. Don’t use the microwave unless you are very careful! My go-to method is taking the packaged ice cream out of the deep freeze and setting it on the counter for about 10 to 15 minutes. You want it soft enough that if you poke it with a spoon, the spoon glides in easily, but it should still feel quite cold and definitely hold its shape on the spoon. That’s the perfect texture for spreading!
Share Your Homemade Ice Cream Cake Creations
I truly hope you give this recipe a try for your next celebration! Whether it’s for a last-minute summer treat or a big milestone Birthday Ice Cream Cake, I’m so excited to hear how it turned out for you. Please leave a comment below, give it a five-star rating if you loved it, and share your gorgeous photos!
If you have any tweaks or genius flavor ideas, I’d love to hear them. Happy freezing, friends! And don’t forget to check out my easy tiramisu recipe when you are ready for your next project.
PrintUltimate Easy No-Bake Cookies and Cream Ice Cream Cake
Make this stunning, easy homemade ice cream cake without turning on your oven. This layered frozen dessert features creamy ice cream, a crunchy cookie crust, and fluffy topping, perfect for birthdays or summer parties.
- Prep Time: 20 min
- Cook Time: 0 min
- Total Time: 2 hours 50 min
- Yield: 10 servings 1x
- Category: Dessert
- Method: Freezing
- Cuisine: American
- Diet: Vegetarian
Ingredients
- 1.5 quarts vanilla ice cream, softened slightly
- 1.5 quarts cookies and cream ice cream, softened slightly
- 1 cup chocolate sandwich cookies (like Oreos), finely crushed
- 1/2 cup melted butter
- 1 cup heavy whipping cream
- 2 tablespoons powdered sugar
- 1 teaspoon vanilla extract
- 1/4 cup chocolate fudge sauce, warmed
- 1/4 cup crushed chocolate sandwich cookies, for topping
Instructions
- Prepare a 9-inch springform pan by lining the bottom with parchment paper.
- Mix the 1 cup of finely crushed cookies with the melted butter until combined. Press this mixture firmly into the bottom of the prepared springform pan to form the crust. Freeze for 15 minutes.
- Remove the pan from the freezer. Spread the softened vanilla ice cream evenly over the crust layer. Smooth the top with an offset spatula. Freeze for at least 1 hour, or until firm.
- Once the vanilla layer is firm, spread the softened cookies and cream ice cream evenly over the top. Return the pan to the freezer for another 2 to 3 hours, or until completely solid.
- When ready to serve, prepare the topping. In a medium bowl, beat the heavy whipping cream, powdered sugar, and vanilla extract until stiff peaks form.
- Carefully remove the cake from the springform pan. Spread the whipped cream topping over the top and sides of the frozen cake.
- Drizzle the warm chocolate fudge sauce over the top of the cake. Sprinkle with the remaining 1/4 cup of crushed cookies.
- Slice the **ice cream cake** with a large, sharp knife dipped in hot water and wiped dry between cuts. Serve immediately.
Notes
- For cleaner slices, place the finished cake back in the freezer for 30 minutes after topping before cutting.
- You can substitute your favorite store-bought **halal** ice cream flavors for a quick assembly.
- This **no bake ice cream cake** is best made at least one day ahead of time for the firmest layers.
Nutrition
- Serving Size: 1 slice
- Calories: 450
- Sugar: 45g
- Sodium: 280mg
- Fat: 28g
- Saturated Fat: 16g
- Unsaturated Fat: 12g
- Trans Fat: 0.5g
- Carbohydrates: 48g
- Fiber: 1g
- Protein: 6g
- Cholesterol: 60mg