
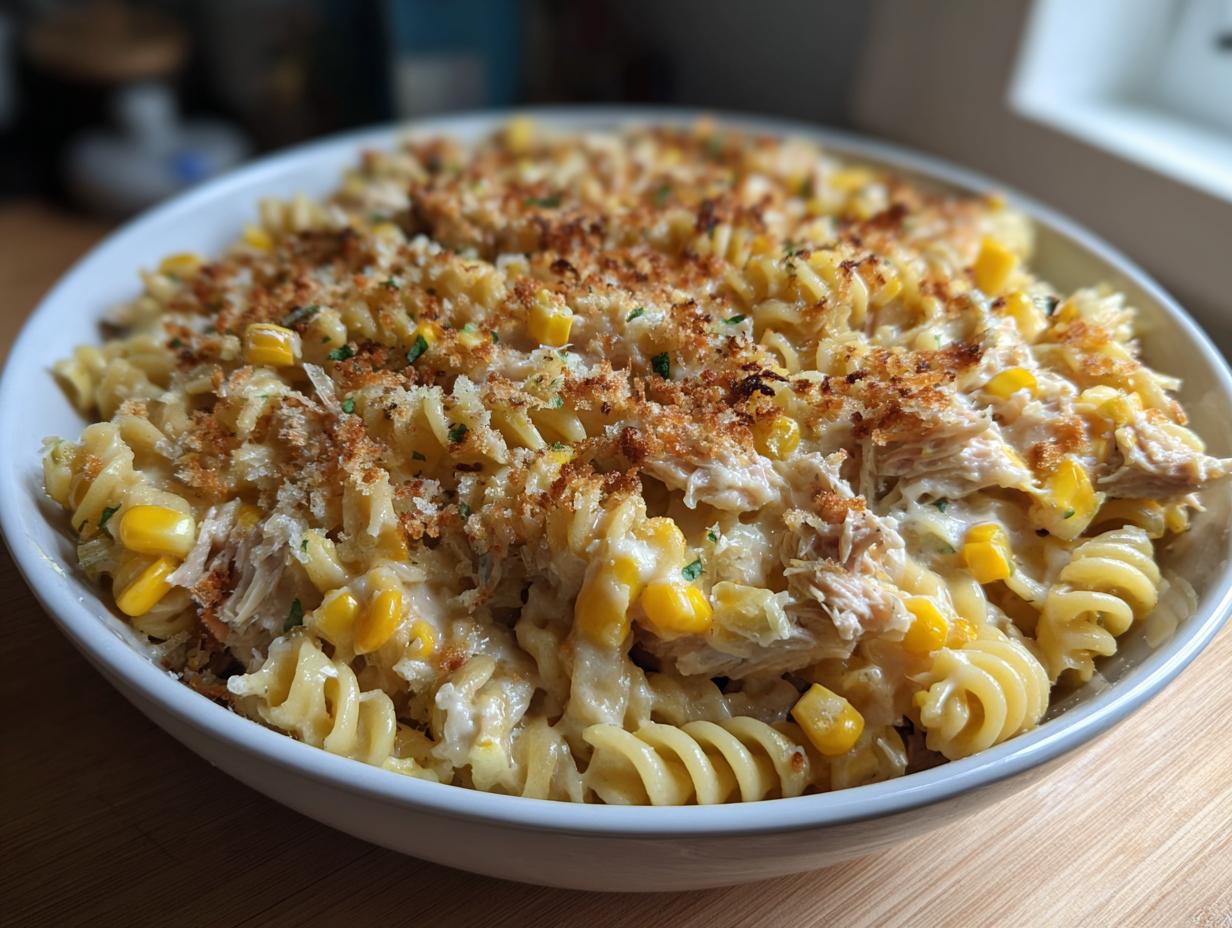
Oh, if you know, you know. That soul-crushing moment around 5:30 PM when you realize you haven’t thought about dinner, and takeout menus are starting to look awfully tempting? Me too! That’s why I live and breathe developing recipes designed specifically for those chaotic weeknights. Trust me, I get it. That’s precisely how this One-Pan Creamy Tuna Pasta came to be. It uses ingredients you probably already have hiding in the back of your cupboard and gets us from zero to delicious, comforting pasta in about 20 minutes flat.
This isn’t some fancy culinary creation; this is real food for real life. Our founder, Ellie Vance, built this whole site on making food that works for the everyday American home cook—food that shows up when you need it most. If you want a satisfying, cheesy, creamy bowl of pure comfort without needing to haul out every single pot and pan you own, this easy tuna pasta is your absolute winner. It’s dependable, quick, and tastes like you spent way more time on it than you actually did. Ready to stop stressing about dinner?

- Why This One-Pan Creamy Tuna Pasta is Your New Weeknight Dinner Hero
- Essential Ingredients for Your One-Pan Tuna Pasta
- Step-by-Step Instructions for Perfect One-Pan Tuna Pasta
- Expert Tips for the Best Creamy Tuna Pasta
- Making Variations on Classic Tuna Pasta
- Serving Suggestions for Your Delicious Tuna Dinners
- Storage and Reheating Instructions for Leftover Tuna Pasta
- Addressing Common Questions About Tuna Pasta
- Making Smart Weeknight Choices: Tuna Pasta vs. Meal Delivery
- Share Your Experience Making This Tuna Pasta
Why This One-Pan Creamy Tuna Pasta is Your New Weeknight Dinner Hero
Listen, I’m all for a slow Sunday simmer, but when Tuesday rolls around, I need efficiency, and I need flavor! This recipe has become my go-to when I’m staring down a tight schedule. We’re talking about a complete meal that cooks entirely in one large skillet. Seriously, cleanup is just one pan and a couple of forks!
When you’re looking for Quick Tuna Dinner Ideas that actually satisfy everyone at the table, this creamy version hits the spot every time. It’s the dictionary definition of comfort food that doesn’t demand fancy steps or weird ingredients. Plus, because we are leaning heavily on pantry staples, this dish is one of the best Budget Friendly Tuna Meals you can whip up this week.
- Lightning Fast: Truly ready in about 20 minutes from start to finish. Perfect for those nights when you need a hot meal fast.
- Minimal Mess: Because it all happens in one pan, cleanup is a breeze—you spend less time scrubbing and more time eating!
- Pantry Power: Uses canned tuna and basic dairy/flour, which means fewer last-minute grocery runs.
- Texture Heaven: The sauce cooks right alongside the pasta, ensuring every piece is coated in that luscious, cheesy coat.
Essential Ingredients for Your One-Pan Tuna Pasta
When you’re relying on pantry items for a quick dinner—which is often for this kind of Canned Tuna Recipes Easy situation—you need to make sure what you pull out is top-notch. Getting these measurements right is key because we aren’t draining off huge amounts of excess liquid like in a traditional casserole. Everything here is working hard to build that creamy sauce right in the pan.
Pasta and Pantry Staples for Easy Tuna Pasta
These are the backbone of the dish! Don’t skimp on the quality of the tuna; it really does make a difference when it’s the star flavor.
- 12 oz pasta (I love using penne or rotini—they grab onto that sauce perfectly!)
- 1 tablespoon olive oil (just plain old olive oil is fine here).
- 1 small onion, chopped up small—we want it to melt into the background flavor-wise.
- 2 cloves garlic, minced super fine, because garlic is non-negotiable.
- 2 (5 oz) cans tuna in water, well drained! Make sure you squeeze out as much water as you can.
- 1/2 teaspoon salt
- 1/4 teaspoon black pepper
- 1/4 cup breadcrumbs (These are just for a little textural crunch on top, honestly!)
Building the Creamy Sauce for Your Tuna Pasta
This is where the magic happens! We create a quick roux and turn humble milk into a rich, savory coating for the whole dish. It’s so much easier than making a separate béchamel sauce, I promise.
- 1/4 cup all-purpose flour (This thickens everything up beautifully.)
- 2 cups milk (Whole milk works best for richness, but whatever you have on hand is fine.)
- 1 cup chicken broth (This adds a layer of savory depth that water just can’t touch.)
- 1 cup frozen peas and corn mix (I just dump this right in when the sauce needs heating up—no thawing needed whatsoever.)
- 1 cup shredded cheddar cheese (Sharp cheddar gives the best bite!)
Step-by-Step Instructions for Perfect One-Pan Tuna Pasta
This is where we prove that we don’t need multiple pans to make something spectacular! The beauty of this One Pot Tuna Pasta is that we cook the pasta first, but everything else—the onions, the garlic, the cheese sauce—happens right inside the same skillet. That means you get all those beautiful, caramelized bits from the onions sticking around to flavor your creamy mixture. Don’t skip reserving that pasta water when you drain the noodles; it’s liquid gold for making your sauce exactly the right consistency. This method is so reliable, it rivals even my favorite one-pot creamy recipe!
Prepping the Pasta and Aromatics for Tuna Pasta
First things first: get your pasta going! Cook your penne or rotini according to the package instructions, but pull it off the heat when it’s just shy of done—we call that al dente. Before you drain it, scoop out about half a cup of that cloudy, starchy cooking water and save it on the side. Now, drain the pasta and set it aside. Forget washing that pot! Dry the skillet, turn the heat back up to medium, and add your olive oil.
Toss in your chopped onion and let it soften up. This takes about five minutes, and you want them tender, not brown and crispy. Once they are soft, toss in your minced garlic. Be quick here; give it just about 60 seconds until you can really smell that amazing garlic aroma. That flavor foundation is what helps this dish taste homemade, even though it’s super fast.
Creating the Velvety Sauce Base for Your Tuna Pasta
Now we build the creaminess, and we do it the quickest way possible! Sprinkle that ¼ cup of flour right over the onions and garlic. Stir that constantly for a full minute. This step is crucial—it cooks out the raw flour taste and creates the roux that thickens our sauce later. Seriously, don’t rush the minute!
Once that flour mixture smells nutty, grab your milk and broth. Add them in slowly—and I mean slowly—while whisking like crazy. We need to break up any lumps right away. Once everything is mixed smoothly, bring the whole skillet up to a gentle simmer. Keep stirring it every so often over medium-low heat for about 5 to 7 minutes. You’ll notice it starting to cling to the back of your spoon when it’s ready. If it gets too thick too fast, don’t panic; we have that reserved pasta water waiting!
Finishing the Creamy Tuna Pasta on the Stovetop
Okay, the sauce is thick and yummy! Reduce your heat way down to low—we don’t want the cheese to get grainy. Gently stir in your drained tuna, the frozen peas and corn (they’ll thaw right in the hot sauce!), salt, and pepper. Let that bubble for just a moment until the frozen bits are hot.
Time for the cheese! Add the shredded cheddar now and stir until it melts completely into a smooth, velvety river coating everything. If it looks too stiff, pour in a splash or two of that reserved pasta water until it’s got that perfect, gorgeous, pourable consistency. Finally, dump in your cooked pasta and toss everything together until every single noodle is draped in that cheesy sauce. My favorite final trick is to sprinkle the breadcrumbs on top, cover the skillet, and take it OFF the heat for five minutes. This resting period lets the pasta absorb all that wonderful flavor. You have an amazing creamy dinner ready to go!
Expert Tips for the Best Creamy Tuna Pasta
You know, sometimes I think people underestimate how much better a dish tastes when you give it just one tiny extra nudge. Since this is our go-to Tuna Pasta Bake Comfort Food for busy nights, I’ve learned a few shortcuts and tricks that elevate it beyond just being ‘quick soup’. I swear, one evening last month, my kid’s soccer practice ran two hours late, and I was seconds away from ordering pizza. Then I remembered I had tuna and pasta. Fifteen minutes later, everyone was happily scarfing this down, and I felt like a total kitchen hero!
Don’t be afraid to treat this recipe less like a rigid script and more like a starting point. These tips from my own kitchen experiments are what make a good dish a great staple.
Leveling Up the Richness with Dairy Swaps
The recipe calls for milk, which is cheap and easy, right? But if you are going for maximum comfort and silkiness—especially if you’re making a small batch—try swapping out half of that regular milk for heavy cream. Oh my gosh, it makes the sauce unbelievably luxurious. It’s cheating a little bit, but no one has to know the secret to making it taste like a restaurant-quality homemade mac and cheese!
Taking It from Stovetop to Baked Comfort
While I preach the gospel of one-pan cooking for cleanup, sometimes you just crave that bubbly, crusty top of a true casserole. If you have an extra 15 minutes, this is how you do it. Once your pasta is fully coated in the creamy sauce (Step 7 in the instructions), transfer the whole gooey mixture into a nice baking dish. Top it generously with a little extra cheese and those breadcrumbs.
Stick it into your oven, which should already be preheated to about 375°F (190°C). You only need about 15 minutes. You’ll see it get bubbly around the edges and that topping turns perfectly golden brown. It’s more effort, yes, but if you need that classic baked texture for a weekend meal, this stovetop base transitions perfectly!
The Importance of Draining the Canned Tuna
This seems obvious for Canned Tuna Recipes Easy, but I have to stress it: drain that tuna super, super well! If you scoop out the tuna and there’s still water dripping off it, that extra liquid is going to thin out your flour-thickened sauce way too much, and you’ll end up needing way more flour. I use the can lid to press down hard on the tuna flakes right in the strainer to squeeze every last drop out. It ensures your sauce stays perfectly thick and cheesy.
Making Variations on Classic Tuna Pasta
Okay, so you’ve mastered the base recipe—that creamy, dreamy, 20-minute tuna pasta that saves your Monday nights. But me? I get bored easily! Variety is the spice of life, and luckily, this sauce is so reliable that you can throw almost anything at it and it still tastes amazing. If you’re looking to switch things up, maybe you need to use up whatever’s about to go bad in the fridge, or perhaps you’re just trying to sneak in more veggies.
I’ve played around a ton, and while this sturdy sauce can handle almost anything, some additions are definitely better than others. If you’re looking for ways to make this feel like a completely new meal without starting over, keep these easy swaps in mind. It’s all about making the recipe work for your current vibe!
Adding Freshness with Herbs and Bright Flavor
The recipe as written is savory and comforting, relying on salt and pepper. But herbs just wake everything up! If you have them on hand, stir in a big handful of fresh parsley right at the very end—it adds a lovely, clean contrast to the rich cheese sauce. Don’t stop there, though. A squeeze of lemon juice right before serving is absolutely transformative. It cuts through the richness of the milk and cheese instantly. It’s like adding a tiny spark to the whole dish.
Don’t be shy with things like dried dill or a tiny pinch of dried oregano either; mix those in when you are adding the tuna and frozen veggies. Just remember, dried herbs need a little time in the liquid to wake up, so add them before the cheese goes in.
Swapping Veggies for Different Textures and Nutrients
We used a standard frozen pea and corn blend because it’s easy, but you can absolutely swap that out! Think about broccoli florets—if you chop them small, you can steam them right in the sauce when you are simmering the milk and broth. They get tender but still give you a nice little bit of chew.
Mushrooms are heavenly in this, too. If you decide to use them, make sure you sauté them with the onions until all their liquid has cooked off first. Nobody wants watery tuna pasta! When you start swapping vegetables, you might find yourself leaning towards Healthy Tuna Pasta Options, which is great. Add spinach, for instance—just toss a few big handfuls in when you add the tuna; it wilts down to almost nothing, giving you that nutritional boost without changing the creamy texture one bit.
Making the Switch to Low-Carb or Whole Grain Pasta
If you are watching carbs or just looking for a little more fiber, this method works beautifully with alternative pastas. Whole wheat pasta holds up great because this sauce is so robust, it doesn’t get mushy easily. If you are going full low-carb, you can swap the traditional pasta for zucchini noodles (zoodles) or even cauliflower florets you’ve steamed until tender.
Just note this super important difference if you switch pasta types: if you use zoodles, you skip the initial pasta cooking step entirely! You’d simply add the raw, spiralized zucchini right into the thick, hot cheese sauce at the end and toss quickly. They only need about two minutes of heat exposure to soften perfectly. This changes it from a 20-minute meal to like, a 12-minute meal!
Serving Suggestions for Your Delicious Tuna Dinners
So, you’ve got this big skillet full of warm, gooey, cheesy tuna pasta. It’s the main star of the show, an absolute comfort powerhouse. But when you’re serving up something this rich and savory, you need a side that plays nice—something bright, fresh, or crunchy to cut through all that creaminess, you know what I mean? You can’t just serve a big bowl of cheese sauce naked!
I think of sides as balancing the meal. If the pasta is heavy and comforting, the sides should be light and vibrant. These pairings mean you get a well-rounded plate without adding ten more steps to your cooking time. These are the simple additions that turn your weeknight meal into truly Delicious Tuna Dinners.
Keep It Light with Quick Green Vegetables
If I’m making this on a Tuesday, I usually steam a bag of green beans or broccoli right while the sauce is simmering. It takes five minutes, and you can toss them with just a tiny bit of olive oil, salt, and pepper afterward. The slight bitterness and crunch of the greens are phenomenal next to the soft pasta.
Asparagus spears are another fantastic choice. Toss them in the oven on a sheet pan while you are doing the final steps of the pasta—roast them hot and fast with a little garlic powder. Steamed spinach is another winner because it wilts down so small you barely notice you’re eating it, but you get those nutrients in!
The Importance of a Crisp Salad Side
A simple, bright salad is my absolute favorite way to round this out. It provides that essential acidic counterpoint—that little *zing*—that stops the whole meal from feeling too heavy. You don’t need a complicated salad recipe; just keep the dressing light.
I usually throw together some mixed greens, maybe a sliced cucumber, and some cherry tomatoes. The dressing should be very simple: white wine vinegar, a dash of Dijon mustard, olive oil, salt, and pepper. Shake it up in a jar! If you want to get a little fancy, a crunchy slaw is totally the way to go. I have an amazing apple and cranberry coleslaw recipe that brings sweetness and crunch, which is surprisingly great with tuna!
Simple Bread for Sopping Up Sauce
Look, realistically, there’s going to be delicious cheesy sauce left in the pan or at the bottom of your bowl. Don’t waste it pretending you’re not going to eat every last bite! You absolutely need something sturdy on the side to grab all that goodness.
Forget fancy garlic bread, though that works too. A few slices of crusty French bread or even some simple Italian bread works perfectly. Just warm it up in the oven for a couple of minutes so it’s got a nice crisp exterior. It’s perfect for using as a utensil to wipe your bowl clean!
Storage and Reheating Instructions for Leftover Tuna Pasta
Oh, the joy of having leftovers from a great Weeknight Dinner Pasta! This creamy tuna pasta is actually fantastic the next day, provided you store it correctly. Honestly, I always make a triple batch just so I have lunches sorted for the next couple of days. It’s one of those comfort foods that just continues to hug you the next day!
But because creamy sauces made with flour and milk naturally want to seize up and become dense when they chill in the fridge, you need to know the secret to bringing them back to life without drying out your tuna. Trust me, nobody likes dry, stiff pasta leftovers!
The Best Way to Store Your Tuna Pasta
The number one rule here is to let it cool down slightly before boxing it up. Putting piping hot food directly into the fridge can mess with your fridge temperature, and it encourages condensation, which leads to sogginess upon reheating. Let it cool on the counter for about 20 minutes until it’s just warm to the touch.
Then, you need an airtight container. Glass containers are great because they heat evenly, but any tight-sealing container will work. Don’t try to store this in thin foil or plastic wrap only; you want it sealed well to keep that remaining sauce from drying out against the cold air. This creamy version will easily last about three to four days safely in the refrigerator. If you try to push it past five days, the texture just starts to get weird, so stick to the four-day rule.
Reheating Creamy Tuna Pasta: Bring Back the Velvet
Here’s the most important part: if you try to reheat a big scoop of leftover tuna pasta straight in the microwave, it will likely look crumbly or dry. The starch in the pasta has absorbed all the liquid while chilling, so we need to reintroduce some moisture!
Before you even stick it in the microwave (or on the stovetop, which I sometimes prefer), stir in a tablespoon or two of liquid for every cup of pasta you are reheating. You can use milk, broth, or even water. Milk gives you creamy back; broth flavors it up. Just stir in that liquid until it loosens up the sauce to where you remember it being on day one.
Microwave vs. Stovetop Reheating Methods
For quick, single-serving jobs, the microwave is your friend. Place your portion in a microwave-safe bowl, add your liquid, stir it around gently, cover it loosely with a damp paper towel (this traps steam and prevents spattering), and heat it in 30-second intervals, stirring well between each one. Keep going until it’s heated through evenly.
Honestly, my favorite way to reheat is on the stovetop if I’m doing a larger portion. Put the leftovers into a skillet over medium-low heat. Add your milk or broth, and stir constantly. Because the heat is gentler and more distributed on the bottom of the pan, the sauce tends to incorporate the liquid much more smoothly than it does in the microwave. It takes maybe 5 or 6 minutes total, but the texture is undeniably better and feels fresher!
Addressing Common Questions About Tuna Pasta
I know that when you’re trying something new, even if it’s supposed to be super easy, little questions pop up in your head. It’s totally normal! I wanted to hit those quick questions right here so you feel 100% confident walking into this recipe. Chances are, if you’re wondering something about making this tuna pasta, someone else is too!
Do I have to use canned tuna packed in water? Can I use tuna in oil?
That’s a great question about ingredient swaps! The recipe is written assuming you’re using tuna packed in water, drained well. If you use tuna packed in oil, you need to skip the tablespoon of olive oil we use to sauté the onions, because the draining oil will already be in there. Be careful though—if you use tuna in oil, your sauce might end up a little greasier than ideal, since the oil is less neutral than water.
I’m short on time; can I skip incorporating the flour to make a roux?
While I totally get wanting to skip steps to save time, I really, really suggest you don’t skip the flour in this specific one-pan version. Remember how we talked about making a roux? That flour is what grabs the milk and broth and stops it from just being lukewarm, watery tomato soup with cheese floating in it. If you absolutely cannot use flour, you’ll need a different recipe entirely, perhaps one that uses a binder like cream cheese directly, or maybe check out this canned salmon patties recipe if you want a different pantry seafood classic.
What should I do if my sauce breaks or gets a little grainy after adding the cheese?
Oh, the dreaded separation! This usually happens if your heat is too high when you add the cheese. Cheese doesn’t like a hard boil when it’s trying to melt into a sauce. If you notice it looking oily or separated, kill the heat completely. Add a tiny splash of that reserved pasta water or even just cold milk and whisk vigorously off the heat. This cools things down just enough to let the sauce emulsify, or come back together. It usually works like magic!
How can I make this even faster if I’m aiming for a true 15-minute dinner?
To shave off those last few minutes, you need to multitask like a pro! While the onion and garlic are sizzling (which takes 6 minutes), you can be measuring out your milk and broth, and even draining your tuna. The absolute biggest time-saver is using pre-shredded cheese and keeping your peas and corn right in the freezer until the last second. If you’re prepping ingredients while the aromatics are cooking, you can easily be eating within 15 minutes!
Making Smart Weeknight Choices: Tuna Pasta vs. Meal Delivery
Listen, I totally get the appeal of those pre-portioned boxes. Sometimes you look at the clock and think, “There is no way I have the brainpower to cook right now.” Trying to decide between different meal delivery companies can feel like a full-time job in itself! If you’re burnt out, that convenience sounds like heaven, and I’ve definitely been there.
But let me tell you why, when it comes to a reliable, classic meal like this creamy Weeknight Dinner Pasta, homemade always wins. Financially, there is no contest. Even if you’re paying premium prices for a service, the per-serving cost of our one-pan wonder is pennies on the dollar compared to ordering in. You’re getting high-quality tuna, fresh dairy goodness, and a giant bowl of comfort food for way less than the cost of a subscription box.
The Cost Factor: Pantry Staples Beat Subscription Fees
The beauty of this recipe is that most of these ingredients—pasta, flour, milk, canned tuna—are staples. They sit patiently in your pantry or fridge waiting for you. When you rely on specialty services, you’re often paying a markup just for the assembly and delivery.
With this tuna pasta, you whip up four servings for the price of maybe one person’s single serving from those other services. It’s incredible freedom! You can even use that money you saved to splurge on better cheese or really high-quality tuna packed in olive oil next time. When you’re planning your weeknights, think of the savings you get from using pantry staples. That money can go toward a vacation, or maybe just ordering the pizza next week when you really need the break!
Control Over Ingredients and Flavor Twists
When you order from those folks, you are locked into their flavor profile or their specific dietary offering, like a keto meal plan delivery option, which might not be what you’re craving that night. If you get a box, and you secretly wanted corn instead of peas, too bad!
Here, the flavor control is 100% yours. Hate onions? Leave ’em out. Need more pepper? Add it! Want to use up some leftover smoked paprika? Throw it in! This recipe is designed to be customized so it fits *your* palate exactly. We want you to feel confident in what you’re serving your family, and making it yourself gives you that peace of mind. For more reliably simple dinners that don’t require a subscription, always check out my list of easy weeknight dinners here on the site.
Speed Check: 20 Minutes Versus Delivery Wait Times
We’ve established this takes about 20 minutes of active cooking time. How long does it take for those delivery drivers to get to your house? Thirty minutes? Forty-five? Sixty, if traffic is bad? And that’s after you spend 15 minutes browsing the menu and placing the order!
The wait for delivery often feels longer than the cooking time itself when you are *starving*. This tuna pasta gets hot food on the table faster than almost any delivery service when factoring in the entire process—from decision to plate. No waiting, no tracking arrows on a map, just cooking!
Share Your Experience Making This Tuna Pasta
I pour my heart into developing these ridiculously easy, reliable recipes, and honestly, the best part is hearing from you! Did this One-Pan Creamy Tuna Pasta save your weeknight when you were totally out of ideas? Did you try adding fresh parsley or doubling up on the cheddar?
I genuinely want to know how this delicious dinner worked out on your table. Cooking is so much more fun when we can share the results, right?
Tell Me How You Liked It!
If you made this savory, comforting dish, please take two seconds to leave a rating. Five stars? Four stars? Even one star with a helpful note is amazing because it helps me tweak things for the next person who tries it. Your feedback means the world!
Drop a Comment Below
Did you discover a secret ingredient that you think should be in the main recipe next time? Did you use rotini, or did you stick with penne? Let me know down in the comments! If you had any issues—like your sauce splitting or thickening too much—share the details so we can troubleshoot together. That’s how our community keeps growing stronger and more confident in the kitchen.
Show Me Your Masterpiece!
If you snapped a picture of your cheesy, bubbling bowl of homemade tuna pasta, I would absolutely love to see it! You can tag me on social media—I try to look at every single photo. Seeing that one-pan wonder sitting on someone else’s table makes all the testing and tasting worth it. Happy cooking, everyone!
PrintOne-Pan Creamy Tuna Pasta for Weeknight Dinner
Make this creamy, comforting tuna pasta in one pan. It uses pantry staples and cooks quickly, making it ideal for busy weeknights.
- Prep Time: 10 min
- Cook Time: 20 min
- Total Time: 30 min
- Yield: 4 servings 1x
- Category: Dinner
- Method: Stovetop
- Cuisine: American
- Diet: Vegetarian
Ingredients
- 12 oz pasta (penne or rotini)
- 1 tablespoon olive oil
- 1 small onion, chopped
- 2 cloves garlic, minced
- 1/4 cup all-purpose flour
- 2 cups milk
- 1 cup chicken broth
- 2 (5 oz) cans tuna in water, drained
- 1 cup frozen peas and corn mix
- 1 cup shredded cheddar cheese
- 1/2 teaspoon salt
- 1/4 teaspoon black pepper
- 1/4 cup breadcrumbs (for topping)
Instructions
- Cook the pasta according to package directions until al dente. Drain the pasta, reserving about 1/2 cup of the cooking water. Set the cooked pasta aside.
- In a large, deep skillet or Dutch oven, heat the olive oil over medium heat. Add the chopped onion and cook until softened, about 5 minutes.
- Add the minced garlic and cook for 1 minute until fragrant.
- Whisk in the flour and cook for 1 minute, stirring constantly to form a roux.
- Gradually whisk in the milk and chicken broth until smooth. Bring the mixture to a simmer, stirring frequently until the sauce thickens enough to coat the back of a spoon, about 5-7 minutes.
- Stir in the drained tuna, frozen peas and corn, salt, and pepper. Cook until the vegetables are heated through.
- Reduce the heat to low. Stir in the shredded cheese until the sauce is smooth and creamy. If the sauce is too thick, add a little of the reserved pasta water until you reach your desired consistency.
- Add the cooked pasta to the skillet and toss everything together until the pasta is fully coated in the sauce.
- Sprinkle the breadcrumbs over the top of the pasta mixture. Cover the skillet and let it sit for 5 minutes off the heat, allowing the flavors to meld. Serve directly from the pan.
Notes
- For a richer flavor, substitute half the milk with heavy cream.
- If you prefer a baked version, transfer the mixture to a casserole dish, top with cheese and breadcrumbs, and bake at 375°F (190°C) for 15 minutes until bubbly and golden. This recipe is a good alternative to using meal delivery companies for a quick dinner.
- This dish pairs well with a simple side salad or steamed green beans.
Nutrition
- Serving Size: 1 serving
- Calories: 550
- Sugar: 6
- Sodium: 650
- Fat: 18
- Saturated Fat: 9
- Unsaturated Fat: 9
- Trans Fat: 0
- Carbohydrates: 65
- Fiber: 4
- Protein: 35
- Cholesterol: 60