

If you want to win the holiday dessert competition, you absolutely need a showstopper centerpiece, and nothing says ‘elegant Christmas’ quite like a magnificent Yule Log Cake. I know, I know—a Bûche de Noël sounds incredibly fancy and maybe even a little intimidating. But trust me, making this traditional French masterpiece achievable right here in your home kitchen is simpler than you think! We’re breaking down the sponge rolling, the creamy filling, and that amazing bark texture so you can wow everyone at your seasonal gatherings this year. If you love chocolate cake, you’ll adore the airy sponge we use right here in this moist chocolate cake recipe, adapted perfectly for the log.
- Why This Classic Chocolate Yule Log Cake is a Holiday Baking Showstopper
- Gathering Ingredients for Your Yule Log Cake
- Mastering the Classic Rolled Cake Technique for Your Yule Log Cake
- Creating the Realistic Chocolate Ganache Bark Technique on Your Yule Log Cake
- Decorating Your Festive Chocolate Log Cake
- Tips for Success When Making a Yule Log Cake
- Make Ahead & Storage for Your Yule Log Cake
- Frequently Asked Questions About the Bûche de Noël Recipe
- Estimated Nutritional Data for This Yule Log Cake
Why This Classic Chocolate Yule Log Cake is a Holiday Baking Showstopper
When I pull this out of the fridge, my family actually gasps. That’s the beauty of a proper Yule Log Cake; it’s truly one of the ultimate holiday baking showstoppers. It transports you straight to a cozy, snowy setting on your dessert plate! This isn’t just another dessert; it’s tradition wrapped up in a truly elegant presentation, making it one of my favorite elegant Christmas sweets to tackle.
Honestly, it looks complicated, but once you see the simple steps, you’ll realize the magic is all in the presentation, not the process. It’s rich, it’s festive, and it tastes absolutely incredible.
Key Features of Our Yule Log Cake
- Airy Chocolate Sponge: A light, flexible sheet cake that rolls up beautifully without cracking.
- Creamy Filling: A cloud of homemade whipped cream to balance out the rich chocolate.
- Realistic Bark Texture: We use a special ganache technique to trick everyone into thinking you carved this out of a real log!
Gathering Ingredients for Your Yule Log Cake
To pull off this gorgeous centerpiece, organization is everything. I always lay out my ingredients like I’m getting ready for battle—or maybe a fancy bake sale! Since this is a holiday showstopper, you want everything ready to go so you don’t panic when it’s time to roll that warm sponge. If you’re struggling with finding time for everything this season, you might want to check out my tips on meal planning to free up some time for baking adventures!
We’re breaking this down into the three main components so you can shop smart. Pro tip: Don’t forget you’ll need a 15×10 inch jelly roll pan for this! If you decide later you want to make some quick decorations, my cookie icing recipe is a great quick fix, though we are sticking to ganache for the log!
Ingredients for the Chocolate Sponge Cake
- 4 large eggs, separated (This is important—no substitutions here!)
- 1/2 cup granulated sugar, divided
- 1/4 cup all-purpose flour
- 1/4 cup unsweetened cocoa powder
- 1/2 teaspoon vanilla extract
- 1/4 teaspoon salt
Ingredients for the Cream Filling
- 1 cup heavy cream, very cold
- 1/4 cup powdered sugar (make sure it’s sifted!)
Ingredients for the Chocolate Ganache Bark
- 8 ounces semi-sweet chocolate, finely chopped
- 1/2 cup heavy cream
- 1 tablespoon unsalted butter
Mastering the Classic Rolled Cake Technique for Your Yule Log Cake
Alright, let’s talk about the part that makes everyone nervous: the roll! This is where we build the structure of our Yule Log Cake, and executing the classic rolled cake technique properly is what separates a log from a cracked mess. Don’t sweat it; I’ve got the foolproof methods for you right here from my favorite chocolate sponge cake tutorials. The key to success in this chocolate sponge cake tutorial is speed and warmth!
Baking and Initial Rolling of the Yule Log Cake Sponge
Get your oven hot—375°F, nice and warm! Prep that jelly roll pan with parchment paper, but give the paper a little flick of cooking spray, just for insurance. Bake it fast; 10 to 12 minutes is all it takes. You pull it out when it just springs back. Now, here’s the secret: have a clean kitchen towel dusted heavily with powdered sugar ready to go. Immediately flip that hot cake right onto the towel and peel off the parchment paper quickly.
Starting from a short end, roll that cake and the towel up tightly together—like a blanket for a tiny chocolate log! Set it on a cooling rack and just leave it alone. It needs to cool completely in that rolled shape. This sets the curve so it won’t snap when you fill it later.
Filling and Final Assembly of the Cream Filled Rolled Cake
Once it’s fully cool, gently unroll your sponge. You’ll see it holds that beautiful curve, perfect for the next step. Make sure your whipped cream filling is nicely stiff. Spread that filling edge-to-edge, but stop about an inch short on the far end—that border helps seal the end when you roll it again.
Now, re-roll it, but this time, leave the towel out! Roll it snugly but gently. This creates our beautiful cream filled rolled cake structure, ready for the bark treatment!
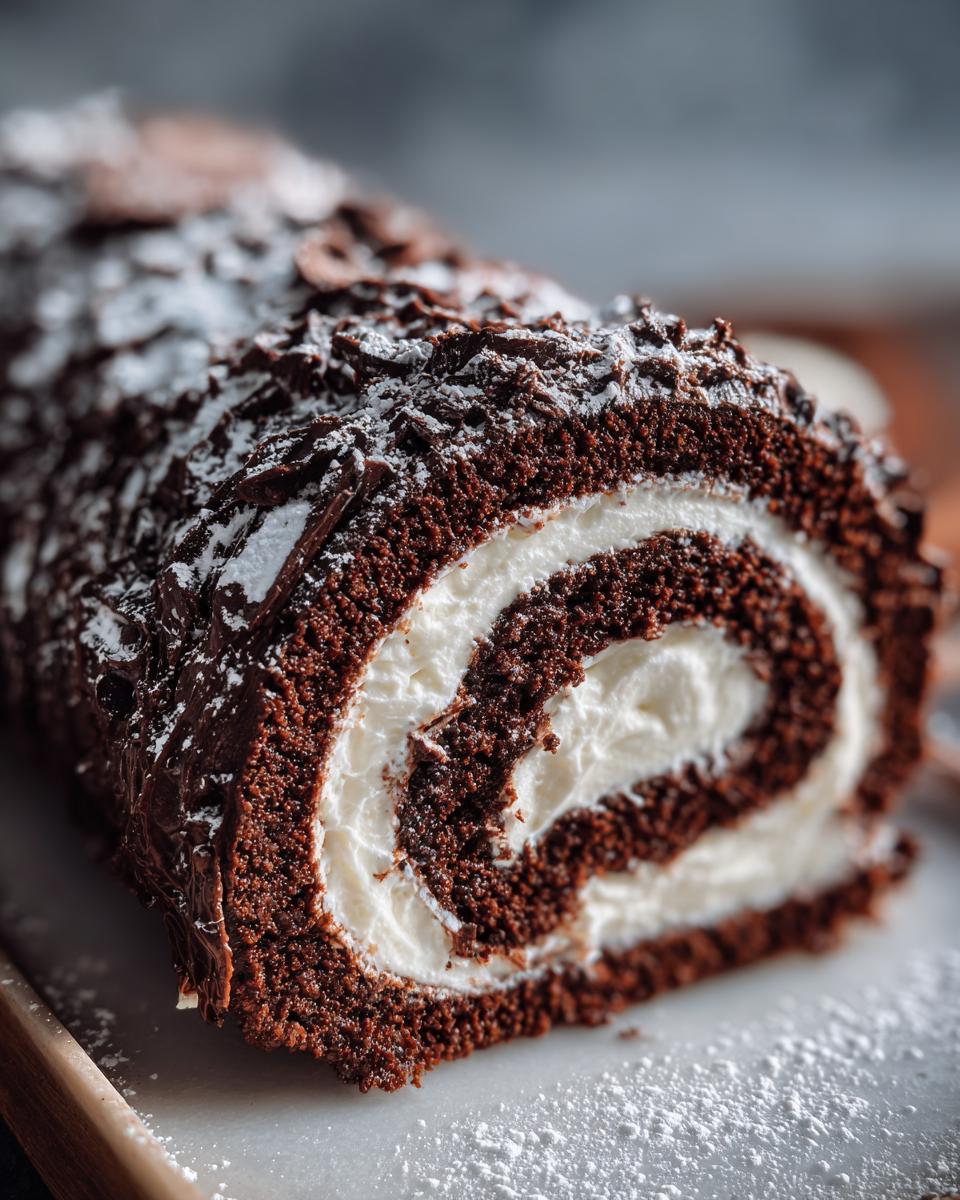
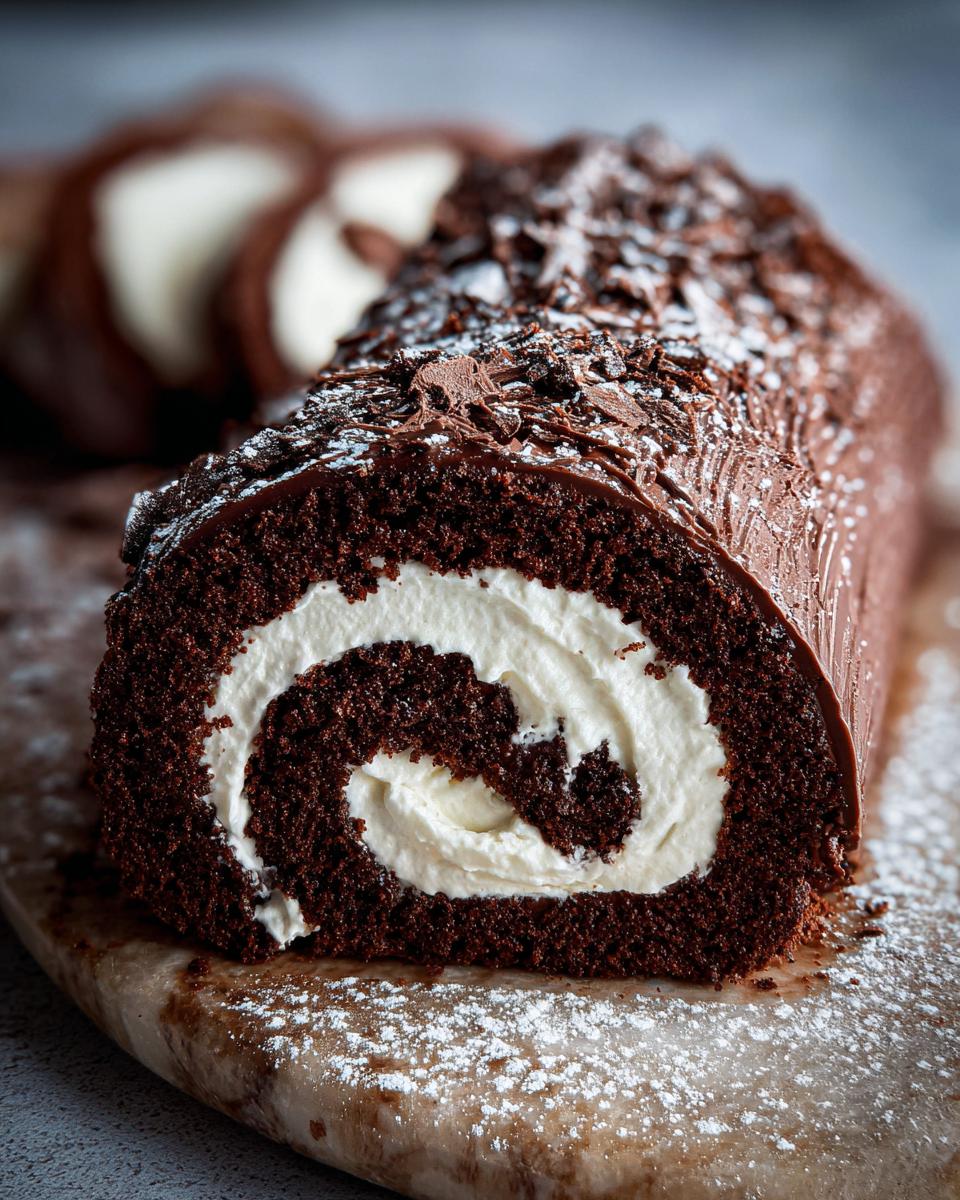
Creating the Realistic Chocolate Ganache Bark Technique on Your Yule Log Cake
This next bit is where the real drama happens—we’re making the outside look like actual wood! If you want that stunning, rustic appearance, you have to master the chocolate ganache bark technique. It’s what turns a nice rolled cake into a true holiday baking showstopper. Don’t worry, it’s just chocolate melting right! For making your ganache base incredibly smooth, remember you can check out my little recipe for a basic chocolate sauce recipe, which uses the same melting principles.
First, you slowly warm up that small pot of heavy cream until it’s just simmering around the edges. Pour that hot cream right over your chopped semi-sweet chocolate. Let it sit undisturbed for five minutes—patience is a virtue here! Only then do you whisk it gently until it melts into a gorgeous, shiny pool. Add the tablespoon of butter for extra gloss; trust me, it makes a difference.
Let it cool down slightly until it’s thick enough that it won’t just run off the cake immediately. Once it’s spreadable—more like thick mud than runny syrup—slather it all over the log. Now, grab a fork (or an offset spatula if you’re feeling fancy) and drag it along the length of the cake, going mostly lengthwise but adding a few diagonal drags and swirls to mimic bumpy bark. This is fun; you can’t really mess it up!
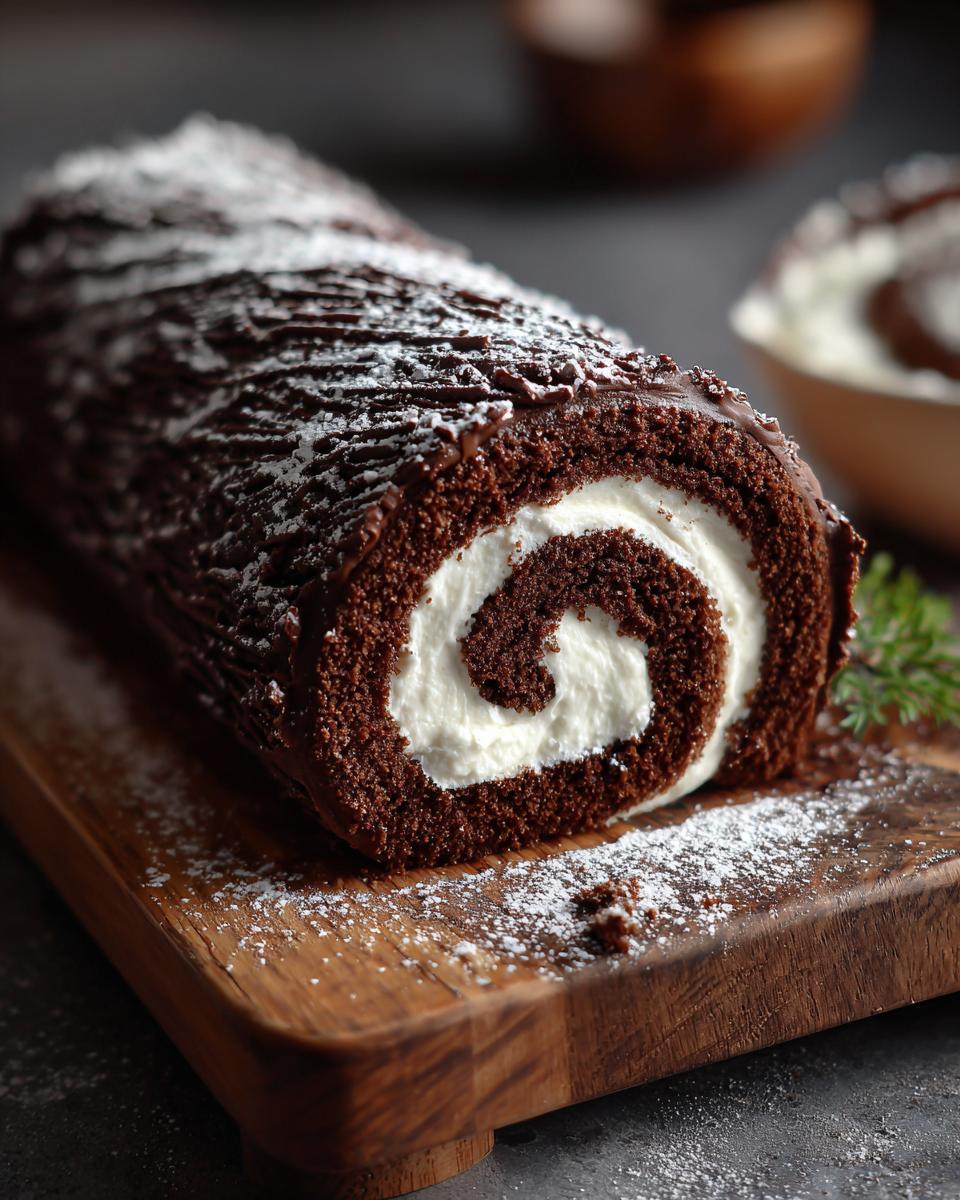
Decorating Your Festive Chocolate Log Cake
The fun part! Now that our Yule Log Cake is covered in that glorious chocolate bark, it’s time to make it look super festive. This is where that classic, woodsy appearance really shines through. You want to imitate how a real log looks, right? This attention to detail is what makes it such a holiday baking showstopper!
First thing: grab a sharp knife and trim the ends of your log at a diagonal angle, making neat little cuts. Take one of those trimmed ends and place it right against the side of the main log to look exactly like a perfectly cut branch intersection. Make sure you smear a little of that leftover ganache over the cut surface so it blends seamlessly!
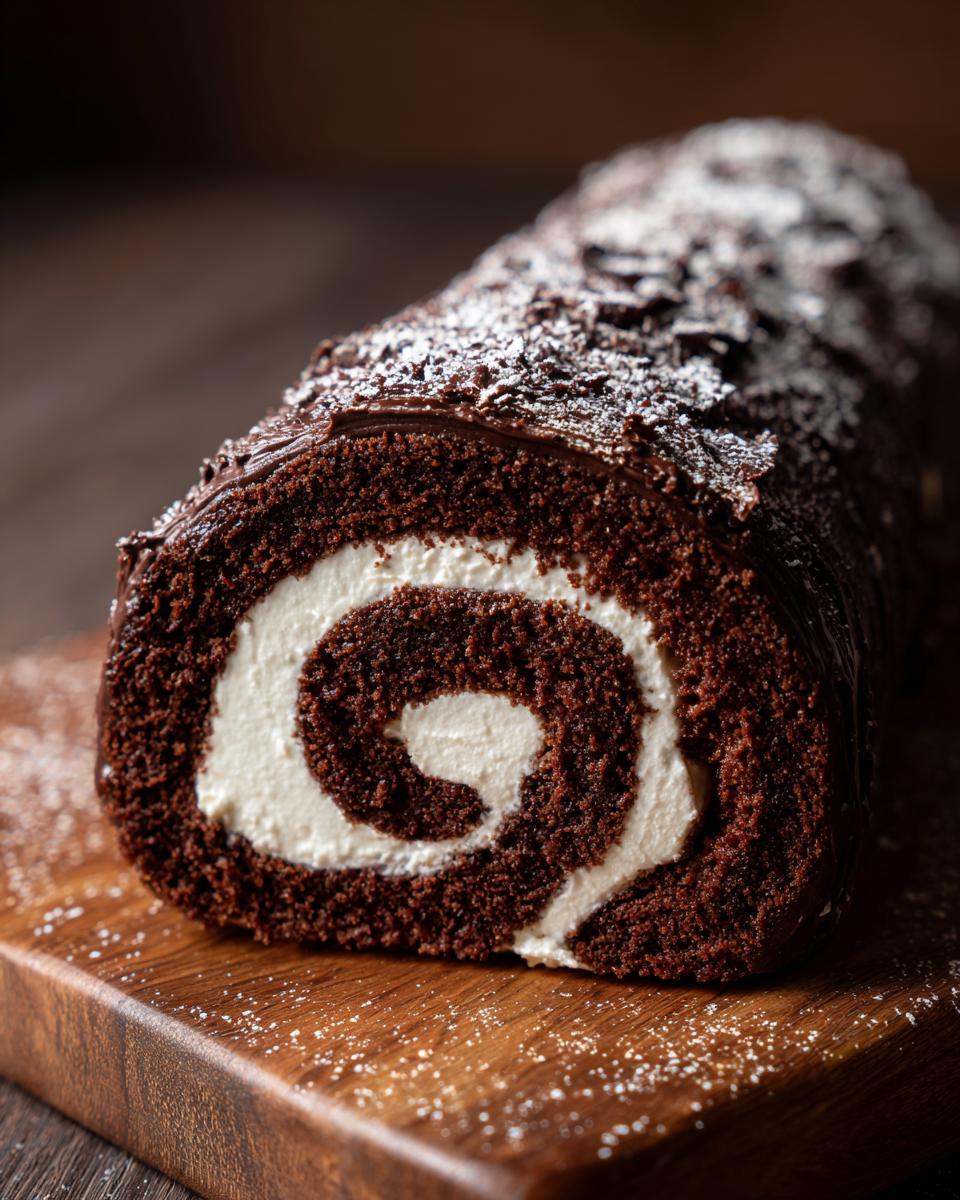
For that final touch, no snowy winter scene is complete without a dusting of white! Sift a generous layer of powdered sugar all over the top. It looks just like fresh snowfall on the forest floor. If you wanted some extra shine or wanted to dab on tiny festive details later, remember you can always use a simple icing for accents, like the one in my easy cookie icing recipe.
If you want a bit more traditional flair, tuck a few sprigs of fresh rosemary around the base to look like pine needles, or garnish it with tiny meringue mushrooms. Keep it simple; the bark texture does most of the heavy lifting for this beautiful festive chocolate log cake!
Tips for Success When Making a Yule Log Cake
Listen, I’ve cracked a few cakes trying to get this right, so let me save you the headache! The absolute biggest mistake people make with any Yule Log Cake is overbaking that sponge. If it feels dry when you touch it, it WILL crack when you roll it. Bake it until just done—seriously, check at 10 minutes. You need that tender pliability!
Also, when you make that glorious ganache coating, don’t rush the cooling step. If it’s too hot, it melts the beautiful whipped cream filling right out of your log. If it’s too cold, it’s chunky, and you can’t make that lovely bark texture. Wait until it coats the back of a spoon nicely before letting it run over your log. It’s all about timing on this one!
Make Ahead & Storage for Your Yule Log Cake
The secret weapon for any big holiday meal is a dessert you can make ahead, and this Yule Log Cake is perfect for that! Because the filling is simple whipped cream, we need a chill time to set everything solid. I always aim to assemble the whole thing—filling, log, and bark—and then tuck it away in the fridge for at least two hours before we plan to serve it. This lets that ganache firm up perfectly.
If you are planning your whole week, this make ahead holiday cake keeps beautifully for up to two days covered tightly in the refrigerator. It tastes even better on Day Two, when all those chocolate and cream flavors have really settled in!
Frequently Asked Questions About the Bûche de Noël Recipe
I always get so many questions when people first try making a Yule Log Cake because it looks so special! It’s great that you are ready to tackle this Traditional French Christmas dessert. These are the common things I hear when tackling what looks like a complicated but is actually an easy holiday baking project!
Can I substitute the whipped cream filling in this yule log cake?
The standard, absolutely classic filling for a Bûche de Noël is just plain, beautifully whipped heavy cream, just like we made it. It offers that heavenly lightness next to the dense cake. If you are worried about stability, especially if your kitchen is warm or you need it to sit out longer, you can stabilize it! Mix your whipped cream with a teaspoon of powdered sugar mixed with a tiny bit of cornstarch, or use a stabilizing powder if you have one. Chocolate mousse is also a fantastic upgrade if you want something richer, but for an authentic light texture, stick close to the original recipe!
What is the best way to serve this Christmas dessert recipe?
Because we use a creamy filling and a chocolate ganache coating, you definitely want to serve this chilled, but not straight from the freezer! Take your gorgeous Yule Log Cake out of the refrigerator about 20 to 30 minutes before you plan to slice and serve it. This lets those flavors really wake up and softens the ganache just enough so it cuts cleanly. It pairs perfectly with a strong cup of coffee or maybe a little dark hot cocoa if you’ve got kids around!
If you are trying to figure out other things for your holiday menu, remember that sometimes relying on services like the best meal delivery services can take the pressure off those weeknight dinners so you can focus on showstoppers like this!
Is this recipe very difficult for a beginner?
I wouldn’t call it beginner-beginner, but if you’ve ever made a decent sheet cake, you can absolutely manage this! The hardest parts are separating the eggs cleanly and the initial roll while the cake is hot. If you follow the towel method—rolling it up warm and unrolling it cool—you are golden. It’s the perfect recipe to try if you want to step up your game for your next party!
Can I make this dessert gluten-free?
That’s a great question, especially since we rely on a specific flour/cocoa lift for the sponge! While I haven’t specifically designed this recipe to be gluten-free, you certainly could try substituting the all-purpose flour with a good quality 1:1 gluten-free baking blend. However, you’ll need to be much more careful with the rolling, as gluten-free sponges can sometimes crack more easily. If you’re exploring other gluten-free options for your holiday spread, check out my gluten-free focaccia recipe for a savory counterpoint!
Estimated Nutritional Data for This Yule Log Cake
We’ve made a truly indulgent dessert here, so it’s good to have a rough idea of what’s in that gorgeous slice of Yule Log Cake! Remember, these numbers are just estimates based on the classic recipe ingredients we used, so your actual results will vary depending on the chocolate brand or cream fullness you choose.
- Serving Size: 1 slice
- Calories: Approximately 380
- Total Fat: About 24g
- Carbohydrates: Around 38g
- Protein: A modest 5g
It’s pretty rich, so save this one for your special holiday celebration! Enjoy every bite!
PrintClassic Chocolate Yule Log Cake (Bûche de Noël)

Make an impressive, traditional chocolate Yule Log Cake for your holiday celebrations. This recipe guides you through creating a light sponge, creamy filling, and realistic chocolate bark texture.
- Prep Time: 45 min
- Cook Time: 12 min
- Total Time: 57 min
- Yield: 10 servings 1x
- Category: Dessert
- Method: Baking and Rolling
- Cuisine: French/American
- Diet: Vegetarian
Ingredients
- 4 large eggs, separated
- 1/2 cup granulated sugar, divided
- 1/4 cup all-purpose flour
- 1/4 cup unsweetened cocoa powder
- 1/2 teaspoon vanilla extract
- 1/4 teaspoon salt
- 1 cup heavy cream, cold
- 1/4 cup powdered sugar (for filling)
- 8 ounces semi-sweet chocolate, chopped (for ganache)
- 1/2 cup heavy cream (for ganache)
- 1 tablespoon unsalted butter (for ganache)
- Powdered sugar, for dusting
Instructions
- Preheat your oven to 375°F (190°C). Line a 15×10 inch jelly roll pan with parchment paper, lightly greasing the paper.
- In a large bowl, beat the egg yolks with 1/4 cup of the granulated sugar until pale and thick. Stir in the vanilla extract.
- In a separate clean bowl, beat the egg whites until soft peaks form. Gradually add the remaining 1/4 cup of granulated sugar and beat until stiff, glossy peaks form.
- Gently fold one-third of the egg whites into the yolk mixture to lighten it. Sift the flour and cocoa powder over the mixture and gently fold until just combined. Fold in the remaining egg whites in two additions, being careful not to deflate the batter.
- Spread the batter evenly into the prepared pan. Bake for 10 to 12 minutes, or until the top springs back lightly when touched. Do not overbake.
- While the cake bakes, place a clean kitchen towel on your counter and dust it generously with powdered sugar.
- Immediately invert the hot cake onto the prepared towel. Carefully peel off the parchment paper. Starting from a short end, roll the cake and towel together tightly. Let it cool completely in this rolled position on a wire rack.
- Prepare the filling: Whip the 1 cup of cold heavy cream with 1/4 cup of powdered sugar until stiff peaks form.
- Once cool, gently unroll the cake. Spread the whipped cream filling evenly over the surface, leaving a 1-inch border on the far edge. Re-roll the cake snugly, without the towel, starting from the same short end.
- Prepare the ganache: Place the chopped chocolate in a heatproof bowl. Heat the 1/2 cup of heavy cream until simmering, then pour it over the chocolate. Let it sit for 5 minutes, then whisk until smooth. Whisk in the butter until fully incorporated. Let the ganache cool slightly until it thickens to a spreadable consistency.
- Place the rolled cake on a serving platter. Trim the ends if necessary to look like cut branches. Cut a diagonal slice from one end to create a ‘branch’ piece. Place this piece against the side of the main log to resemble a branch.
- Use an offset spatula or fork to spread the chocolate ganache over the entire cake, dragging the tines across the surface to create a bark texture. Use the excess ganache to cover the cut branch piece.
- Chill the cake for at least 2 hours before serving. Before serving, dust heavily with powdered sugar to simulate snow. You can add meringue mushrooms or rosemary sprigs for extra decoration.
Notes
- For best rolling results, ensure the cake is warm when you first roll it with the towel.
- If you are planning ahead, you can assemble the cake one day before serving. Keep it covered in the refrigerator.
- This cake pairs well with a simple coffee or tea, or consider a Baileys-infused filling for an adult version.
- If you are looking for quick meal planning ideas to balance out holiday baking, check out the best meal delivery services for easy weeknight dinners.
Nutrition
- Serving Size: 1 slice
- Calories: 380
- Sugar: 30g
- Sodium: 120mg
- Fat: 24g
- Saturated Fat: 14g
- Unsaturated Fat: 10g
- Trans Fat: 0.5g
- Carbohydrates: 38g
- Fiber: 2g
- Protein: 5g
- Cholesterol: 110mg