

Is there anything more thrilling than pulling a dish out of your very own oven that looks like it belongs on a five-star menu? I live for those moments! Making a restaurant-quality masterpiece at home doesn’t have to feel impossible, especially when it comes to the legendary Beef Wellington. This isn’t just dinner; it’s *the* showstopper, perfect for when you’re celebrating big holidays or just want to truly dazzle your family.
When I developed this definitive foolproof beef wellington recipe, my main goal, just like our founder Ellie Vance insists upon here at DeliceRecipe, was to strip away the intimidation factor. We’re nailing every single layer—the perfect sear, the savory mushroom duxelles, and that utterly flaky pastry. Trust me, this Classic Beef Wellington Recipe is totally accessible, even if this is your very first time tackling it!
- Why This Foolproof beef wellington recipe Works for Beginners
- Essential Ingredients for Your Classic Beef Wellington Recipe
- Step-by-Step: How to Make Beef Wellington Like a Pro
- Tips for Success with Your beef wellington recipe
- Serving Suggestions for Your Showstopper Dinner Ideas
- Storage and Reheating Instructions for Leftover beef wellington recipe
- Frequently Asked Questions About the beef wellington recipe
- Estimated Nutritional Data for This Special Occasion Main Dish
- Share Your Showstopper Beef Wellington Results
Why This Foolproof beef wellington recipe Works for Beginners
Look, I know Wellington seems like one of those intimidating, ‘only-for-fancy-chefs’ dishes. But honestly? It’s all about technique, not magic. My goal here is to break this whole thing down so you get that amazing restaurant result without all the stress. This Easy Beef Wellington Guide proves you can do it!
- It truly delivers on that showstopper look for any holiday or celebration.
- We focus only on the essential steps—no unnecessary fluff!
- The chilling stages are built in, which is key for a perfect finish.
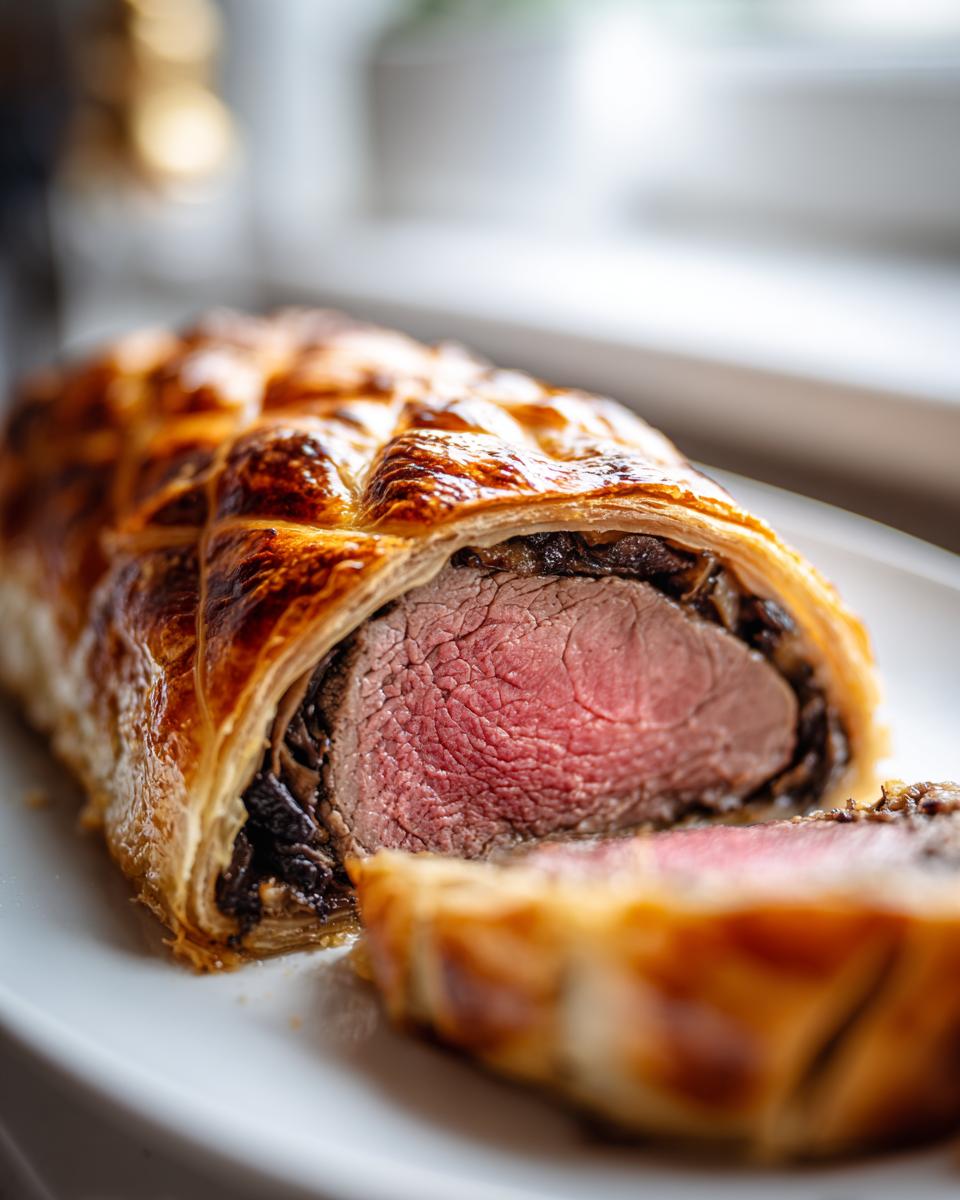
Achieving the Perfect Medium Rare Beef Wellington
Nobody wants dry, grey beef wrapped in pastry, right? That’s why searing is everything! We sear it high and fast to get a beautiful crust, which locks those beautiful juices right inside. Then, after it’s wrapped, you *must* let it rest before slicing. Please, please use a reliable instant-read thermometer; aiming for 125°F before resting means you’ll nail that Perfect Medium Rare Beef Wellington every single time. It takes all the guesswork away!
Flaky Puff Pastry Main Course Secrets
That dreaded soggy bottom? We’re fighting that with two things! First, we dry out that mushroom duxelles mixture until it’s practically dust—that’s critical moisture control. Second, the prosciutto layer acts like a delicious, salty raincoat, protecting the pastry from steamy beef juices. Following the chilling steps means your pastry stays cold and crisp right up until it hits the piping-hot oven. Voila! Instant Flaky Puff Pastry Main Course success.
Essential Ingredients for Your Classic Beef Wellington Recipe
Okay, let’s talk about what you actually need to pull this off. You don’t need a pantry full of gourmet stuff, thankfully! But the ingredients you *do* use have to be top-notch because, remember, there’s not a ton of camouflage hiding the flavor here. This is where quality counts for your Classic Beef Wellington Recipe. Everything is laid out here, including what you need for that amazing mushroom paste—the core of the Mushroom Duxelles Recipe.
- A beautiful 2 lb center-cut beef tenderloin (Chateaubriand). Get the whole piece trimmed up nicely, please!
- Just 2 tablespoons of olive oil for getting that perfect sear going on high heat.
- Salt and freshly ground black pepper—and be generous with the pepper!
- 2 tablespoons of Dijon mustard. This tangy hug goes on right after the sear.
- For the duxelles: 1 pound of cremini mushrooms (finely chopped), 1 shallot (finely chopped), and the leaves from 2 sprigs of fresh thyme.
- A splash of dry white wine (about 1/4 cup) if you want to deepen the flavor in your duxelles.
- 4 ounces of super thin prosciutto or Parma ham. This is your moisture shield, don’t skip it!
- One standard package of all-butter puff pastry—thawed, of course. I only use the all-butter kind for flakiness.
- For painting it gold: 1 large egg yolk beaten with just 1 teaspoon of water for that perfect egg wash.
- And 1 tablespoon of butter for cooking down the mushrooms.
Step-by-Step: How to Make Beef Wellington Like a Pro
Alright, deep breath! This is the part where we put it all together. It feels like a lot of moving pieces, but if you follow these phases exactly, you’ll master how to Make Beef Wellington that looks professionally done. Remember, we want those perfect layers and zero soggy spots. We’re building this thing layer by layer to get that incredible, rich result that everyone expects from such an Elegant Dinner Party Centerpiece. Let’s get to the delicious part of this Beef Wellington Step by Step guide!
Phase 1: Searing the Beef and Applying Mustard
First things first, we season that beautiful beef tenderloin aggressively with salt and pepper. Then, crank your skillet up until that olive oil is practically smoking! We only want to sear it fast—about a minute or two on every single side. We aren’t cooking it through, just giving it that deep, mahogany bark. Once it’s gorgeous and browned, pull it out immediately. Let it cool down just a hair—you don’t want it hot—and then brush every single inch of that seared meat with Dijon mustard. The mustard flavor sort of melts into the beef while it bakes, which is just divine.
Phase 2: Creating the Flavorful Mushroom Duxelles Recipe
This step is where you earn your stripes for a non-soggy bottom! Wipe out that searing pan and melt your butter. Toss in those finely chopped mushrooms and shallots. Now, you have to cook these babies down slowly until *all* the liquid has evaporated. I mean ALL of it. Keep stirring them until they start looking dark, almost like a rich paste—this takes a good 15 to 20 minutes, don’t rush it! If you leave any water in there, your pastry pays the price later. Stir in the thyme and wine (if you are using it) and cook until that wine is gone too. Spread this cooled paste on a plate so it dries out even more while you prep the next step.
Phase 3: Wrapping the Beef Wellington for Beginners
Time for the cocoon! Lay out a huge sheet of plastic wrap—seriously, use a big one. Arrange your prosciutto slices on top so they overlap just a bit, creating one big sheet. Spread that completely dry duxelles mixture evenly over the prosciutto. Now, place your mustard-coated beef at one end and start rolling it up tight using that plastic wrap to guide you. Twist the ends of the plastic wrap like a giant sausage casing to make it super compact. This compaction is essential for structure, so don’t be shy! Wrap it super tight and pop it in the fridge for at least 30 minutes. If you’re planning ahead, you can even leave it overnight—this chilling really helps it keep that perfect cylinder shape for the pastry wrap.
Phase 4: Final Pastry Encasement and Baking
Once that beef log is firm, roll out your all-butter puff pastry on a floured surface until it’s big enough to cover the whole thing. Take the beef off the plastic wrap and lay it gently on the pastry. Brush the exposed pastry edges with your egg wash. Wrap it up snugly, sealing those seams really well—trim off any bulky overlap. Place it seam-side down on a baking sheet lined with parchment paper. Give the whole thing another light coating of egg wash and use the back of a small knife to score a delicate pattern on top; just don’t cut all the way through! Chill again for 15 minutes. Then, into a 400°F oven it goes! For that glorious Flaky Puff Pastry Main Course and that must-have medium-rare center, aim for about 30–40 minutes, checking the internal temperature until it hits about 125°F. If you want to dive deep into the exact timing Gordon Ramsay uses, check out his famous method here: Gordon Ramsay Beef Wellington style tips are always helpful!
Tips for Success with Your beef wellington recipe
It seems like every step of this beef wellington recipe screams ‘be careful!’ and honestly, it’s because a few quick checks can turn this from a nice dinner into a total showstopper. If you want that truly Gourmet Beef Dish result, pay serious attention to two things: temperature and patience during the rest.
First, temperature control is your best friend. I can’t stress this enough—you need a reliable instant-read thermometer. You’re looking for that perfect 125°F to 130°F internal heat for medium-rare. If you see the pastry starting to turn dark brown but you aren’t close to that temperature, you need to tent it loosely with foil. Trust me, burnt pastry is heartbreaking when the inside is still raw.
Second, you absolutely must let it rest. I know you just pulled this beautiful, golden beast out of the oven, and you want to slice into it right then, but don’t! That 10-minute rest allows the muscle fibers in the tenderloin to relax and reabsorb those precious juices. If you cut into it immediately, all that beef goodness just spills out onto your cutting board, and your Wellington ends up noticeably drier. This resting time is non-negotiable for tenderness!
Also, if you are serving this with a sauce, this is the perfect time to whisk up a decadent, peppery topping. A lovely creamy peppercorn sauce cuts right through the richness of the pastry and beef perfectly. For inspiration on cooking techniques that avoid common pitfalls (like sogginess), I always check out expert breakdowns, like this one covering some key Ramsay techniques: The Kitchn Wellington guide.
Serving Suggestions for Your Showstopper Dinner Ideas
Now that you’ve made this absolute triumph—this incredible beef wellington recipe—the moment of truth has arrived: what do you put on the plate next to it? You don’t want to overshadow this magnificent centerpiece, you just want to serve things that make it shine even brighter. We’re aiming for that sophisticated, restaurant-plated feel here, the kind that instantly makes this an Elegant Dinner Party Centerpiece.
Because the Wellington is so rich with butter from the pastry and the savory duxelles, you need sides that offer balance—something earthy or brightly acidic works so well.
Perfect Potato Pairings
You cannot go wrong with potatoes, but skip the heavy mashed ones unless you are serving a very small portion. I prefer something a little crisper or lighter. Roasted root vegetables are fantastic because they add sweetness that plays beautifully against the savory beef. Have you ever made my simple Roasted Potatoes and Carrots Recipe? They go perfectly—they get caramelized and slightly sweet, needing just herbs and salt.
Green Vegetables for Color and Contrast
We need some green on that plate, just for color contrast alone! Asparagus is a classic choice for any fancy beef dish. I quickly blanch mine and then finish them with just a spritz of fresh lemon juice right before serving. That little bit of acidic brightness cuts through the richness of the pastry layer beautifully.
Green beans tossed quickly with some toasted almonds (a quick variation of a French almondine) also work wonderfully. Or, if you want something slightly more unique, try sautéed Swiss chard with a touch of garlic. The key is light preparation—we want texture and vibrant natural flavor here, nothing too heavy that requires a separate rich sauce!
Don’t Forget the Sauce!
While the Wellington is pretty self-sufficient, a simple pan sauce made from the drippings or a quick red wine reduction pulls everything together. If you made a simple sauce in the pan after you rested the beef, drizzle just a touch around the base of each slice. A little goes a long way when you’ve put this much effort into the construction of your Showstopper Dinner Ideas!
Storage and Reheating Instructions for Leftover beef wellington recipe
Oh my gosh, if you have leftovers from this glorious beast, first, congratulations, because you made something truly special! Now, we need to treat our leftovers right, especially that beautiful puff pastry. You definitely don’t want to ruin this masterpiece by reheating it incorrectly. We’re aiming to keep that pastry crisp and the beef moist, which is a delicate balance!
How Long Can I Keep Cooked Wellington?
Once you’ve sliced into it, any leftover cooked beef wellington recipe should be treated like roast beef. Place the slices in a clean, airtight container. Don’t let them sit out at room temperature for more than two hours, obviously! In the fridge—and it really needs to be refrigerated—it should stay good for about three or maybe four days tops. Any longer than that, and the moisture from the duxelles starts to make the pastry really soft, which defeats the whole purpose of making it a Flaky Puff Pastry Main Course in the first place.
The Best Way to Reheat Your Wellington Slices
Here’s the big secret: Put down the microwave! Microwaving leftover Wellington is a recipe for hot, steamy beef encased in soggy, chewy pastry. We want crisp, golden pastry, remember? The best method, without a doubt, is back in a moderate oven. Set your oven to about 350°F (175°C). Place the slices on a baking sheet lined with parchment paper. If you have an air fryer, that is even better—it heats fast and keeps things crunchy!
Bake them for about 10 to 15 minutes, depending on how thick you sliced them originally. You just want it heated through gently. If the pastry looks like it’s browning too fast but the beef inside is still cold, just tent a tiny bit of foil over the top until the beef warms up. This keeps the pastry nice and crisp, totally saving your culinary efforts!
Reimagining Leftovers (If You’re Feeling Creative!)
If you happen to have a ton of slices left and maybe the pastry is a little past its prime crispness, don’t toss it! You can pull the beef out and use it for sandwiches or toss it into something totally new. Or, if you have leftover sides, like my Mashed Potato Cakes, you can serve those alongside the warmed Wellington slices for a totally different, but equally delicious, second meal. It’s all about recycling those gorgeous flavors!
Frequently Asked Questions About the beef wellington recipe
I know tackling a dish like this in a busy week can bring up questions, even with the best guide! I’ve gathered the most common things I hear from folks trying this beef wellington recipe for the first time. Hopefully, these quick answers help you feel totally confident about getting that amazing final result!
Can I make the Mushroom Duxelles ahead of time for this beef wellington recipe?
Absolutely, yes! In fact, I encourage it! The mushroom duxelles work even better when they’ve had a day or two in the fridge. Once you’ve cooked out ALL that moisture (remember, that’s the secret!), just let them cool completely, store them in an airtight container, and pop them in the fridge. Just pull them out about thirty minutes before you plan to wrap the beef so they aren’t ice cold when you spread them onto the prosciutto. Keeps beautifully for up to three days!
What temperature should the beef tenderloin be for a perfect medium rare *beef wellington recipe*?
This is where you rely on science, not guesswork! For that absolutely dreamy, picture-perfect medium-rare center—the kind that makes everyone gasp—you want your instant-read thermometer to register between 125°F and 130°F *right* when you pull the Wellington out of the oven. But here’s the secret added tip: You must let it rest for a full 10 minutes after baking before you slice it. During that rest, the temperature will climb a few more degrees (carry-over cooking), setting you up perfectly at that 130°F sweet spot!
How do I prevent the pastry from getting soggy in this *Easy Beef Wellington Guide*?
Preventing the dreaded soggy bottom requires three non-negotiable steps that we covered in detail, but here’s the ultra-quick summary! One: Make sure that mushroom duxelles mixture is bone dry—cook off every drop of water. Two: Use that thin layer of prosciutto as your second line of defense against moisture. And three: Chill, chill, chill! Make sure the beef log is tightly wrapped and chilled before it ever touches the pastry, and chill the whole wrapped Wellington again before baking. Cold dough hits hot air, and that’s how you get a super flaky crust!
If you found these tips helpful, I promise that making my Easy Chicken Tortilla Soup Recipe or any other recipe here will be just as straightforward! Cooking should always be fun, not scary.
Estimated Nutritional Data for This Special Occasion Main Dish
Now, let’s be real, folks. When you are making a showstopper like this beef wellington recipe, you aren’t exactly counting calories or worrying about light salads for dinner! This is luxurious, celebratory food, meant to be enjoyed fully. Think of this as your ultimate Special Occasion Main Dish—something you make once or twice a year when you truly want to treat yourselves.
The nutritional information below is meticulously calculated based on all the ingredients listed in our guide, but please remember these are just estimates. If you use high-fat cuts of tenderloin or slightly different pastry brands, things will shift a little. But this gives you a great ballpark idea of just how hearty and delicious this meal is!
- Serving Size: 1 slice
- Calories: Around 550 (Yes, that’s a solid meal!)
- Fat: About 30g (Don’t forget the rich butter in that pastry!)
- Saturated Fat: Roughly 14g
- Protein: A whopping 45g of pure beef power!
- Carbohydrates: Approx. 25g (Mostly from the pastry and mushrooms)
- Sugar: Very low, around 2g
- Sodium: About 450mg (Thanks mostly to the seasoning and that salty prosciutto!)
Because this dish packs such a savory punch, it pairs wonderfully with lighter, healthier sides to balance out the richness. If you’re looking for something vibrant to serve alongside this indulgence, you should totally try my recipe for Easy Fluffy Cauliflower Rice. It adds texture without weighing down the plate!
Share Your Showstopper Beef Wellington Results
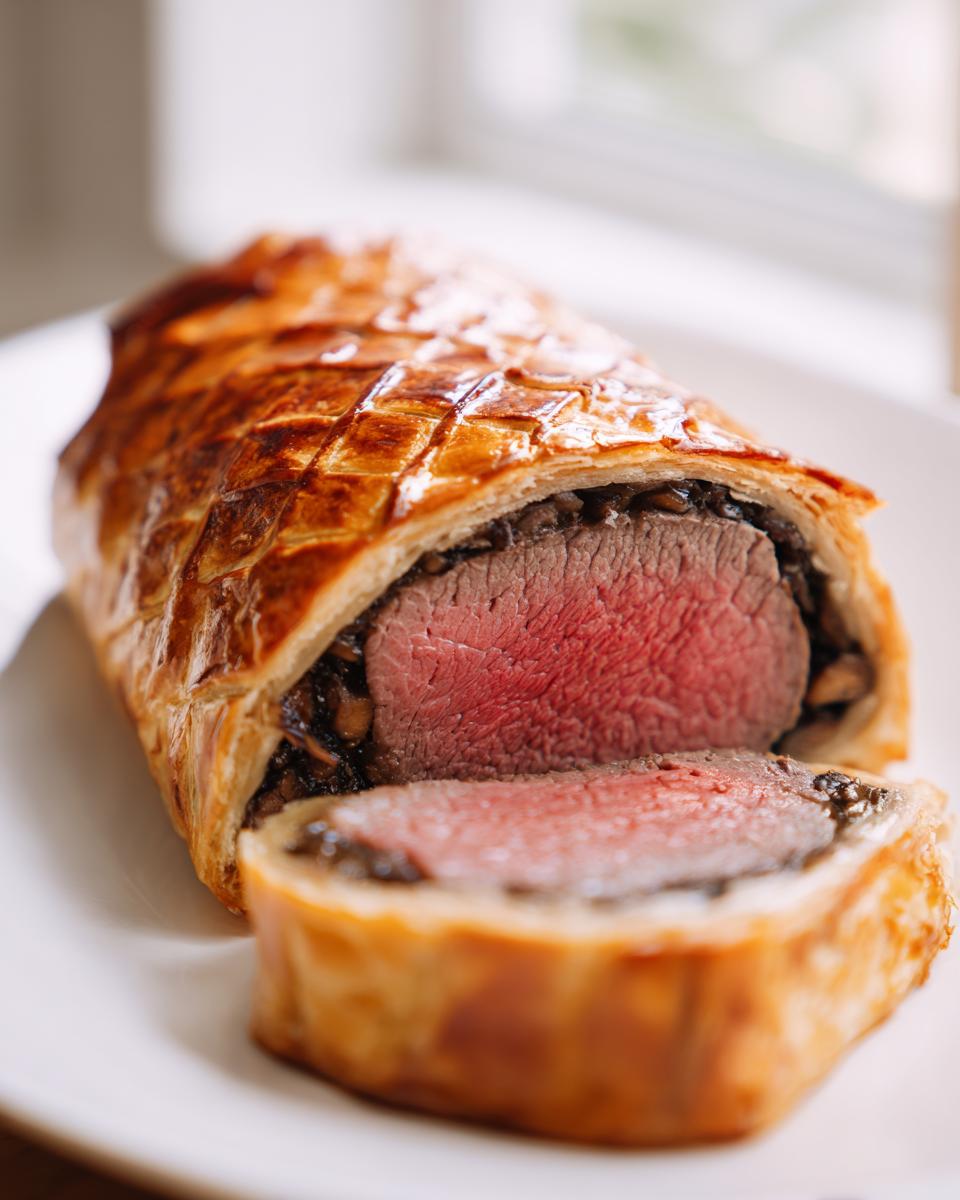
Whew! You did it! You took on the legendary beef wellington recipe and came out the other side with a golden, flaky masterpiece. Doesn’t that feel incredible? Seriously, pulling that Wellington out of the oven and hearing that satisfying *thunk* when you set it down to rest is the best sound in the kitchen.
Now that you’ve had your moment of glory—slicing into that perfect medium-rare beef surrounded by savory duxelles—I would absolutely *love* to hear all about it! We build this community on trust, and seeing your successes (and hearing your funny mishaps!) helps everyone else feel confident enough to take on this challenge next time.
Leave a Rating and Tell Me How It Went!
Right below this, there’s a spot where you can leave a rating for this guide. Please give it stars based on how easy you found the steps and how happy you were with the final taste and presentation. Did you manage to keep the pastry crisp? Did the prosciutto barrier work like a charm? Let me know!
Don’t be shy about sharing photos if you can! Nothing makes me happier than seeing your beautiful creations tagged online. Knowing you impressed your guests with this stunning Showstopper Dinner Ideas centerpiece truly makes all the testing worthwhile.
What’s Next on Your Culinary Adventure?
Once you conquer the Wellington, you feel unstoppable, right? If you’re looking for another home-run dessert to serve after such a savory feast, you have to try something equally impressive but maybe a little less stressful on the assembly front. I highly recommend my recipe for the Ultimate Moist and Rich Homemade Chocolate Cake next time you need an unforgettable finale. It’s pure, decadent comfort food!
Thank you for trusting this recipe, and happy cooking, friend. I can’t wait to hear about your Wellington triumphs!
PrintFoolproof Classic Beef Wellington Recipe for Beginners

Make a show-stopping Beef Wellington with this step-by-step guide. You will achieve tender beef, savory mushroom duxelles, and flaky puff pastry, perfect for special occasions.
- Prep Time: 45 min
- Cook Time: 40 min
- Total Time: 95 min
- Yield: 4 servings 1x
- Category: Dinner
- Method: Baking
- Cuisine: British/French
- Diet: Low Fat
Ingredients
- 2 lb center-cut beef tenderloin (Chateaubriand), trimmed
- 2 tablespoons olive oil
- Salt and freshly ground black pepper
- 2 tablespoons Dijon mustard
- 1 pound cremini mushrooms, finely chopped
- 1 shallot, finely chopped
- 2 sprigs fresh thyme, leaves only
- 1/4 cup dry white wine (optional)
- 4 ounces thinly sliced prosciutto or Parma ham
- 1 package (14.1 ounces) all-butter puff pastry, thawed
- 1 large egg yolk, beaten with 1 teaspoon water (for egg wash)
- 1 tablespoon butter
Instructions
- Season the beef tenderloin generously with salt and pepper. Heat the olive oil in a large skillet over high heat until shimmering. Sear the beef on all sides until deeply browned, about 1-2 minutes per side. Remove the beef and let it cool slightly. Brush the entire surface of the cooled beef with Dijon mustard.
- Prepare the duxelles: Wipe out the skillet and melt the butter over medium heat. Add the chopped mushrooms and shallot. Cook, stirring frequently, until all the moisture has evaporated and the mixture is dry and dark brown, about 15-20 minutes. Stir in the thyme leaves and white wine (if using); cook until the wine evaporates. Season with salt and pepper. Spread the duxelles mixture onto a plate to cool completely.
- Lay a large sheet of plastic wrap on your work surface. Arrange the prosciutto slices on the plastic wrap in an overlapping rectangle large enough to wrap the tenderloin. Spread the cooled duxelles evenly over the prosciutto.
- Place the mustard-coated beef at one end of the prosciutto/duxelles layer. Using the plastic wrap to help you, tightly roll the prosciutto and duxelles around the beef. Twist the ends of the plastic wrap tightly to form a compact cylinder. Chill the wrapped beef for at least 30 minutes, or up to 24 hours, to help it hold its shape.
- On a lightly floured surface, roll out the puff pastry into a rectangle large enough to completely enclose the beef log. Remove the beef from the plastic wrap and place it on the pastry. Brush the edges of the pastry with the egg wash.
- Wrap the pastry tightly around the beef, trimming any excess dough. Seal the seams well and place the Wellington seam-side down on a parchment-lined baking sheet. Brush the entire surface with the egg wash. Score the top lightly with the back of a knife in a decorative pattern, avoiding cutting all the way through. Chill for another 15 minutes.
- Preheat your oven to 400 degrees F (200 degrees C). Bake the Wellington for 30-40 minutes, or until the pastry is golden brown and crisp. For medium-rare beef (125-130 degrees F internal temperature), check the temperature using an instant-read thermometer inserted into the center.
- Let the Beef Wellington rest on a cutting board for 10 minutes before slicing into thick portions. Serve immediately.
Notes
- For best results and to prevent a soggy bottom, chill the wrapped beef thoroughly before wrapping it in pastry.
- If you are planning your week, consider how this fits into your meal planning; this dish is a great centerpiece for special occasions.
- Achieving medium-rare is key; use a reliable thermometer to avoid overcooking the tenderloin.
Nutrition
- Serving Size: 1 slice
- Calories: 550
- Sugar: 2
- Sodium: 450
- Fat: 30
- Saturated Fat: 14
- Unsaturated Fat: 16
- Trans Fat: 0.5
- Carbohydrates: 25
- Fiber: 3
- Protein: 45
- Cholesterol: 150