
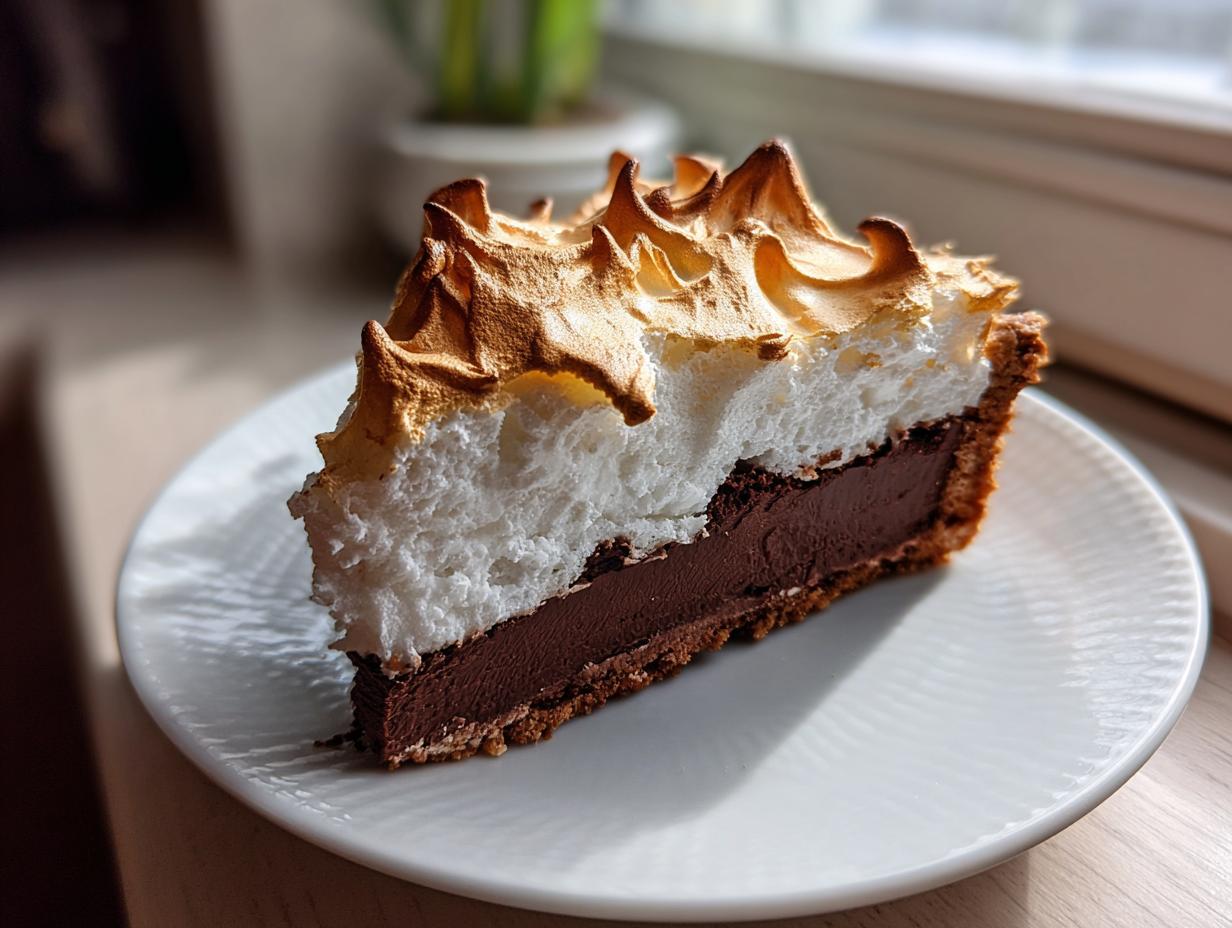
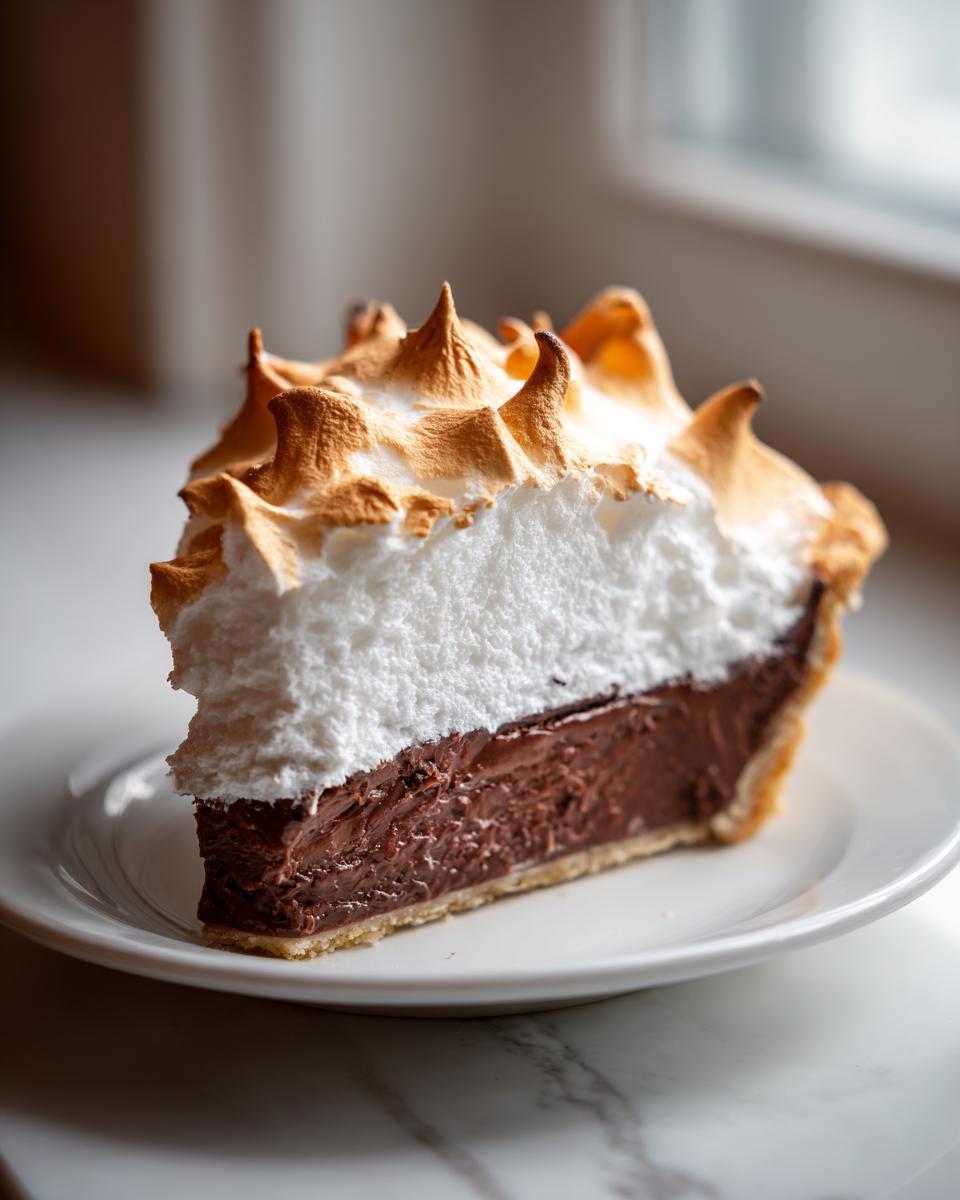
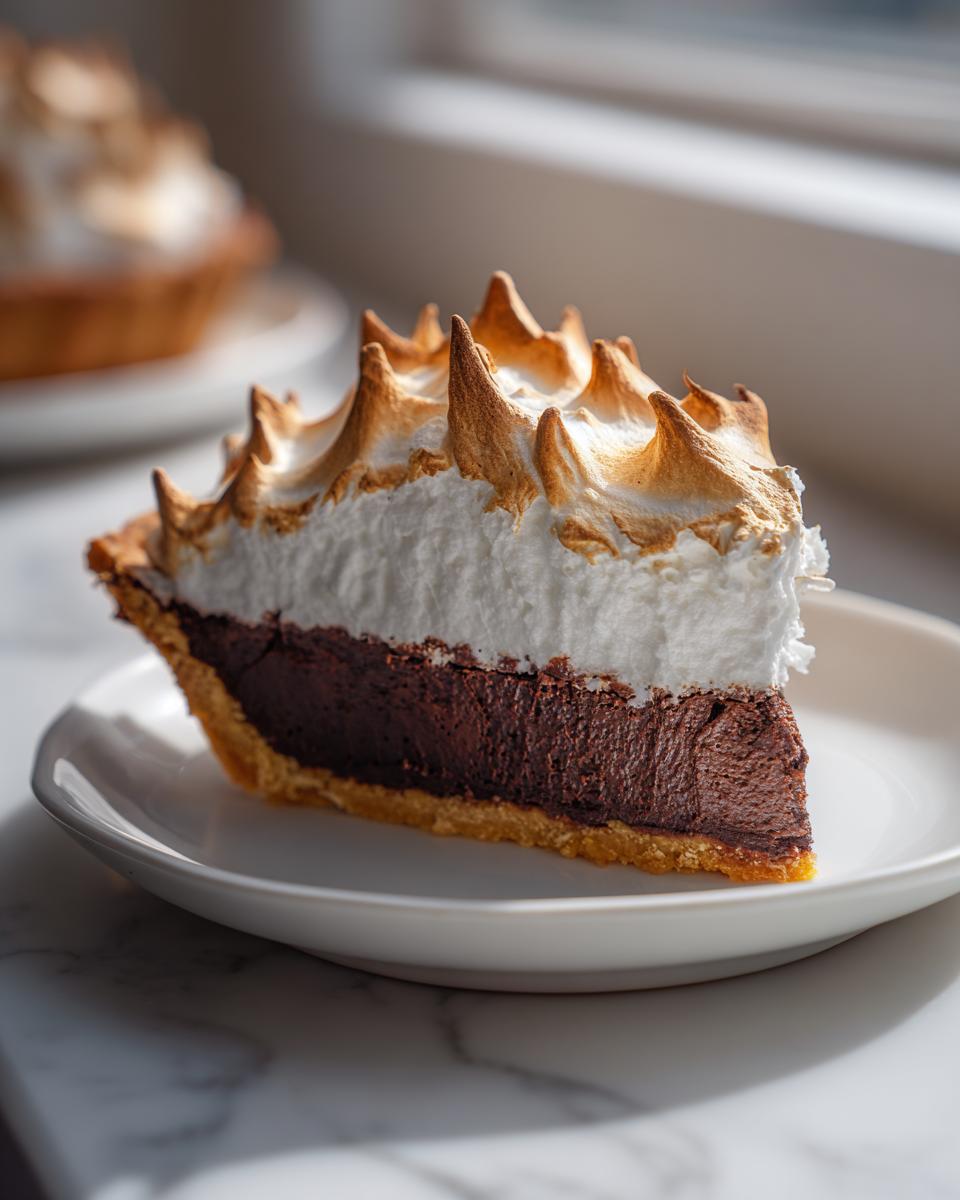
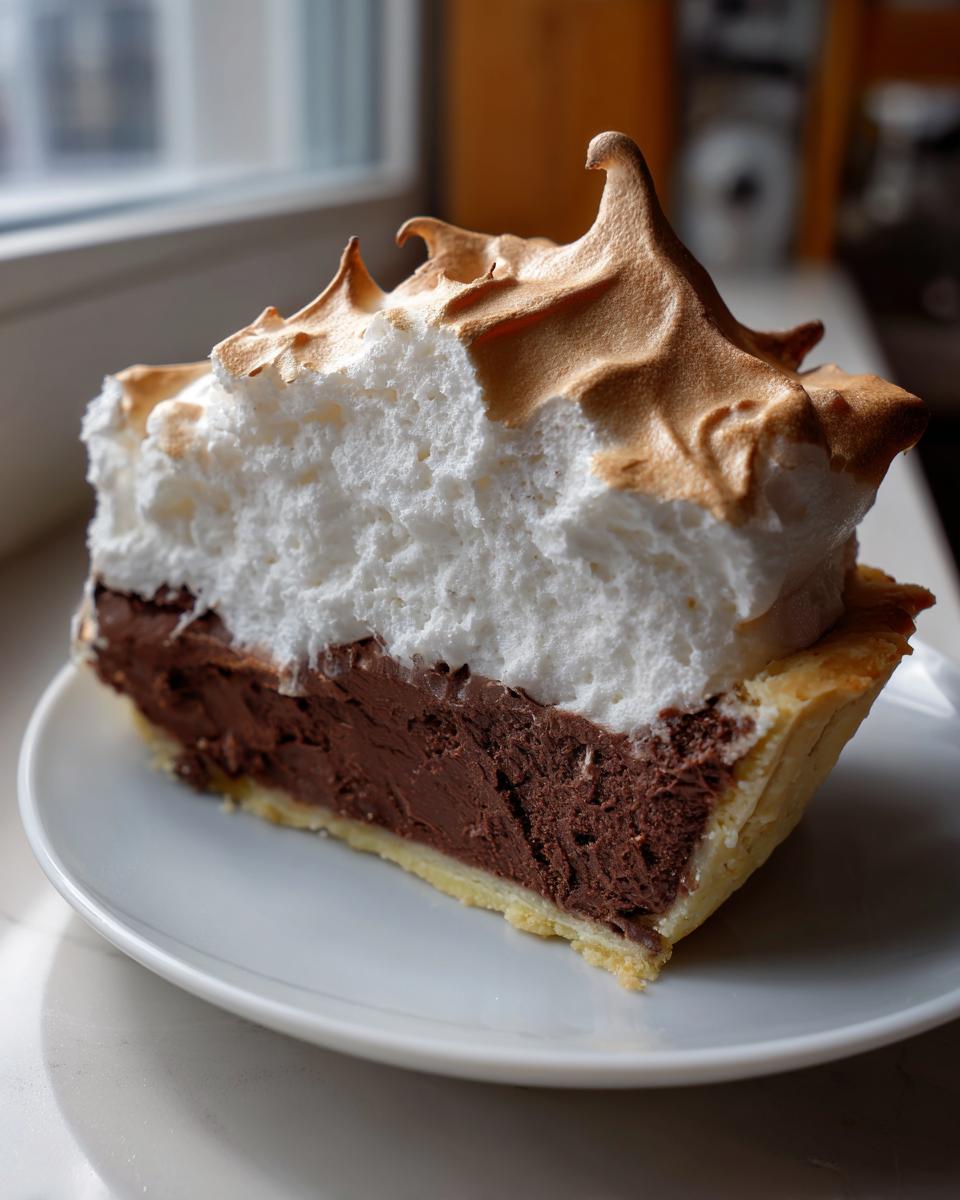
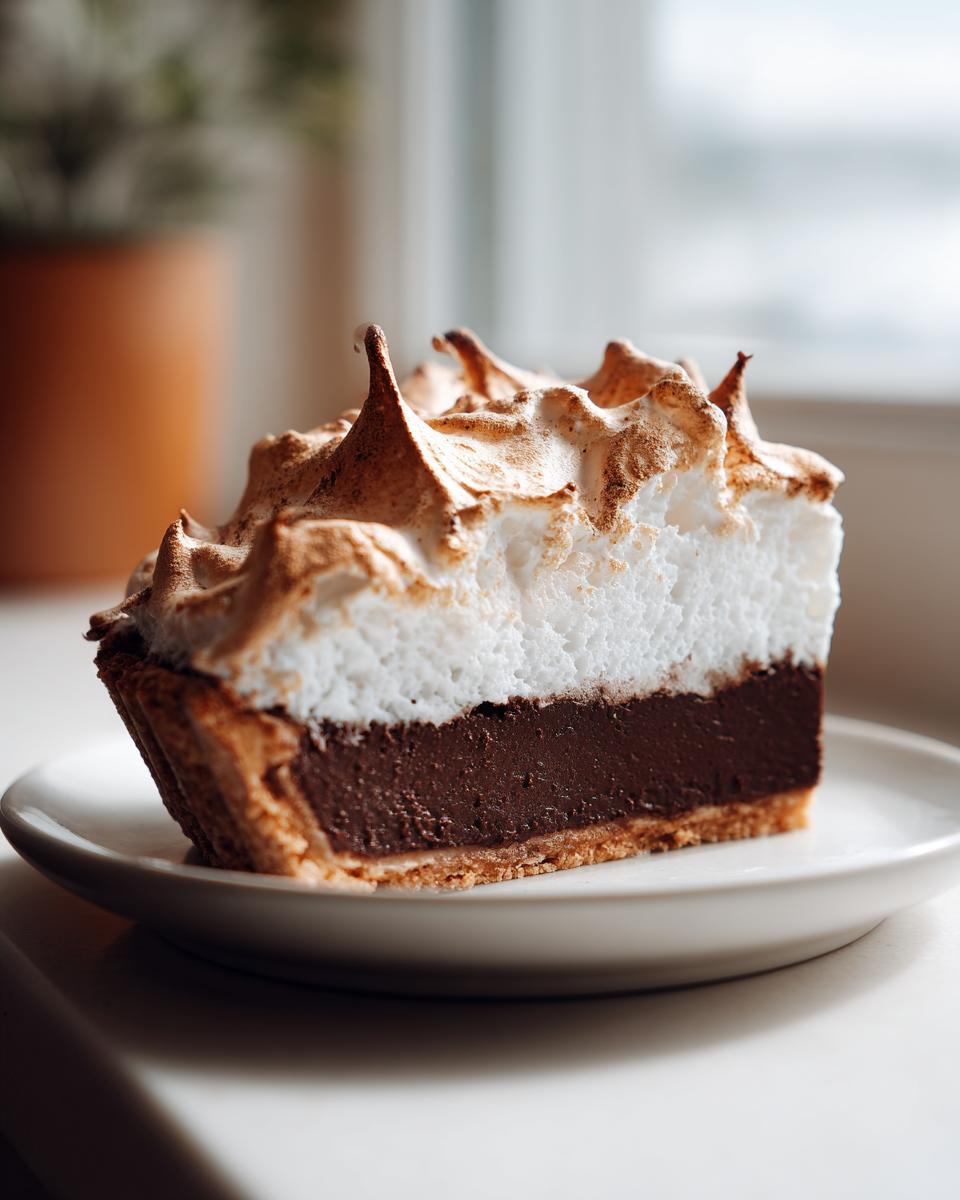
Oh, let’s talk about the undisputed king of the dessert table: the Chocolate Meringue Pie. If you ask me, Eleanor Vance, nothing screams classic American comfort like a slice of this beauty. We spend so much time chasing trends, but sometimes, you just need something rich, creamy, and impressive, right? That’s why, after years of testing every trick under the sun, I landed on what I genuinely believe is the very best chocolate meringue pie recipe out there. Forget the sunken centers or the weeping, watery meringue this thing delivers a dreamy, rich chocolate filling and a towering, stable, fluffy meringue topping every single time. It’s truly a showstopper dessert!
It took me ages to get this just right. My journey through perfecting this pie wasn’t glamorous—it involved late nights and way too much sugar—but when I finally cracked the code on that non-weeping meringue, I knew I had something special to share. You can find my full collection of delicious dessert recipes, but this one holds a special place on my heart.
- Why This Chocolate Meringue Pie Recipe Stands Above the Rest
- Gathering Ingredients for Your Homemade Chocolate Meringue Pie
- Step-by-Step Instructions for the Best Chocolate Meringue Pie
- Tips for Success with Your Chocolate Meringue Pie
- Ingredient Notes and Substitutions for Chocolate Meringue Pie
- Storing and Serving Your Decadent Chocolate Dessert
- Frequently Asked Questions About Making Chocolate Meringue Pie
- Creating a Showstopper Dessert for Holiday Pie Ideas
- Rate Your Chocolate Meringue Pie Experience
Why This Chocolate Meringue Pie Recipe Stands Above the Rest
This isn’t just another recipe you find floating around the internet; this is the tried-and-true version that I guarantee will perform beautifully. We’re talking about the Best Chocolate Meringue Pie experience here. I spent months testing for reliability, focusing specifically on nailing that creamy chocolate filling while simultaneously conquering the age-old enemy: the weeping meringue. I promise you, this formula works!
I’ve linked out to a great resource that helped me understand some of the core science behind successful baking, but what matters is what we do in our own kitchens. My goal was to achieve a No Weeping Meringue Pie, and we succeeded by focusing on temperature and technique.
Achieving a Creamy Chocolate Filling Pie Texture
The richness in this Rich Chocolate Custard Pie Filling comes from two places: finishing it with good quality butter right at the end and making absolutely sure you let that cornstarch/cocoa mixture boil for a full minute. That boiling step is crucial! It gelatinizes the starches perfectly, locking in moisture and giving you that thick, spoonable, deeply satisfying texture that’s never gummy.
The Secret to a Fluffy Meringue Topping Recipe That Holds Up
For a truly stable, Fluffy Meringue Topping Recipe, you need zero fat interference. That means your mixing bowl and whisk attachments must be spotless—I mean wipe them down with a little vinegar just to be safe! Also, never skip shaking out those egg whites until they’re at room temperature. They whip up higher and hold their structure much better when they aren’t chilled. That’s how we build a cloud that stays put!
Gathering Ingredients for Your Homemade Chocolate Meringue Pie
Okay, friend, the absolute key to making this Homemade Chocolate Meringue Pie shine is starting with excellent components. We need to be clear about what goes into that filling versus what we need for that gorgeous cloud on top. Don’t worry, the list isn’t intimidating, but paying attention to the details—like having the egg whites warm—makes all the difference. Trust me on this part!
For the Buttery Crust Pie Shell
First things first, we need a home for that luscious filling! This pie calls for one:
- 1 (9-inch) pre-baked pie crust. I always suggest making your own flaky buttery crust pie if you have the time, but if you’re pressed, use your favorite store-bought version. Just make sure it’s completely cooled before we add anything hot!
For the Rich Chocolate Custard Pie Filling and Fluffy Meringue Topping Recipe
Now for the main event—the fillings and the fluffy clouds! Gather these neatly so you can move quickly when the time comes:
- 1 1/2 cups granulated sugar (this is split between the filling and the meringue, so maybe measure them into two separate bowls just to be safe!)
- 1/3 cup unsweetened cocoa powder
- 1/4 cup cornstarch (This is non-negotiable for thickness, folks!)
- 1/4 teaspoon salt
- 1 1/2 cups cold water
- 3 large egg yolks, lightly beaten (Save those whites!)
- 2 tablespoons unsalted butter (for that fantastic richness)
- 1 teaspoon vanilla extract
- 4 large egg whites, at room temperature (This is my standing instruction—they must be room temp!)
Step-by-Step Instructions for the Best Chocolate Meringue Pie
Alright, we’ve got our gorgeous ingredients lined up, and now it’s time to put this masterpiece together. Don’t rush these steps, especially around the custard part—that’s where the magic (and the potential for scrambled eggs!) happens. If you follow this method exactly, you’ll have that stunning chocolate base and a meringue that actually looks like it wants to stay put. I’ve walked a million miles in your shoes worrying about this pie, and these instructions are forged in fire (okay, maybe just stovetop heat!). Let’s get cooking!
Preparing the Crust and Making the Creamy Chocolate Filling Pie
First things first, make sure that crust is ready to go. Step one is just letting your pre-baked crust cool completely on a wire rack. I mean it—totally cool. If it’s even slightly warm, you’ll mess up the custard later. While that chills out, let’s focus on that decadent filling. In a medium saucepan—and this is important—whisk together 1 cup of your sugar, the cocoa powder, the cornstarch, and the salt. Whisk them dry first before adding any liquid; that prevents those awful cocoa lumps! Then, slowly whisk in the cold water until everything looks like smooth chocolate milk.
Now, set that over medium heat. You have to stir this constantly! Once it thickens up and comes to a full boil, keep stirring for one more minute. Take it off the heat immediately after that minute. Now for the expert tip that prevents disaster: tempering the yolks. Take your 3 beaten yolks in a separate small bowl. Slowly, I mean *slowly*, drizzle about 1 cup of that hot chocolate mixture into the yolks while whisking the yolks non-stop! This gently raises their temperature so they don’t curdle when you pour them back in. Once tempered, pour that entire yolk mixture back into the saucepan with the rest of the filling. Go back to medium heat and stir constantly until it bubbles gently again. Off the heat, stir in your butter and vanilla until everything is glossy and smooth. Pour this hot filling right into that cooled crust. See? Creamy texture guaranteed!
Crafting the Fluffy Meringue Topping Recipe and Sealing the Pie
This is the moment of truth for achieving that Fluffy Meringue Topping Recipe that doesn’t budge. Get your spotlessly clean, grease-free bowl and start whipping those room temperature egg whites on medium speed until they form soft peaks. Don’t stop, but start adding that remaining 1/2 cup of sugar, just one tablespoon at a time. Keep beating until you have stiff, glossy peaks that look like shiny mountains! When the filling is set in the crust, you need to work fast!
Spread that meringue over the hot chocolate filling right away. I’m stressing this: **immediately**! Make sure the meringue touches the crust all the way around the edge. This seals the moisture in, which is the #1 defense against weeping. You’re creating a waterproof seal between the filling and the air. Don’t worry about pretty swirls yet, just make sure you seal the edges completely!
Baking and Cooling the Chocolate Meringue Pie
Once sealed, we bake it! Pop the pie into a 350°F (175°C) oven for about 12 to 15 minutes. You’re not cooking the pie here; you’re just toasting those beautiful meringue peaks until they are perfectly golden brown. Keep an eye on it; meringue can brown way faster than you think! This is a delicate process, much like getting a good chocolate cake just right. When you see that lovely golden color, you know you’re close to achieving that classic look, similar to the results others have had with beautiful classic pie recipes.
After that glorious golden color, the final, most important step is patience. Cool the pie right on the counter for about 1 hour to let the initial heat dissipate. Then, and this is crucial for a firm set, you must refrigerate it for a minimum of 4 hours, but honestly, overnight is best for that perfect sliceable texture. Resist the urge to cut into it early, or you’ll have soup everywhere!
Tips for Success with Your Chocolate Meringue Pie
Okay, this is where we go from a decent pie to an absolute showstopper. People always stress about the meringue, but honestly, it’s not that scary if you just follow a couple of my non-negotiable rules. You’ve got this! My notes from testing this Classic Pie Recipe over and over really boiled down to three key areas.
First, let’s hit the dreaded weeping. To prevent moisture from sneaking out and leaving sad little puddles on your beautiful chocolate filling, you have to seal it tight! Make sure when you’re piling that fluffy meringue on, you spread it so the meringue actually touches the crust’s edge all the way around. Think of it like caulking around a bathtub—you’re trapping all that steam inside the meringue so it bakes up high and golden instead of leaking out.
Next up, remember that absolute requirement for the cleanest bowl possible? Seriously, check your mixer whisk or beater for any trace of grease or even a speck of egg yolk from before. Any little bit of fat will sabotage your efforts, preventing those egg whites from building the structure we need for a truly tall, Fluffy Meringue Topping Recipe. If you’re worried, just wipe down your bowl and whisk with a paper towel dipped in white vinegar right before you start whipping the whites.
And I can’t say this enough: use room temperature egg whites. If you use them cold, they just won’t whip up to the volume they should. They need to be soft and relaxed to incorporate the air necessary for a great meringue. It’s one of those little tricks that sets a good baker apart from a great one, and it makes a huge difference in the final texture of this Decadent Chocolate Dessert.
If you check out some of the classic ways others tackle this, like with some of the techniques you can see over at Paula Deen’s approach, you’ll see they often focus on similar science. But here, we’ve baked those steps right into the main recipe for you! If you’re ever using a different topping for cookies or something, my recipe for hard-setting icing reminds you just how much temperature matters in baking!
Ingredient Notes and Substitutions for Chocolate Meringue Pie
When you’re making a classic like this Chocolate Meringue Pie Recipe, the ingredients you choose really do sing the loudest. We’ve streamlined this so you don’t have to spend all day making components from scratch, but there are a few places where I really encourage you to stick to the recipe for the best outcome. It’s about protecting that beautiful texture we worked so hard to achieve.
Let’s talk crust first. I listed that you need a pre-baked crust, and honestly, while you can grab one from the store, it’s a shame to put such an incredible Creamy Chocolate Filling Pie into a store-bought shell! If you have the time, I urge you to whip up a quick buttery crust. It makes such a difference in the overall flavor profile. If you need a great reference, I have a simple, flaky one I use all the time.
Now, if you absolutely must make a swap, I’d look at how you handle the richness. The 2 tablespoons of butter called for in the filling are crucial for that smooth, non-grainy mouthfeel. If you’re out of salted butter, you can use unsalted and skip adding the 1/4 teaspoon of salt, but please, please don’t swap the butter for margarine or oil! We need the milk solids and fat structure that only real butter provides to keep that filling decadent and creamy. See, that little bit of fat keeps the custard from becoming tough once it sets!
As for vanilla? That’s the easiest one to switch up if you’re in a pinch. If you don’t have pure vanilla extract, a splash of high-quality almond extract provides a lovely, almost floral note that pairs wonderfully with the dark chocolate. Just use a tiny bit less than the vanilla called for, maybe half a teaspoon, because almond is powerful. But in terms of core flavor and structure, the sugar, cocoa, and egg ratios are locked in—they are what make this an Old Fashioned Chocolate Pie favorite!
Storing and Serving Your Decadent Chocolate Dessert
Okay, you’ve made something gorgeous, and now you need to keep it perfect! For this Dessert Pie, refrigeration is absolutely key. Once it’s completely cooled on the counter (that first hour!), cover the pie loosely with plastic wrap—try not to let it touch the meringue, if you can help it—and pop it into the fridge for at least four hours. Seriously, overnight makes it slice like a dream!
I don’t recommend reheating meringue pies at all; that heat just encourages weeping and deflation. Serve these slices chilled! They are rich, so they pair wonderfully with a strong cup of coffee or maybe a small side of my easy stovetop cinnamon applesauce if you want a little warm contrast alongside that chilled slice. Enjoy that perfect texture!
Frequently Asked Questions About Making Chocolate Meringue Pie
It’s totally normal to have questions when you’re baking a masterpiece like this! Even when following a foolproof recipe, sometimes little things pop up. I’ve gathered the most common issues people have when making this Old Fashioned Chocolate Pie so you can bake with total confidence. If you’ve read up on general baking tips for meringue, you’ll see these answers pop up again and again because they are the keys to success!
Can I make the filling for my chocolate meringue pie ahead of time?
Yes, you absolutely can make the filling ahead of time! The rich chocolate base is actually better if you make it one day, let it cool completely, and then cover it tightly in the fridge. This lets it set up nicely. However, you MUST wait to make and spread the meringue until right before you plan to bake and serve the pie. Meringue really hates sitting around, even over a cooled filling, so save that whipping until the last minute!
Why is my meringue weeping after baking?
Ah, the dreaded weep! This happens when moisture separates from the sugar and leaks out. My number one tip to prevent this—and this is essential for a no weeping meringue pie—is making sure you spread that meringue immediately over the hot filling and seal it completely right to the crust edge. If there’s any gap, that steam escapes, cools too fast, and pulls moisture out, causing those ugly tears. Also, make sure your egg whites were beaten to stiff peaks with all the sugar incorporated so the structure is sound before it even goes into the oven!
My meringue cracked badly during baking. What did I do wrong?
Cracking usually means the meringue baked too fast or cooled too quickly. When the temperature changes drastically, the air bubbles trapped inside expand unevenly and crack the surface. To help prevent this, try not to dollop the meringue too thickly in one spot; spread it relatively evenly. When baking, make sure your oven temperature is accurate—if it’s too hot, the peaks brown before the inside sets, leading to cracking. And finally, never shock a baked pie; let it cool gradually on the counter before chilling, just like we do for baked custards!
Should the crust be hot or cold when I add the chocolate filling?
This is so important for the final set! The crust absolutely must be completely cool when you pour in the hot chocolate custard filling. If the crust is warm, it can slightly steam the bottom of the filling, leading to that dreaded soggy bottom, or worse, it can mess with the temperature balance needed for the meringue seal. Cool crust, hot filling, immediate meringue—that’s the golden rule for this classic!
Creating a Showstopper Dessert for Holiday Pie Ideas
Doesn’t this pie just scream ‘special occasion’? Whether you’re putting this beauty on the table for Thanksgiving or trying to impress at a summer cookout, the presentation is everything. We’ve already nailed the texture—rich custard and a stable top—so now let’s make it look like the work of art it is!
When you’re spreading that meringue, don’t be afraid to get artistic! Remember how I said the goal is to seal it to the edges? After you’ve made that tight seal, pull your spoon or spatula outwards from the center toward the edge, making lovely swirls and sharp peaks along the top. Those peaks catch the oven light so beautifully when they toast up golden brown. It really makes you look like you know exactly what you’re doing, even though we both know how much science went into keeping it from collapsing!
Baking it until those points are gorgeous amber is the final moment of glory. Don’t be shy about that final 12 to 15 minutes in the oven. If you want extra dramatic peaks, you can even use a kitchen torch once it’s out of the oven, just hitting the very tips of the swirls for a faster golden finish. It adds such a fantastic, professional look to your dessert, and people always ooh and aah over that perfectly toasted cloud.
Once it’s cooled completely and set up, slice it carefully with a sharp, thin knife dipped in hot water between slices—that keeps the filling clean. I love serving this alongside something light, like perhaps a coffee or maybe even experimenting with making a batch of easy tiramisu as a lighter alternative for guests who might be too full! But honestly, this pie stands all by itself.
When you manage to create something this stunning using simple pantry staples, you have to share the victory! Once you’ve sliced yours, snap a picture and tag me. I want to see all those beautiful golden peaks! Don’t be shy about telling me how many compliments you received—you earned them!
Rate Your Chocolate Meringue Pie Experience
Now, here’s where I need your help, my friend! You’ve made the pie, you’ve resisted cutting into it for hours (I know it was hard!), and you’ve finally enjoyed a beautiful slice of homemade glory. I pour my heart into making sure these recipes work perfectly in real kitchens, and your feedback tells me if I hit the mark. Did that meringue stay high and fluffy? Did the chocolate filling set firm and creamy?
I would absolutely love for you to come back here and leave a star rating right below this section. It helps other bakers feel confident trying this showstopper dessert! Don’t just leave a rating, though—tell me your success story! Did you try spiking the filling with a little coffee? Did you manage to get perfectly defined peaks? Or, maybe you had a substitution that worked beautifully?
Share your variations, your tips, and your triumphs in the comments! If you ever have a burning question that the FAQ didn’t cover, remember you can always reach out to me personally through the contact page. Happy baking, and thank you for bringing this classic American favorite to your table!
PrintThe Best Chocolate Meringue Pie Recipe with Flawless, Non-Weeping Meringue

This is the classic, homemade chocolate meringue pie recipe you need for a rich, creamy chocolate filling and a towering, stable meringue topping. Follow these steps for a showstopper dessert every time.
- Prep Time: 25 min
- Cook Time: 25 min
- Total Time: 4 hr 50 min
- Yield: 8 servings 1x
- Category: Dessert Pies
- Method: Baking
- Cuisine: American Classic Pie
- Diet: Vegetarian
Ingredients
- 1 (9-inch) pre-baked pie crust (buttery crust pie recommended)
- 1 1/2 cups granulated sugar, divided
- 1/3 cup unsweetened cocoa powder
- 1/4 cup cornstarch
- 1/4 teaspoon salt
- 1 1/2 cups cold water
- 3 large egg yolks, lightly beaten
- 2 tablespoons unsalted butter
- 1 teaspoon vanilla extract
- 4 large egg whites, at room temperature
Instructions
- Prepare the pie crust: Bake your 9-inch pie crust according to your preferred recipe or package directions until golden brown. Let it cool completely.
- Make the chocolate filling base: In a medium saucepan, whisk together 1 cup of the sugar, cocoa powder, cornstarch, and salt. Gradually whisk in the cold water until smooth.
- Cook the filling: Place the saucepan over medium heat. Cook, stirring constantly, until the mixture thickens significantly and comes to a boil. Boil for 1 minute, stirring constantly. Remove from heat.
- Temper the egg yolks: In a small bowl, whisk the egg yolks. Slowly pour about 1 cup of the hot chocolate mixture into the yolks while whisking constantly to temper them.
- Combine and finish filling: Pour the tempered yolk mixture back into the saucepan with the remaining chocolate mixture. Return to medium heat. Cook, stirring constantly, until the mixture thickens again and bubbles gently. Remove from heat immediately. Stir in the butter and vanilla extract until smooth.
- Fill the crust: Pour the hot chocolate filling into the cooled, pre-baked pie crust.
- Make the meringue topping: In a large, clean, grease-free bowl, beat the egg whites with an electric mixer on medium speed until soft peaks form. Gradually add the remaining 1/2 cup of sugar, 1 tablespoon at a time, beating well after each addition. Continue beating until stiff, glossy peaks form. This creates your fluffy meringue topping.
- Top the pie: Immediately spread the meringue over the hot chocolate filling, making sure the meringue touches the edges of the crust all the way around. This seals the filling and helps prevent weeping.
- Bake the meringue: Bake at 350°F (175°C) for 12 to 15 minutes, or until the meringue peaks are golden brown.
- Cool the pie: Cool the pie completely on a wire rack at room temperature for about 1 hour. Then, refrigerate for at least 4 hours, or preferably overnight, before slicing.
Notes
- To prevent weeping in your meringue, make sure your mixing bowl and beaters are completely free of any grease or egg yolk residue.
- Spread the meringue so that it completely seals the filling to the edge of the crust. This traps the moisture and stops the meringue from shrinking or weeping.
- Use room temperature egg whites; they whip up to a higher volume than cold whites.
Nutrition
- Serving Size: 1 slice
- Calories: 380
- Sugar: 45g
- Sodium: 180mg
- Fat: 18g
- Saturated Fat: 9g
- Unsaturated Fat: 9g
- Trans Fat: 0g
- Carbohydrates: 52g
- Fiber: 2g
- Protein: 6g
- Cholesterol: 110mg