

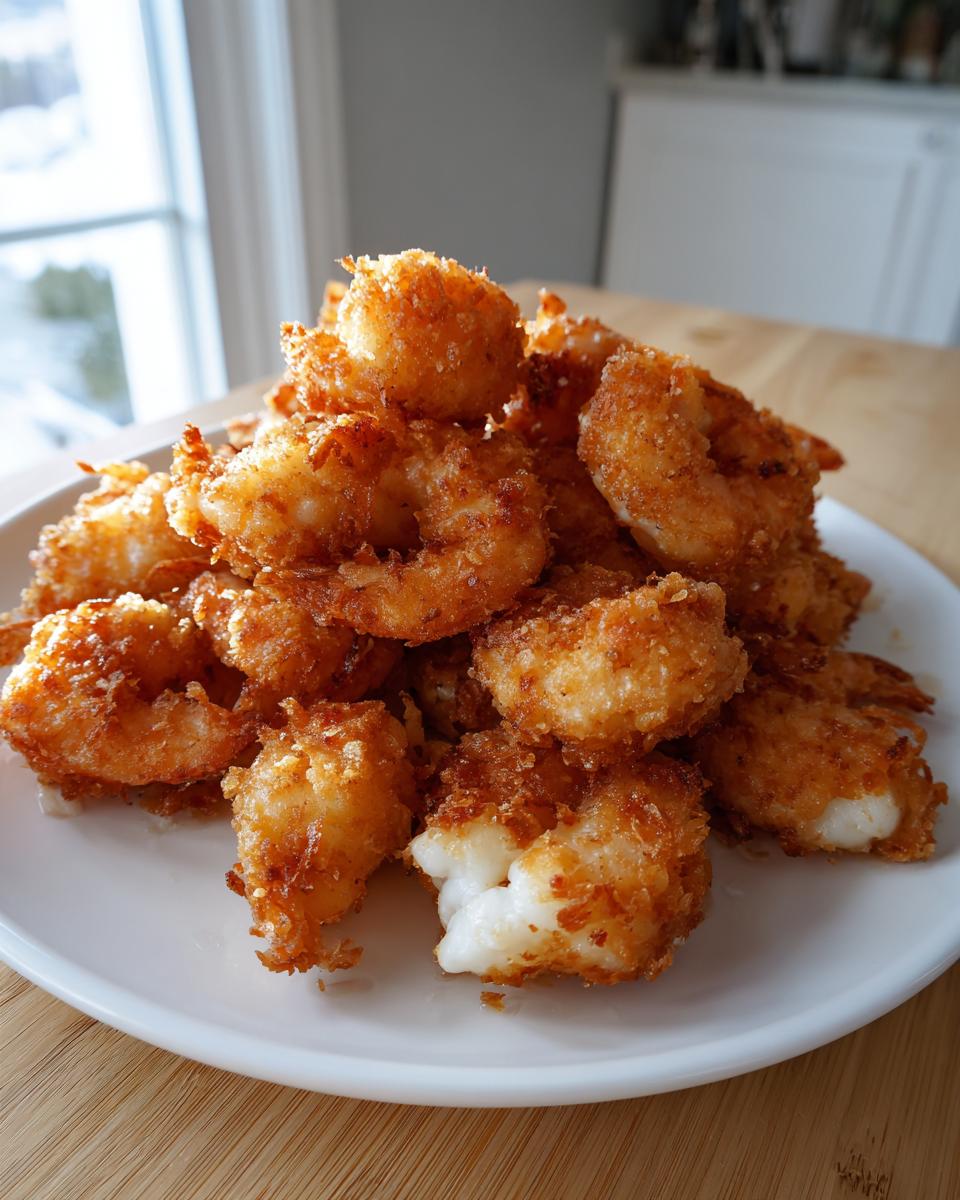
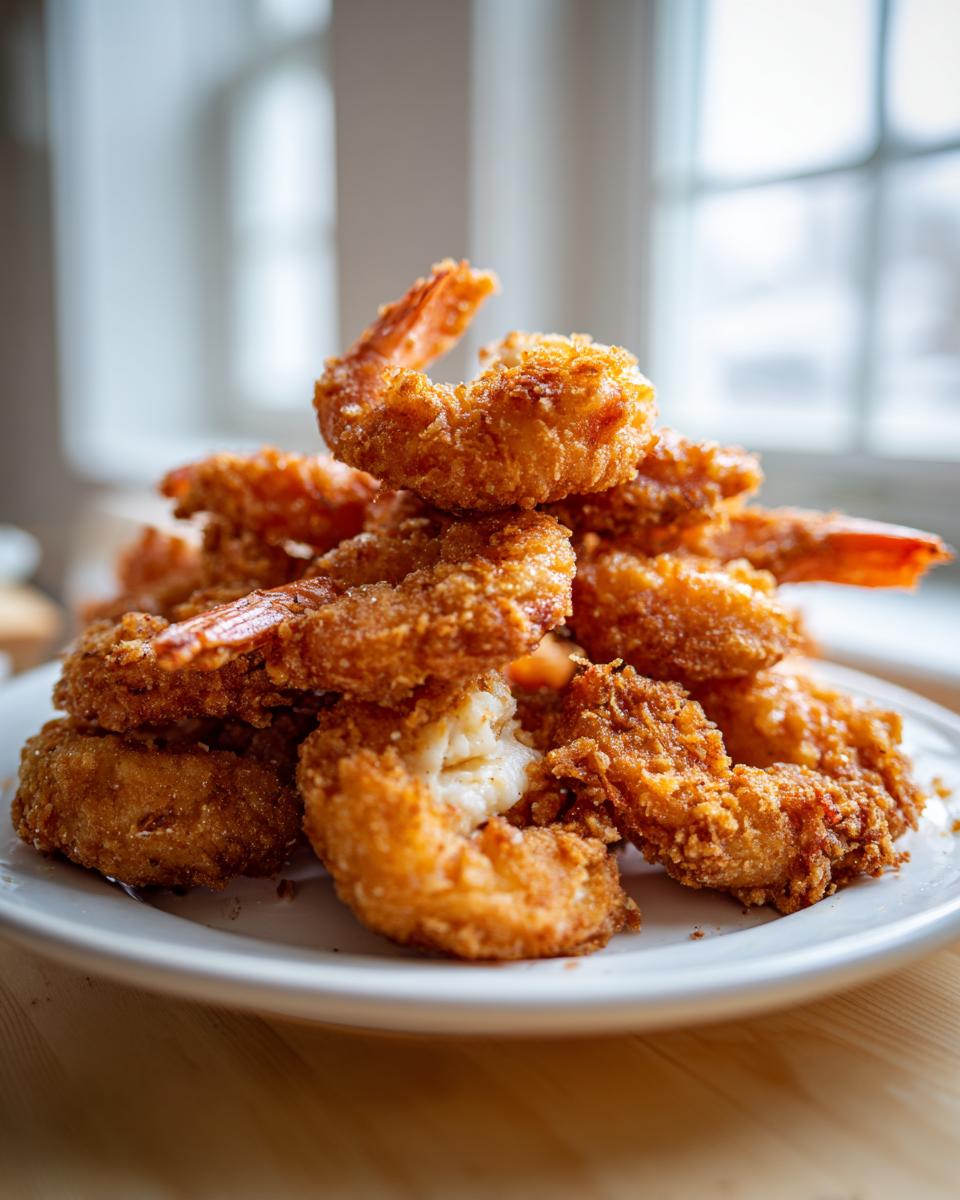
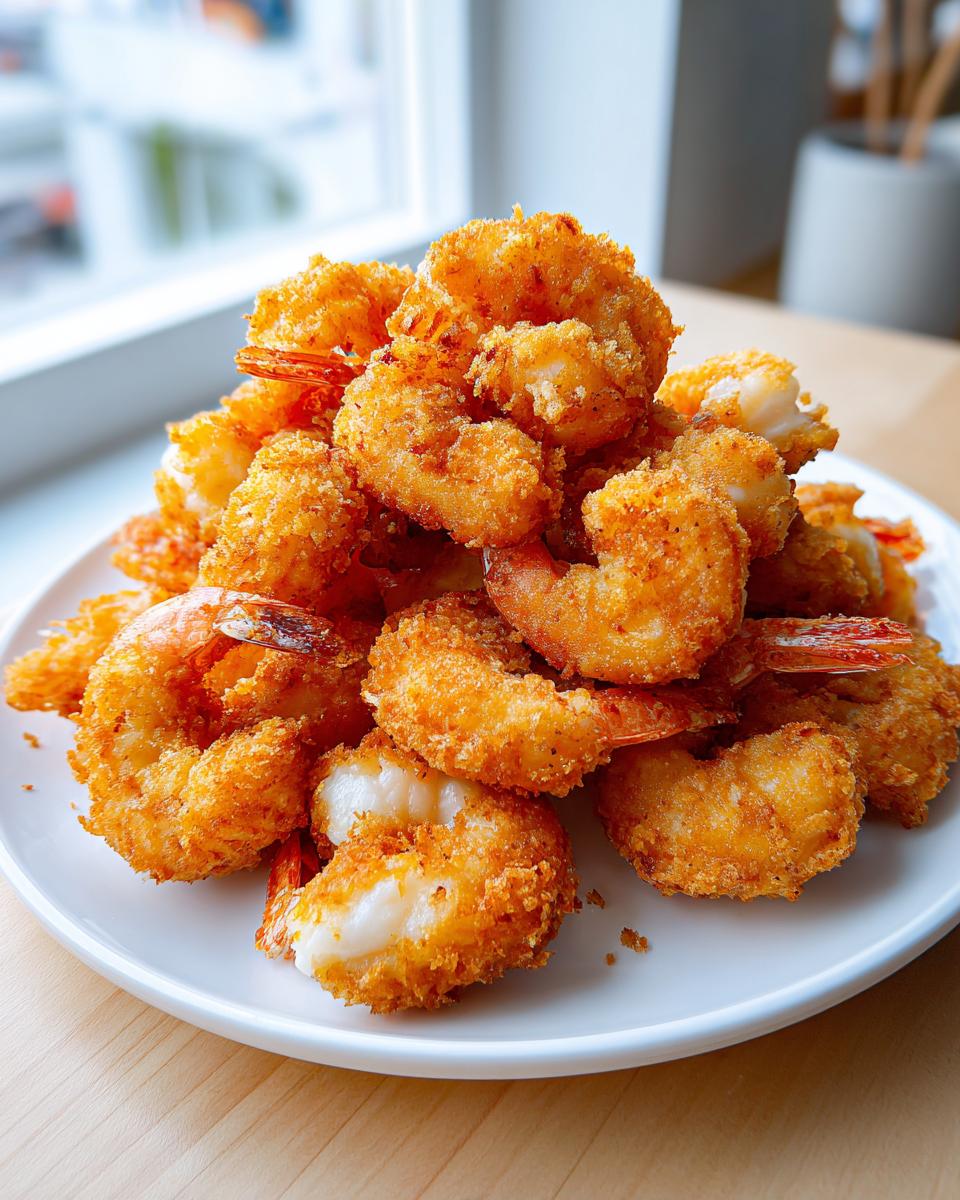
Listen, achieving that shatteringly crisp, golden coating on your homemade fried shrimp can feel like crossing the finish line at a marathon, right? It’s frustrating when you pull them out and they look… floppy. Well, fear not! I am Ellie Vance, and here at DeliceRecipe, reliability is our whole jam. We ditch the guesswork so you can trust your cooking every time. This, my friends, is The Ultimate Crispy Fried Shrimp Recipe. It’s my copycat version of the best seafood shack shrimp out there. Forget those mediocre kits; we’re going fully homemade, ensuring these **fried shrimp** deliver that perfect crunch you thought you could only get ordering out. I promise, this method is foolproof—just follow along!
- Why This Is Your Best Crispy Fried Shrimp Recipe Yet
- Essential Ingredients for Perfect Fried Shrimp
- How to Prepare Easy Fried Shrimp Step-by-Step
- Variations: Southern Fried Shrimp and Panko Crusted Shrimp
- Serving Suggestions for Your Homemade Fried Shrimp
- Storage and Reheating Instructions for Crispy Fried Shrimp Recipe
- Frequently Asked Questions About Fried Shrimp
- Tips for Meal Planning with Fried Shrimp
- Estimated Nutritional Data for Fried Shrimp
Why This Is Your Best Crispy Fried Shrimp Recipe Yet
What makes my recipe transform humble shrimp into the legendary, Restaurant Style Fried Shrimp you dream about when heading to the coast? It honestly comes down to a few non-negotiable steps that stop sogginess in its tracks. First, that buttermilk soak does heavy lifting—it tenderizes the protein while creating perfect little ridges for the coating to grab onto. Next, we’re hitting the oil at a precise, steady temperature. If the oil isn’t hot enough, you end up with greasy, sad shrimp! These tricks ensure you get that satisfying, deep golden hue and that incredible texture that defines a truly **Crunchy Shrimp Recipe**. No more worrying about floppy coatings, I promise!
The Secret to Ultra Crispy Fried Shrimp Coating
The magic for the **Best Fried Shrimp Coating** is hiding in plain sight: cornstarch! I always mix cornstarch right into my flour dredge. That bit of starch is what gives you that lightweight, shatteringly crisp exterior. And if you really want to go pro? Try the quick double-dredge dip I mentioned in my notes—a second, light pass through the buttermilk and flour combination locks the crust on tight. That’s the secret handshake for guaranteed crispness!
Essential Ingredients for Perfect Fried Shrimp
When we talk about quality **fried shrimp**, you can’t skimp on the core players. Because we are going for that professional texture, you need everything measured just right before things get hot and fast! For this recipe, you’ll need about two pounds of lovely **Jumbo Fried Shrimp Recipe** size, get them peeled and deveined—leave the tails on if you like that classic look for appetizers! We use two cups of all-purpose flour, but make sure you mix in a half-cup of cornstarch with it; that’s key for crunch. Then we’ve got the seasonings: paprika, garlic and onion powder, thyme, salt, pepper, and just a tiny kick of cayenne. And that soak? That’s one full cup of creamy buttermilk keeping everything happy before the deep dive.
Ingredient Notes and Substitutions for Fried Shrimp
Let’s talk oil for a minute—please ditch the olive oil here, okay? For safety and flavor, you want a neutral oil with a high smoke point. Peanut oil is my absolute favorite for that pure, slightly sweet flavor, but vegetable oil works great too. If you can’t find buttermilk? No sweat! Just take one regular cup of milk and stir in one tablespoon of white vinegar or lemon juice, let it sit for five minutes until it curdles slightly. That will work just as beautifully in our marinade for that tender interior. Remember, this recipe relies on that simple, seasoned flour for flavor!
How to Prepare Easy Fried Shrimp Step-by-Step
Okay, now for the fun part—the actual cooking! When you learn **How to Fry Shrimp** using this method, you’ll wonder why you ever waited so long to try making this at home. The crucial first step after the buttermilk soak is patting those shrimp *really* dry—I mean, use a whole roll of paper towels! That takes away excess liquid so the flour sticks properly. Once they are coated in that spiced flour mixture, we move straight to the oil. You absolutely must have that oil sitting steady at 360°F (182°C). I use my little thermometer religiously because temperature consistency is the difference between crunchy goodness and greasy disappointment! If you are curious about other fast cooking methods, you might check out how I manage heat when making things like air fryer french fries, because temperature control is everything.
Remember, we are working in small batches. Don’t dump them all in at once! Overcrowding the pot will drop that oil temperature faster than you can say “delicious appetizer.” Give them about two or three minutes, just until they turn that spectacular deep golden brown color. When they look ready, scoop them out gently!
Techniques for Golden Brown Shrimp
When you are dredging, don’t just gently toss the shrimp in the flour; you really need to press that coating onto the shrimp. Really massage it in there so it gets thick and craggy! This locks onto the buttermilk. And here is a huge tip for maintaining that perfect crunch: once the **fried shrimp** are done, skip the paper towels for draining! Seriously, paper towels trap steam right underneath your beautiful crust and make it soggy. You need to use a wire rack set over a baking sheet—that lets the air flow all around them so they stay crisp while you finish the next batch.
Variations: Southern Fried Shrimp and Panko Crusted Shrimp
Now that you’ve mastered the classic ultra-crispy style, I love mixing things up for different dinner vibes! If you’re leaning into that deep, comforting Southern flavor, you’ll want to lean into making **Southern Fried Shrimp**. For that, I usually amp up the savory spices a tiny bit—maybe add a pinch more thyme and a dash of smoked paprika to boost that richer taste profile. You can see how I build flavor in other regional classics like my black-eyed peas over at my recipe for Southern Classic Black Eyed Peas; applying that kind of deep flavor thinking works here too.
But maybe you want something that crunches even louder? Hello, Panko! If you swap out the seasoned flour/cornstarch mix entirely and use Panko breadcrumbs instead, you get **Panko Crusted Shrimp**. It’s wonderfully light and airy. Just make sure you still do the buttermilk soak! Panko doesn’t absorb moisture quite like flour, so you might notice the coating needs a slightly firmer press, but the texture payoff is unbelievable. It’s seriously a different beast, but equally delicious!
Serving Suggestions for Your Homemade Fried Shrimp
What do you serve with the best **fried shrimp** you’ve ever made? Oh, the possibilities! If you’re doing a quick shrimp appetizer for game night, you absolutely must have a couple of dipping sauces ready to go—classic cocktail sauce and creamy tartar sauce are staples around my house. But when you decide this is your main event for **Seafood Dinner Ideas**, you have to balance that crispy richness with something bright. I always lean toward something crunchy and cool, like my signature Apple Cranberry Coleslaw. It cuts right through the richness and is honestly the perfect pairing!

Storage and Reheating Instructions for Crispy Fried Shrimp Recipe
Your perfect **fried shrimp** might not last long, but if you have leftovers—and you should always plan for leftovers!—we need to handle them gently. Do not, under any circumstances, let them sit in the fridge uncovered or put them in the microwave. That is a guaranteed path to serious sogginess, and frankly, we deserve better than that after all our hard work!
For the best results bringing them back to life, the oven or your air fryer is the only way to go. Spread the shrimp in a single layer on a baking sheet. Pop them in a 400°F oven for about five to seven minutes. If you use an air fryer, three minutes at 375°F should get that golden, crunchy coating back to its former glory. You want them hot and crispy again!
Frequently Asked Questions About Fried Shrimp
Can I use an air fryer for fried shrimp?
Yes, absolutely! While nothing beats deep-frying for that authentic crackle, the air fryer is amazing for reheating or making a slightly healthier batch. If you are making them from scratch in the air fryer, make sure you spray the coating generously with oil before cooking. Cook them at about 380°F until they are golden, making sure to flip them halfway through for even color. It’s a great alternative if you’re trying to avoid heavy oils but still want a decent crunch!
What oil is best for frying shrimp?
For the best results, you really want a neutral-flavored oil that can handle high heat without smoking out your kitchen. My top pick is peanut oil, which gives a subtle, lovely flavor. Vegetable oil is a solid, budget-friendly runner-up. You need enough oil to come up about 2 or 3 inches in your pot so the shrimp can swim freely. Remember, the temperature needs to stay locked in right around 360°F for success!
How do I prevent my fried shrimp from being soggy?
This is the number one question, and here’s the short answer: dryness and heat. First, pat those shrimp bone-dry after the buttermilk soak before dredging. Second, make sure your oil is properly heated *before* adding the shrimp. And third, drain them on a wire rack, not paper towels! Avoiding any trapped moisture is the key to keeping that coating perfectly crisp. If you follow these three rules, you’ll have a fantastic **Crispy Shrimp Recipe** every single time.
Is there a difference between this and Southern Fried Shrimp?
My main recipe leans heavily into that classic American preparation, but if you want it to be true **Southern Fried Shrimp**, you just bump up the savory spices a bit. Think a little extra garlic powder, maybe some smoked paprika, and definitely ensure you have that cayenne for just a hint of Southern heat! The buttermilk soak is the backbone of that style, so you keep that for sure!
Can I make these for quick lunch recipes?
Oh, they make fantastic leftovers, but they are best enjoyed right away! If you are boxing them up for a quick healthy lunch recipes day, make sure you reheat them properly, as I mentioned above, using the oven or air fryer. They aren’t the easiest to pack up if you want that initial perfect texture, but they still taste great!
Tips for Meal Planning with Fried Shrimp
You know, getting these out of the fryer and eating them immediately is the dream, but life gets busy! That’s where smart **meal planning** comes in handy. You can totally save time by whisking together that seasoned flour dredge ahead of time—I keep mine in a sealed jar on the counter for a week. That way, all you have to do is prep the shrimp and soak them when you want dinner!
Even though truly crispy fried shrimp needs to be eaten fresh, planning those side dishes in advance, maybe using a service like these ideas, means the only cooking you do when company arrives is the quick 3-minute fry. It makes serving a big batch easy!
Estimated Nutritional Data for Fried Shrimp
When we talk about enjoying food, it’s important to know what we’re working with! Here are the estimates for a serving size of about six shrimp based on this recipe. I want to be clear, though—these are just my best guesses!
- Calories: about 350
- Total Fat: 18g
- Protein: 24g
- Carbohydrates: 25g
Because we are deep-frying, the final numbers can really swing depending exactly how much oil your shrimp absorbs. So, take these as a good guide, but not gospel truth for your own plate!
PrintThe Ultimate Crispy Fried Shrimp Recipe (Restaurant Copycat)
Make restaurant-quality fried shrimp at home with this simple recipe. You achieve an ultra-crispy, golden coating and tender shrimp every time by using a buttermilk soak and seasoned flour dredge.
- Prep Time: 15 min
- Cook Time: 10 min
- Total Time: 55 min
- Yield: 4 servings 1x
- Category: Seafood
- Method: Deep Frying
- Cuisine: American
- Diet: Non-Diabetic
Ingredients
- 2 lbs jumbo shrimp, peeled and deveined, tails on or off
- 1 cup buttermilk
- 1 teaspoon salt
- 1/2 teaspoon black pepper
- 1/4 teaspoon cayenne pepper
- 2 cups all-purpose flour
- 1/2 cup cornstarch
- 1 tablespoon paprika
- 1 teaspoon garlic powder
- 1 teaspoon onion powder
- 1/2 teaspoon dried thyme
- Vegetable oil or peanut oil, for frying
Instructions
- Pat the peeled and deveined shrimp completely dry with paper towels. This step helps prevent sogginess.
- Place the dry shrimp in a bowl and pour the buttermilk over them. Add salt, pepper, and cayenne pepper. Toss to coat. Let the shrimp marinate in the refrigerator for at least 30 minutes, or up to 2 hours.
- In a shallow dish, whisk together the flour, cornstarch, paprika, garlic powder, onion powder, and thyme. This is your seasoned coating.
- Remove the shrimp from the buttermilk, allowing excess to drip off, but do not wipe them dry.
- Dredge each shrimp thoroughly in the flour mixture, pressing the coating onto the shrimp to create a thick layer. Place the coated shrimp on a wire rack set over a baking sheet.
- Heat 2 to 3 inches of oil in a deep, heavy-bottomed pot or Dutch oven to 360°F (182°C). Use a thermometer to monitor the temperature; maintaining this heat is key to crispiness.
- Carefully place 6 to 8 shrimp into the hot oil, ensuring you do not overcrowd the pot. Overcrowding lowers the oil temperature, leading to greasy shrimp.
- Fry for 2 to 3 minutes, turning once, until the coating is deep golden brown and crisp.
- Remove the fried shrimp with a slotted spoon and place them immediately on a clean wire rack set over a baking sheet to drain excess oil. Do not place them on paper towels, as this traps steam and softens the crust.
- Repeat with the remaining shrimp, allowing the oil temperature to return to 360°F between batches.
- Serve immediately with your favorite dipping sauce.
Notes
- For extra crunch, you can double-dredge: dip the coated shrimp back into the buttermilk briefly, then back into the flour mixture before frying.
- If you are planning your weekly meals, this recipe pairs well with simple sides, making it a great option for meal planning.
- Keep the oil temperature consistent. If the oil smokes, it is too hot; if the shrimp look pale after a minute, it is too cool.
Nutrition
- Serving Size: 6 shrimp
- Calories: 350
- Sugar: 1
- Sodium: 550
- Fat: 18
- Saturated Fat: 3
- Unsaturated Fat: 15
- Trans Fat: 0
- Carbohydrates: 25
- Fiber: 1
- Protein: 24
- Cholesterol: 180