
Oh, nothing beats the smell of fresh bread filling your kitchen, right? It’s just pure comfort! I still remember baking with my grandmother—that’s what Ellie Vance, our founder here at DeliceRecipe, knows all about. We aren’t about complicated, fussy techniques here; we’re about making real food that tastes amazing!
If you’ve ever wanted those classic, holy-grail kinds of breakfast breads, you are in the right place. Forget dry, squishy store-bought versions. I’m going to show you how to make the homemade english muffins that will absolutely blow your mind. I mean the ones with those famous, buttery nooks and crannies! Trust me, this easy recipe is my go-to for fluffy English muffins, and it’s so much simpler than you think, even without heavy kneading.
It’s all about good, honest home cooking, and you’ll be thrilled you made these from scratch. Check out these easy breakfast ideas while you’re gathering your supplies!
- Why This Is the Best Easy English Muffin Recipe
- Gathering Ingredients for Homemade English Muffins
- How to Make English Muffins: Step-by-Step Instructions
- Essential Equipment for Perfect Homemade English Muffins
- Tips for Success When Making Homemade English Muffins
- Serving Suggestions for Your Homemade English Muffins
- Storage and Reheating Instructions for Homemade English Muffins
- Frequently Asked Questions About Homemade English Muffins
- Understanding the Nutrition of Homemade English Muffins
Why This Is the Best Easy English Muffin Recipe
I’ve tried all the fancy bread machine tricks, but honestly, this Easy English Muffin Recipe stands out because it respects the busy home cook. This is true from scratch bread baking without all the fuss! We skip the intense kneading that most recipes demand. Why work so hard when the yeast does the heavy lifting?
Instead of baking these in the oven, we cook them right on the stove top in a skillet. That slow, gentle heat is the secret weapon. If you’re looking for a quick bread option, you’ll love that this takes less time than traditional oven-baked loaves. For more simple baking projects, take a peek at this easy no-yeast quick bread recipe I love!
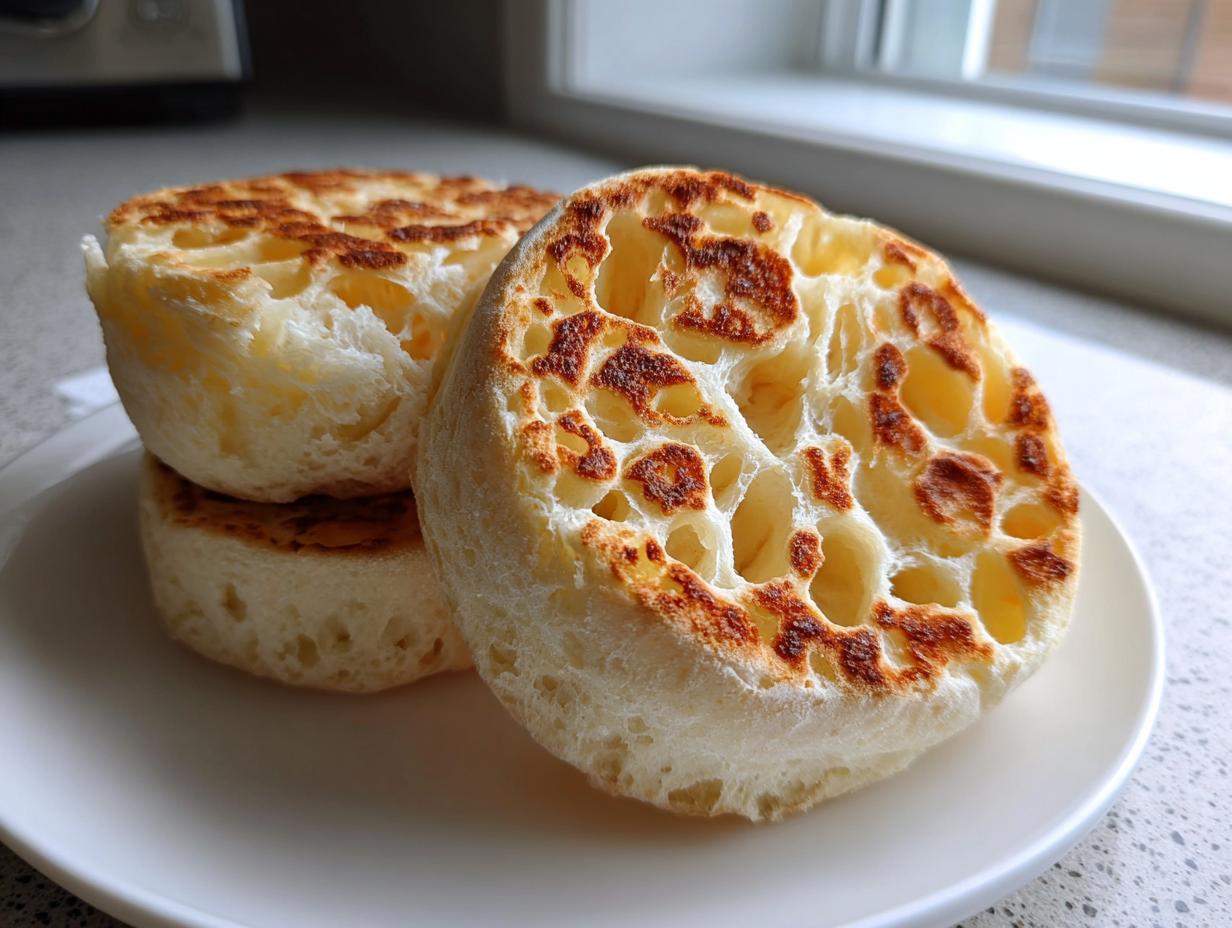
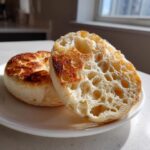
Achieving Perfect English Muffin Nooks and Crannies
The real magic, the stuff everyone asks about, are those signature English Muffin Nooks and Crannies! To secure them, you have to commit to cooking low and slow on that griddle. If the heat is too high, you’ll just burn the outside and end up with raw dough inside.
We are looking for that beautiful golden color that comes from patience, which allows the interior structure to fully set up and create those little caves ready for butter. Don’t rush it; the low temperature is what makes them fluffy.
Gathering Ingredients for Homemade English Muffins
Okay, let’s get our supplies lined up! The beauty of these homemade English muffins is that they use pantry staples. You’ll need 1 1/2 cups of warm milk—and please, make sure it’s warm, around 105-115°F, so our little yeast friends wake up happily! We combine that with sugar and yeast first. Then, we grab the flour, salt, and melted butter. Remember, soft dough is the goal here, so have the rest of that flour nearby!
Ingredient Notes and Substitutions for Homemade English Muffins
We stick to all-purpose flour for this recipe because it gives us just the right amount of chewiness for those pockets. Don’t try to swap it for bread flour unless you are an experienced baker, honestly! You’ll see cornmeal or extra flour mentioned—that’s just for dusting the sheet and your skillet so nothing sticks. It never goes into the dough itself.
The most important tip here is checking your yeast. When you mix the milk, sugar, and yeast, if you don’t see foam after 5 or 10 minutes, your yeast is dead, and you’ll end up with a flat pancake instead of fluffy English muffins. Start over with fresh yeast!
How to Make English Muffins: Step-by-Step Instructions
This is where the magic happens, and I promise you there’s no need to dust off that stand mixer; we are keeping this easy. We are making truly homemade English muffins without breaking a sweat!
Activating Yeast and Mixing the Dough for Homemade English Muffins
First things first, get that yeast proofing! Mix your warm milk, yeast, and sugar, and just let it sit until it’s bubbly and foamy—that’s how you know it’s alive. Once it’s happy, stir in your melted butter, salt, and almost all of the flour. Mix it until you get what I call a ‘shaggy, sticky dough.’ Yep, it should feel sticky; that’s characteristic of this No Knead English Muffins method. Don’t worry about kneading it stiff; just cover the bowl and let it do its thing for about an hour and a half until it doubles.
Cooking the Homemade English Muffins on the Skillet
Once it’s risen, gently push the air out. Now, roll it gently—don’t smash it flat—to about half an inch thick, and cut out your rounds. They get a quick rest, and then it’s time for the skillet! Be super patient here. Heat up a good, dry cast-iron skillet or griddle to medium-low heat. We are cooking these skillet English muffins for a good 8 to 12 minutes per side. Resist the urge to press them down like pancakes! That slow cooking is how you guarantee those fantastic internal pockets for your quick, healthy lunch recipes later!
Essential Equipment for Perfect Homemade English Muffins
You don’t need a ton of fancy gear for these homemade English muffins, which is what I love about them! We’re keeping the equipment list real, something anyone with a standard kitchen drawer can handle. You’ll need a big, sturdy bowl because this dough puffs up nicely during the rise. Don’t skimp on space!
Next up is your cutter. You’ll want something round, like a 3-inch biscuit cutter or even an empty ring mold if you have one handy. Make sure the sides are straight, not tapered, which helps keep that nice, even shape when you cut them out of the dough.
But the absolute most crucial piece of kit? That’s your cooking surface. Forget your non-stick frying pan for this job. You really need a heavy-duty cast-iron skillet or a flat griddle. This heavy metal holds the heat evenly, which is essential for that skillet English muffins technique we use to get the inside cooked before the outside burns. Honestly, having a good cast iron makes all the difference in achieving those perfect golden sides!
Tips for Success When Making Homemade English Muffins
Now that you know the basic steps for these homemade English muffins, let me share a few ‘Ellie’s Tricks’ that really elevate them. The biggest one is handling the dough gently. When you roll it out to cut the rounds, keep it thick—about 1/2 inch. If you roll it too thin, you lose the volume needed for that fluffy interior!
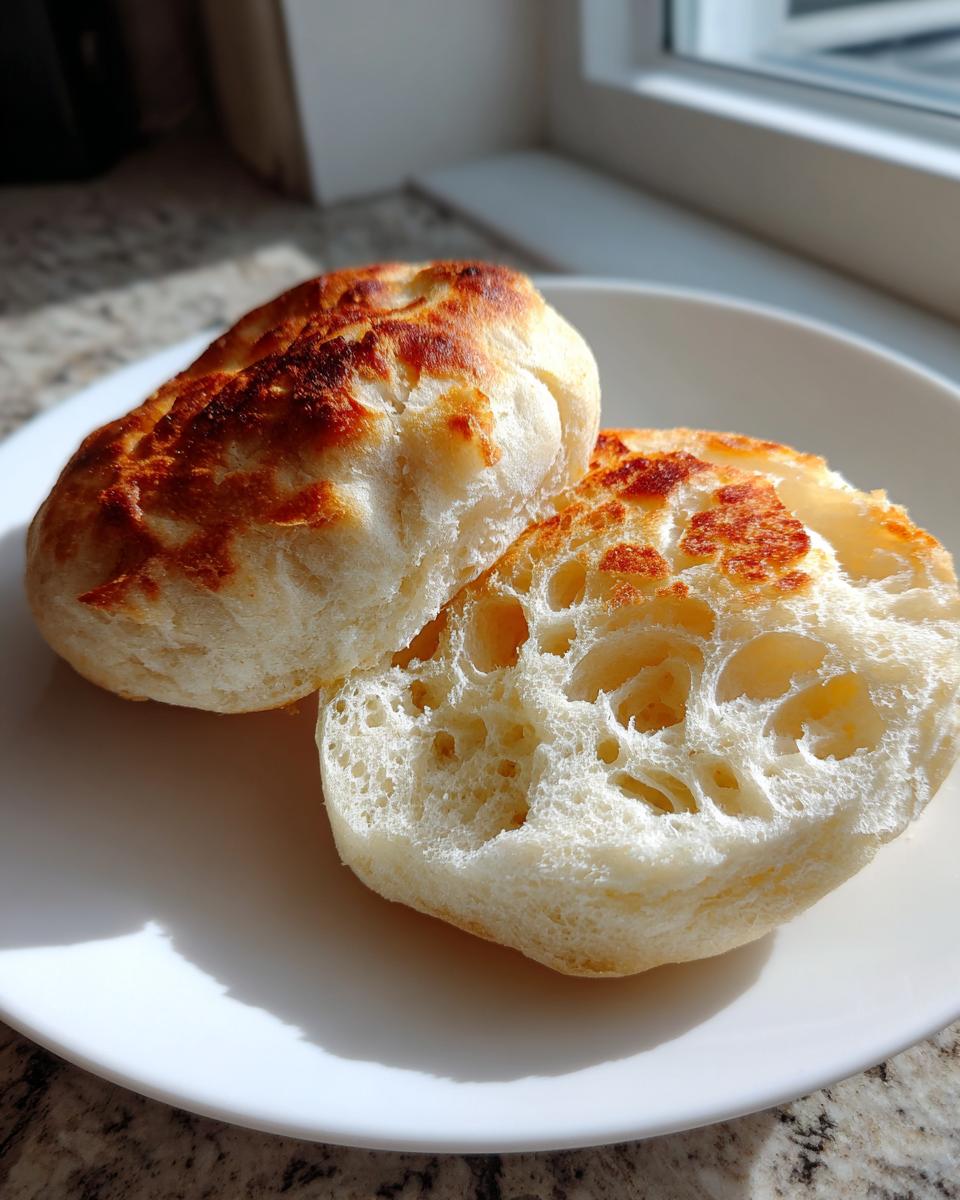
When you cut the rounds, use a sharp cutter straight up and down. Don’t twist it! Twisting seals the edges shut, and guess what that means? No nooks! You’ll seal the edges, and all that buttery goodness will stay trapped inside.
Wait until they are completely cool before opening them up. I know it’s torture, but use a fork, not a knife, to split them apart. A knife squishes the insides down. The fork pries those layers open, exposing those beautiful internal tunnels. It’s totally worth the wait, especially if you’re planning them for your easy weeknight dinners rotation!
Serving Suggestions for Your Homemade English Muffins
What’s glorious about making your own homemade English muffins is getting to eat them right away! Seriously, split one open when it’s still warm—it practically begs for the butter to melt immediately into all those deep little pockets. That’s the true test of success!
For a classic, simple breakfast, you just can’t beat high-quality salted butter smeared edge-to-edge, or maybe some sweet homemade jam or honey. That gooey texture when toasted is heaven, and it’s so much better than any store-bought bread!
But let’s talk about turning these into something truly satisfying. These are the perfect base for homemade breakfast sandwiches. Think scrambled eggs, a slice of cheddar that melts right into the nooks, maybe some bacon or a nice sausage patty. They hold up beautifully under toppings because they’re dense and sturdy!
If you are looking for more ideas to build out a fantastic morning meal, be sure to check out my recipe for my favorite old-fashioned pancakes—we make a big brunch spread sometimes!

Storage and Reheating Instructions for Homemade English Muffins
So, you made a giant batch! Good for you! Luckily, these homemade English muffins store really well, which is fantastic for busy mornings. Once they are completely cool—and I mean totally cool, otherwise you get steam and sogginess—toss them into an airtight container. I usually keep mine on the counter for maybe two days.
If you made these extra fluffy guys and you know you won’t get to them all by then, definitely freeze them! Wrap them tightly in plastic wrap first, and then put them into a freezer bag. They’ll be great for a month or more.
When you’re ready to eat them, skip the microwave! The very best way—the *only* way, if you ask me—is to toast them up. Split them open with that fork like we talked about, and let the toaster bring back those slightly crisp edges while melting the center into pure goodness.
Frequently Asked Questions About Homemade English Muffins
I get so many questions about these muffins once people try them, which just proves how amazing they are! It’s totally normal to wonder about tweaks or storage when you’re trying a new recipe, especially when you are aiming for those perfect nooks and crannies. Here are some of the most common things folks ask me when they are first starting their homemade English muffins journey.
Can I use different types of flour in this Easy English Muffin Recipe?
This is a great question, and here’s my honest answer: For your first few tries making these easy English muffin recipe at home, stick to the all-purpose flour listed. Bread flour has more protein, and while it sounds like it would make bread better, it can actually develop too much gluten in this low-knead dough. That extra structure can prevent those delicate internal air pockets from forming.
If you use only bread flour, you might end up with a chewier, denser muffin that lacks the classic light texture. Save the bread flour for pizza dough! For these, all-purpose is the perfect match to keep things fluffy and maximize those beautiful interior tunnels.
Also, I always get asked about skipping the 30-minute resting step after cutting. Don’t do it! That short rest lets the dough relax just enough before hitting the hot pan. If you skip it, the dough springs back too much and you lose height on your muffins.
If you are planning a big weekend breakfast feast, make sure you look at my favorite brunch recipes homemade ideas to go alongside these!
How long do homemade English muffins actually last?
These are best eaten the day they are made, obviously! But they do last a couple of days stored in an airtight container on the counter. If you think they won’t all disappear in 48 hours, freeze them! Wrap them well and they keep beautifully for about a month. Just slice them before freezing if you plan to toast them individually.
Why are my homemade English muffins not getting any nooks?
If you aren’t seeing those lovely holes, it almost always comes down to two things we talked about. First, make sure you are cooking them low and slow on the skillet—if they brown too fast, the inside hasn’t had time to bake and form the pockets. Second, remember to split them open with a fork, not a knife, when you toast them. That fork technique is essential for revealing those airy interiors!
Understanding the Nutrition of Homemade English Muffins
I always like to give you a heads-up on what’s in our delicious treats, even though these are made with simple ingredients! Since we aren’t lab professionals here, just dedicated home bakers, please remember these numbers are just estimates based on the recipe proportions. Knowing what’s in your food is so helpful, especially if you are looking into structured eating like meal planning.
For one muffin, you’re looking at about 220 calories. They contain 5g of fat and 40g of carbs, with a decent 6g of protein. Not bad at all for a totally satisfying bread that beats anything you get from those big meal delivery companies!
PrintThe Best Homemade English Muffins with Perfect Nooks and Crannies
Make classic, fluffy homemade English muffins from scratch using a simple, no-knead method. These muffins cook on the skillet and develop the signature nooks and crannies perfect for soaking up butter or making breakfast sandwiches.
- Prep Time: 20 min
- Cook Time: 30 min
- Total Time: 2 hours 50 min
- Yield: 10 muffins 1x
- Category: Breakfast
- Method: Skillet Cooking
- Cuisine: American
- Diet: Vegetarian
Ingredients
- 1 1/2 cups warm milk (about 105-115°F)
- 2 1/4 teaspoons active dry yeast
- 1 tablespoon granulated sugar
- 3 1/2 cups all-purpose flour, plus more for dusting
- 1 teaspoon salt
- 1/4 cup unsalted butter, melted
- Extra flour or cornmeal for dusting the cooking surface
Instructions
- Combine the warm milk, yeast, and sugar in a large bowl. Let this mixture sit for 5 to 10 minutes until it becomes foamy. This shows the yeast is active.
- Stir in the melted butter, salt, and 3 cups of the flour into the yeast mixture. Mix until a shaggy, sticky dough forms. Add the remaining 1/2 cup of flour gradually if the dough seems too wet to handle, but keep it relatively soft.
- Cover the bowl with plastic wrap or a clean kitchen towel. Let the dough rise in a warm spot for 1 to 1.5 hours, or until it has doubled in size. This recipe does not require kneading.
- Gently punch down the risen dough. Turn the dough out onto a lightly floured surface. Pat or gently roll the dough to about 1/2 inch thickness.
- Use a 3-inch round biscuit cutter or English muffin ring to cut out the rounds. Gather the scraps, gently re-pat, and cut out any remaining muffins.
- Lightly dust a baking sheet or large platter with flour or cornmeal. Place the cut rounds on the prepared surface, leaving space between them. Cover loosely and let them rest for 30 minutes.
- Heat a large, dry cast-iron skillet or griddle over medium-low heat. Cooking low and slow is key to developing the interior texture.
- Place the dough rounds onto the warm skillet, working in batches. Cook for 8 to 12 minutes per side, until golden brown. Do not press down on the muffins while cooking.
- Remove the cooked muffins and let them cool completely on a wire rack.
- To achieve the classic texture, split the cooled muffins using a fork, not a knife. Toast them well before serving.
Notes
- For the best nooks and crannies, cook these muffins low and slow on the griddle. High heat will brown the outside before the inside cooks properly.
- If you are interested in structured eating plans, look into meal planning options rather than relying on meal delivery companies.
- These muffins are excellent split, toasted, and topped with butter, jam, or used to build breakfast sandwiches.
Nutrition
- Serving Size: 1 muffin
- Calories: 220
- Sugar: 2
- Sodium: 250
- Fat: 5
- Saturated Fat: 3
- Unsaturated Fat: 2
- Trans Fat: 0
- Carbohydrates: 40
- Fiber: 2
- Protein: 6
- Cholesterol: 15