
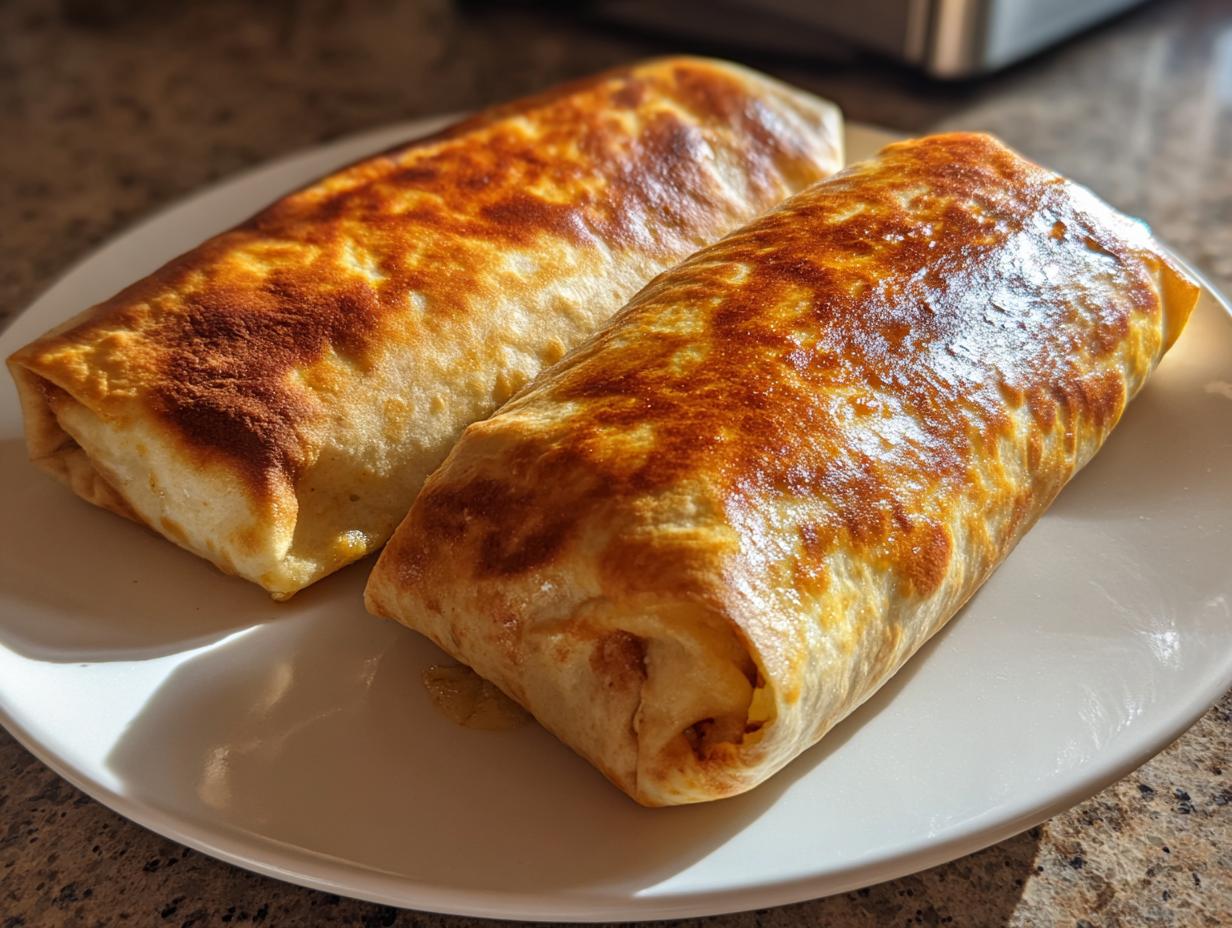
Sometimes, you just crave that perfect crunchy, savory bite that shouts “Tex-Mex comfort food,” right? Me too! That’s exactly why I developed this recipe for **Chimichangas**. Forget the deep fryer and the heavy grease; we’re leaning into a way to get that glorious golden crispness using just the oven, which makes them so much easier for a Tuesday night.
Here at DeliceRecipe, my goal, as founder Eleanor Vance, is always to give you foolproof recipes that taste incredible but don’t demand you spend hours in the kitchen. These chicken and cheese chimichangas are ready in about 30 minutes total. They deliver that satisfying crunch you’re looking for, transforming simple ingredients into deeply flavorful *Homemade Chimichangas* without any fuss. Trust me, once you try this baked method, you might never go back!

- Why This Easy Chimichanga Recipe Delivers Comfort Food Flavor
- Gathering Ingredients for Flavorful Chimichanga Filling
- How To Make Chimichangas: Step-by-Step Baking Instructions
- Expert Tips for Perfect Crispy Chimichangas
- Serving Suggestions for Your Chicken Chimichangas
- Storage and Reheating Instructions for Leftover Chimichangas
- Frequently Asked Questions About Making Chimichangas
- Nutritional Estimates for These Cheesy Chimichangas
- Share Your Experience Making These Easy Chimichangas
Why This Easy Chimichanga Recipe Delivers Comfort Food Flavor
When I set out to create this recipe, I knew I needed something fast. Honestly, life doesn’t always leave room for fancy frying, but that craving for Mexican comfort food hits hard! That’s why I love this Easy Chimichanga Recipe. It truly shines because we skip the oil bath but keep all the flavor.
We’re talking about a complete meal wrapped up in about 30 minutes total. This allows them to fit perfectly into your schedule, qualifying them as one of those fantastic Quick Weeknight Mexican Meals. The secret to the texture is just a quick spray of cooking oil before baking; it gives you that crunch everyone loves, making these a satisfying dinner choice every time.
Quick Prep for Weeknight Chimichangas
The best part? The filling comes together in about 15 minutes flat. I just sauté some onion and garlic, toss in my seasonings and that beautiful shredded chicken, and boom—flavor base ready! You aren’t messing around with deep fryers heating up or waiting forever for oil smoke points. This speed ensures you get to the table faster, which is exactly what a busy home cook needs to feel successful on a Wednesday night.
Gathering Ingredients for Flavorful Chimichanga Filling
When we talk about the best part of any Mexican dish, we’re talking about the filling, aren’t we? Knowing exactly what goes inside is step one to making sure these turn out perfectly flavorful. Since we’re baking these bad boys, we want every ingredient to really sing. I’ve listed everything you’ll need below. My goal here is absolute clarity—no guesswork!
Don’t stress if you don’t keep every single spice on hand; home cooking is about flexibility, but for the absolute best flavor profile here, try to stick to the list. And yes, the beans are optional; it just depends on how much you want that satisfying, rich density inside your wrap.
Essential Components for Crispy Chimichangas
- 1 tablespoon olive oil
- 1 small yellow onion, diced
- 2 cloves garlic, minced
- 1 teaspoon chili powder
- 1 teaspoon ground cumin
- 1/2 teaspoon dried oregano
- 1/4 teaspoon salt
- 1/4 teaspoon black pepper
- 2 cups cooked, shredded chicken breast
- 1 cup shredded Monterey Jack cheese
- 1/2 cup refried beans (optional)
- 8 medium flour tortillas (burrito size)
- Cooking spray
See? Straightforward stuff. That shredded chicken breast melts right into the cheese and spices, creating a filling that holds together beautifully when you roll it up. And those spices—chili powder, cumin, and oregano—that’s where that authentic Tex-Mex flavor really hits you. You want burrito-sized tortillas, too! Smaller ones just don’t hold enough goodness.
How To Make Chimichangas: Step-by-Step Baking Instructions
Okay, now for the fun part—putting it all together! This is where we turn our simple ingredients into those beautiful, golden-brown treats we all dream about. Don’t worry if you haven’t rolled many burritos before; I’m going to walk you through every move so you get perfect **Chimichangas** every single time.
Creating the Flavorful Chimichanga Filling
First things first, we need that incredible flavor base. Grab a skillet and warm up that tablespoon of olive oil over medium heat. Toss in your diced onion and let it sweat until it gets soft—about four minutes should do it. See how that starts to smell good already? Once the onion is happy, toss in your garlic, chili powder, cumin, oregano, salt, and pepper. You only cook that for about a minute until you can really smell those spices waking up. That’s the start of a truly Flavorful Chimichanga Filling!
Now, pull that skillet off the heat. In a bowl, mix that seasoned onion and garlic mix right into your two cups of shredded chicken and that glorious cup of Monterey Jack cheese. If you’re using the refried beans, spread a thin line of those into the mix too! Stir it all up until everything looks beautifully combined and cheesy.
Perfectly Rolling Your Homemade Chimichangas
Here is where a lot of people mess up their Homemade Chimichangas—they forget to warm the tortillas! Cold tortillas crack and tear like old paper when you try to fold them. Pop those eight medium flour tortillas in the microwave for just 15 or 20 seconds, or warm them in a dry skillet until they feel super pliable. They need to bend, not break!
Take one warmed tortilla. Put about 1/3 cup of your filling mixture near one edge. If you used beans, put a thin layer down first. Then, this is key: you fold the sides inward first, just like you’re tucking in the ends of a burrito or present. After the sides are secure, roll that tortilla up tightly from the filled edge all the way to the other side. Make sure it’s snug! You should end up with a neat, sealed package ready for the oven.
Achieving Crispy Chimichangas in the Oven
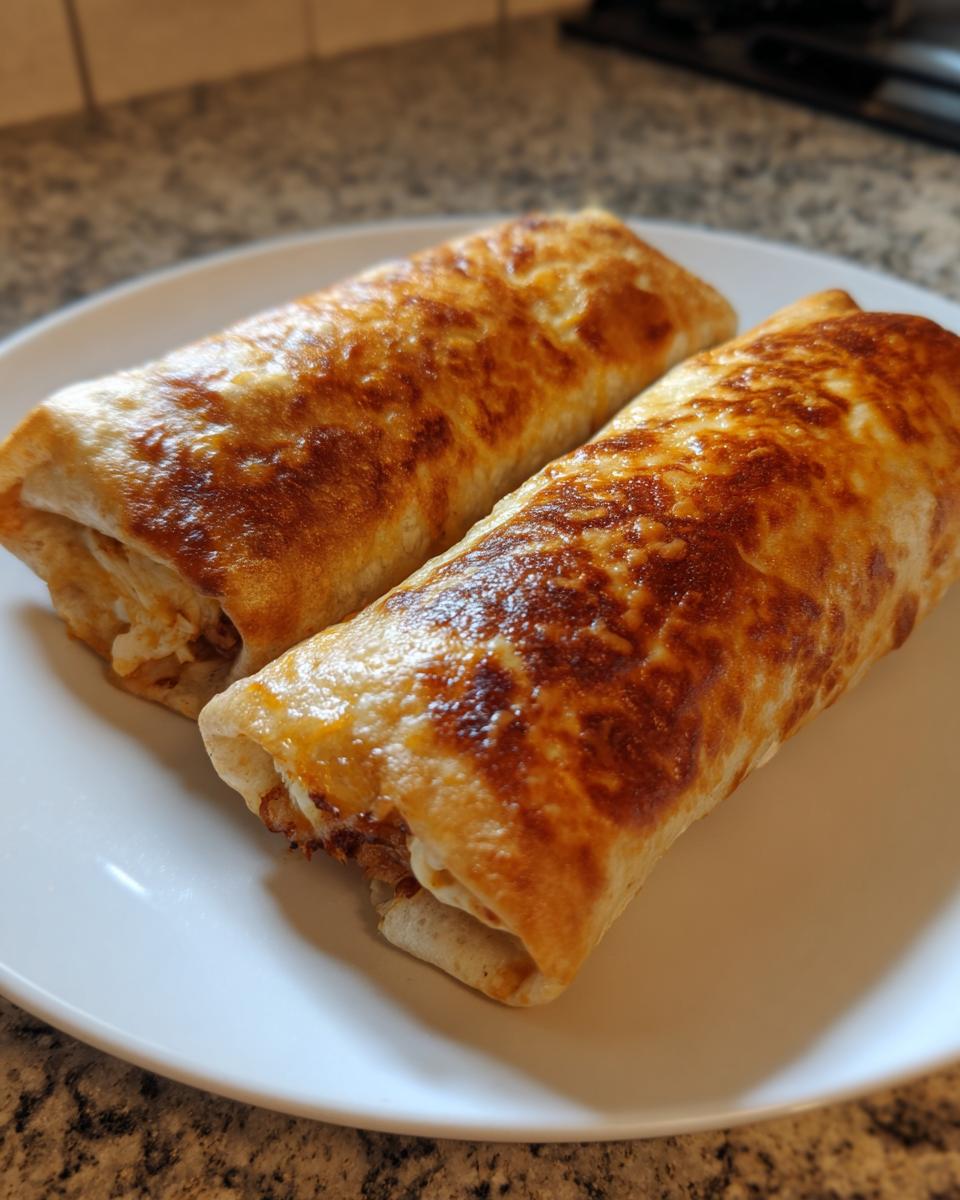
We’re skipping the oil splurge, so we need the oven to do the hard work. Preheat your oven to 400°F (200°C). Make sure you’ve lined a baking sheet with parchment paper—this saves cleanup time, which I love. Lay your rolled chimichangas seam-side down on the sheet.
This next part is crucial for that crunch in these Baked Chimichangas Recipe winners: give the tops and bottoms a really generous spray with cooking spray. Don’t be shy! Bake them for 12 to 15 minutes total. But wait! You must flip them halfway through because the oven heat isn’t perfectly even. Once they’re golden brown and totally crisp, they are ready to come out! You can learn a bit more about maximizing those flavors when combining ingredients over at my guide for classic ground beef recipes, which uses similar seasoning bases.
Expert Tips for Perfect Crispy Chimichangas
I’ve already told you that baking gives you fantastic, lighter results, but I think it’s important that I share all the little secrets I learned while developing these recipes. My notes section always has the best shortcuts and twists, especially when you’re chasing that perfect crunch. My goal is always to send you home with meals that are reliable and delicious, whether we are talking about these Chimichangas or something else entirely!
Sometimes you need results even faster, or maybe you just love that blast-furnace heat the air fryer gives you. If you want ultra-fast, extra-crispy results, you need to know about this alternative method for getting those perfect Crispy Chimichangas.
Air Fryer Chimichangas Alternative
If you own an air fryer, you simply must try it for these! Honestly, the results are stunning; they get beautifully golden and crispy fast. Instead of setting the oven to 400°F, you’ll preheat your air fryer to 375°F (190°C). You only need to cook them for about 8 to 10 minutes total.
Just like the oven method, you must flip them halfway through so both sides crisp up evenly. Seriously, if you need unbelievably crispy results in less time, this is how you do it. You can check out my guide on other crispy air fryer chicken preparations for more tech tips!

Also, don’t forget that note about ground beef! If you’ve got some leftover taco meat or just prefer it, swapping out the chicken for ground beef seasoned with taco seasoning works like a charm. You end up with a hearty, classic Tex-Mex experience that tastes just as good as the chicken version.
Serving Suggestions for Your Chicken Chimichangas
Whew! Now that you have these perfectly baked, crispy bundles fresh out of the oven, we have to talk about the best part: what you put on top! A crispy shell demands great toppings to balance that texture, and these deserve the full Tex-Mex treatment. This is where you take a great dinner and push it right over the top into *amazing* territory.
When I serve these at home, I always make sure I have a few essentials ready to go. Forget fancy; think fresh and cool to contrast that hot, cheesy inside!
For immediate cooling relief, you absolutely need sour cream. It cuts through the richness so nicely. And you can’t have Mexican food without salsa! I highly recommend making a fresh batch; you can find my simple recipe for homemade salsa here. The brightness of fresh tomato and lime makes such a difference.
If you are serving these as a full-on dinner spread—and you totally should—you need a good side dish. Forget boring rice! Last week, I paired these with a creamy, slightly tangy side that uses up some of the same spice profiles we used in the filling. It’s my recipe for easy creamy taco pasta salad. It travels well if you’re taking these to watch the game, too!
Here are my top suggestions when setting out the topping bar:
- Guacamole—freshly mashed, please!
- Shredded crisp lettuce for texture contrast.
- A sprinkle of cotija cheese if you happen to have some.
- Maybe a side of black beans sprinkled with cilantro if you want something heartier than just rice.
Take a cheesy, savory bite with cool sour cream and bright salsa. That, my friends, is what making home cooking delicious is all about!
Storage and Reheating Instructions for Leftover Chimichangas
Even though these baked **Chimichangas** are so incredibly good that they rarely last until tomorrow, life happens! If you happen to have any extras left over from your spectacular Tex Mex Dinner Ideas night, it’s important to handle them correctly so they don’t lose that coveted crisp shell.
The absolute worst mistake you can make is trying to zap these in the microwave. Please, don’t do it! The microwave turns that beautiful, delicate crispiness into chewy, sad little tortillas. We want to prioritize keeping that texture intact for leftovers.
For storage, let the chimichangas cool completely first. Warm food traps steam, and that steam is the enemy of crispness, even in the fridge. Once they are totally at room temperature, slip them into an airtight container. They should keep perfectly fine in the refrigerator for about three to four days. They might lose a tiny bit of their initial crunch just sitting in the container, but don’t panic!
Restoring That Perfect Crispness
When you’re ready to enjoy them again, you have two fantastic options—and surprisingly, no deep fryer needed! I personally try to reheat them using the same method we baked them in, just at a slightly lower temperature to gently warm the filling through before the shell crisps up.
Set your oven to about 350°F (175°C). Place the leftovers directly on a parchment-lined baking sheet. Give them a very light spray with cooking spray if they look a bit dry. Pop them in for about 8 to 10 minutes. Keep an eye on them, because they might not need the full time, but you’ll notice that golden color start to come back!
If you’re feeling impatient (I know I get impatient!), the air fryer is your best friend for reheating. Set it to 350°F (175°C) and let them go for just 4 to 6 minutes. The air fryer heats them faster and restores that signature crunch remarkably well. It’s almost like making them fresh all over again!

Frequently Asked Questions About Making Chimichangas
I always get a few questions after folks try one of my recipes for the first time, and these **Chimichangas** are no exception! Since this recipe focuses on a lighter, baked method, people always wonder about the traditional way or how to switch up the protein. I’m happy to clear up any confusion so you can enjoy this amazing Mexican Comfort Food exactly how you like it!
Can I deep fry these Chimichangas instead of baking them?
You absolutely can! Deep frying is the classic way, and it certainly yields a different, super-puffy texture. If you go that route, heat about two inches of neutral oil (like canola or vegetable) to 375°F (190°C). Fry them one or two at a time, seam-side down first, turning gently until they are gloriously golden brown all over—usually about 2 to 3 minutes per side. Just make sure you drain them really well on a wire rack lined with paper towels afterward. While the oven is easier for quick assembly, deep frying does deliver that ultimate richness!
What is the best type of tortilla to use?
I specifically call for medium, burrito-sized flour tortillas in the ingredients list, and here’s why: you need that extra surface area to completely wrap around the filling without tearing. Corn tortillas are too fragile for folding and usually break when we try to bake them this tightly. Make sure they are nice and pliable before you start rolling, just like I mentioned in the instructions. Warm tortillas are happy tortillas!
Can I use ground beef instead of chicken for this recipe?
Yes, and I highly encourage it if you prefer! If you want to switch over to a hearty Beef Chimichanga version, it’s super easy. Just skip the shredded chicken in step three. Instead, you’ll swap in one pound of ground beef cooked with taco seasoning. You can follow the general seasoning guide I used for my beef taco salad recipe over here to get that seasoning just right before mixing it with the cheese. It makes for a wonderfully savory treat!
Why do my chimichangas sometimes unroll while baking?
That usually happens for two reasons, and we want to prevent both! First, if your tortillas aren’t warm, they won’t bend correctly, leading to weak folds. Second, you must tuck those sides in *before* you roll it up tightly. Think of it like wrapping a present—you secure the ends first. If you roll it loosely, the pressure from the hot filling will push it open while it bakes. Roll it tight, seam-side down on the baking sheet, and they should stay perfectly sealed!
Nutritional Estimates for These Cheesy Chimichangas
Now, I know some of you are watching macros or calories, and others are just generally curious, so I always like to share a breakdown of what’s in these amazing bites. Keep in mind, as Eleanor Vance, I develop recipes based on flavor and fun first, so these numbers are just good ballpark estimates. The exact calories, fat, and sodium can—and will—change depending on the brands of tortillas, chicken, and cheese you choose to use in your kitchen.
We’re basing these nutritional estimates on them being baked, not deep-fried, which is why they are a much lighter option than what you might get out of a restaurant basket! These estimates cover one single chimichanga serving size.
For reference, here is the estimated data:
- Serving Size: 1 chimichanga
- Calories: 320
- Fat: 14g (with 6g Saturated Fat)
- Carbohydrates: 30g
- Protein: 19g
- Sugar: 2g
- Sodium: 450mg
As you can see, you get a fantastic hit of protein here—that’s that shredded chicken and cheese doing the heavy lifting! Since we’re baking them, the fat count stays reasonable for something that feels so indulgent. If you’re managing your sodium, though, be mindful of the cheese and seasoning mix you use, as those two components often fluctuate the most in pre-packaged ingredients.
Share Your Experience Making These Easy Chimichangas
Well, that’s it! You’ve made an amazing, crispy, cheesy dinner, and you didn’t even have to pull out the big pot of oil. I truly hope you loved how straightforward these **Chimichangas** were, especially since the whole thing takes less than 30 minutes from start to finish! That speed alone deserves bragging rights, don’t you think?
Here at DeliceRecipe, sharing food is such a huge part of what I do, and I absolutely love hearing how recipes turn out in *your* kitchen. Whether you stuck with the baked chicken version, or you bravely tried the air fryer instructions I shared, I want to see the golden results!
Please, don’t be shy! If you loved how easy this Tex-Mex dinner was, would you mind taking a quick moment to leave a rating down below? It helps other home cooks like you feel confident giving this recipe a try. If you snapped a photo of your finished platter—maybe piled high with sour cream and salsa—I’d be thrilled if you tagged me online!
If you ended up trying out that delicious Air Fryer Beef & Bean recipe linked above—that irresistible one that comes together in 25 minutes—I’d love to know the comparison! You can reach us anytime through the contact page if you have specific questions about substitutions or techniques. Happy cooking, friends, and thank you for trusting me with your dinner table!
PrintEasy Crispy Baked Chicken Chimichangas

Make satisfying, crispy chicken chimichangas at home using this straightforward recipe. These are baked instead of fried for a lighter texture, perfect for a quick Tex-Mex dinner.
- Prep Time: 15 min
- Cook Time: 15 min
- Total Time: 30 min
- Yield: 8 servings 1x
- Category: Dinner
- Method: Baking
- Cuisine: Tex-Mex
- Diet: Vegetarian
Ingredients
- 1 tablespoon olive oil
- 1 small yellow onion, diced
- 2 cloves garlic, minced
- 1 teaspoon chili powder
- 1 teaspoon ground cumin
- 1/2 teaspoon dried oregano
- 1/4 teaspoon salt
- 1/4 teaspoon black pepper
- 2 cups cooked, shredded chicken breast
- 1 cup shredded Monterey Jack cheese
- 1/2 cup refried beans (optional)
- 8 medium flour tortillas (burrito size)
- Cooking spray
Instructions
- Heat the olive oil in a skillet over medium heat. Add the diced onion and cook until soft, about 4 minutes.
- Add the minced garlic, chili powder, cumin, oregano, salt, and pepper to the skillet. Cook for 1 minute until fragrant.
- In a bowl, combine the shredded chicken, the seasoned onion mixture, and the shredded cheese. Mix well to create the flavorful chimichanga filling.
- Warm the flour tortillas briefly in the microwave or a dry skillet to make them pliable.
- Place about 1/3 cup of the filling mixture near one edge of a tortilla. If using, spread a thin line of refried beans over the filling.
- Fold the sides of the tortilla inward over the filling, then tightly roll the tortilla up, starting from the filling side, to create a sealed package. Repeat with the remaining filling and tortillas.
- Preheat your oven to 400°F (200°C). Lightly spray both sides of each rolled chimichanga with cooking spray to help them crisp up.
- Place the chimichangas seam-side down on a baking sheet lined with parchment paper.
- Bake for 12 to 15 minutes, flipping halfway through, until the tortillas are golden brown and crispy.
- Serve immediately with your favorite toppings like salsa, sour cream, or guacamole.
Notes
- For an even crispier texture, you can cook these in an air fryer at 375°F (190°C) for 8 to 10 minutes, flipping halfway.
- You can substitute ground beef seasoned with taco seasoning for the shredded chicken if you prefer a beef chimichanga.
- Make sure the tortillas are warm before rolling; cold tortillas tear easily.
Nutrition
- Serving Size: 1 chimichanga
- Calories: 320
- Sugar: 2
- Sodium: 450
- Fat: 14
- Saturated Fat: 6
- Unsaturated Fat: 8
- Trans Fat: 0
- Carbohydrates: 30
- Fiber: 2
- Protein: 19
- Cholesterol: 55