Easy No-Bake Oreo Dirt Cake Cups
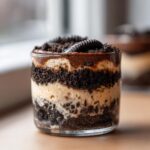
Make this simple, creamy Oreo Dirt Cake dessert. It uses crushed cookies, chocolate pudding, and a cream cheese base, perfect for parties or as a fun kids’ treat.
- Prep Time: 25 min
- Cook Time: 0 min
- Total Time: 4 hr 25 min
- Yield: 8 servings 1x
- Category: Dessert
- Method: No-Bake
- Cuisine: American
- Diet: Vegetarian
Ingredients
Scale
- 1 package (8 ounces) cream cheese, softened
- 1 cup unsalted butter, softened
- 1 cup powdered sugar
- 1 container (12 ounces) frozen whipped topping, thawed
- 2 packages (3.9 ounces each) instant chocolate pudding mix
- 3 cups cold milk
- 1 package (14.3 ounces) Oreo cookies, crushed into fine crumbs
- Gummy worms, for garnish
Instructions
- In a large bowl, beat the softened cream cheese and butter together until smooth.
- Gradually add the powdered sugar to the cream cheese mixture and beat until fully combined.
- Gently fold in the thawed whipped topping until the mixture is uniform. Set this creamy base aside.
- In a separate bowl, whisk together the instant chocolate pudding mix and cold milk for about two minutes, until the pudding begins to thicken.
- Gently fold the thickened chocolate pudding into the cream cheese mixture until just combined. Do not overmix.
- Crush the Oreo cookies until they resemble fine dirt. Set aside about 1 cup of crumbs for the top layer.
- Prepare individual serving cups or a large trifle dish.
- Create the first layer by placing a layer of crushed Oreos at the bottom of each cup.
- Spoon or pipe the chocolate cream mixture over the cookie layer.
- Repeat the layers: cookie crumbs, then cream mixture, until the cups are full, ending with a layer of cream mixture on top.
- Sprinkle the reserved crushed Oreos over the top layer to create the ‘dirt’ look.
- Press a few gummy worms into the top layer of crumbs for decoration.
- Chill the dirt cake cups for at least four hours, or until firm.
Notes
- For the best texture, crush the Oreos in a food processor, leaving some slightly larger pieces for variety.
- You can prepare this dessert one day ahead of time. Cover and refrigerate.
- If you are looking for alternatives to traditional baking, this recipe is a great option, similar to some no-bake cheesecake desserts.
- This recipe works well for meal planning when you need a quick, impressive dessert for a potluck.
Nutrition
- Serving Size: 1 cup
- Calories: 450
- Sugar: 45
- Sodium: 350
- Fat: 28
- Saturated Fat: 15
- Unsaturated Fat: 13
- Trans Fat: 0.5
- Carbohydrates: 50
- Fiber: 2
- Protein: 6
- Cholesterol: 55
Find it online: https://delicerecipe.com/easy-no-bake-dirt-cake-recipe/