
Oh, who hasn’t been there? You open the oven, expecting golden, flavorful perfection, and instead, you pull out that sad, dry, shoe-leather sort of baked chicken breast. It’s the absolute worst! But I promise you, that’s history now. Since our founder Ellie Vance started DeliceRecipe, her whole mission has been curing that problem. She believes totally in foolproof home cooking methods, and this recipe is the result of years of testing to make sure you get that guaranteed result. You can read more about our philosophy over on our About Page!
We call this breakthrough recipe ‘The Ultimate Juicy Baked Chicken Breast: Simple Seasoning & Foolproof Method,’ because it genuinely is the easiest way to guarantee tenderness. We are dumping the guesswork and sticking to a few core techniques that work every, single time. Seriously, if you can turn on your oven, you can master this dish today!
- Why This is the Best Baked Chicken Breast Method for Juicy Results
- Ingredients for the Ultimate Juicy Baked Chicken Breast
- Step-by-Step Instructions for Perfect Baked Chicken Breast
- Flavor Variations: Beyond Simple Chicken Breast Seasoning
- Tips for Baked Chicken Breast for Meal Prep Success
- Serving Suggestions for Your Quick Weeknight Chicken Dinner
- Frequently Asked Questions About Baked Chicken Breast
- Nutritional Estimates for Healthy Baked Chicken Ideas
- Share Your Juicy Baked Chicken Breast Success
Why This is the Best Baked Chicken Breast Method for Juicy Results
I know you’ve seen a million ways online claiming they know how to bake chicken breast without drying out, but this one is different. This isn’t just luck; we’re talking guaranteed results because we nailed down two essential steps that most people skip. First, we make sure the chicken is an even thickness. If you don’t pound those thicker ends down a bit, the thin side is going to be bone-dry before the middle ever gets safe to eat. It’s total common sense when you think about it!
Ellie remembers making giant batches for Sunday dinners; she used to dread the uneven cooking so much! After years of frustration, she realized that precision in prep equals a juicy baked chicken breast every single time. This method is so simple, it’s perfect for those evenings when you’re aiming for a quick weeknight chicken dinner, but you still want something that tastes like you spent hours on it. You can find a few other simple ideas when you check out our favorite easy weeknight dinners!
Achieving Tender Oven Baked Chicken Every Time
Temperature control is your superpower here, my friends. Don’t just trust the clock; trust your thermometer! Pull that chicken out the *second* it hits 165°F. But wait, don’t touch it yet! The most magical part of getting tender oven baked chicken happens after it leaves the heat. Letting it rest for five minutes is non-negotiable. This resting time lets all those beautiful juices—which were running scared during the baking process—reabsorb back into the meat. Seriously, don’t skip the rest; it’s the whole secret!
Ingredients for the Ultimate Juicy Baked Chicken Breast
Okay, I’m going to show you exactly what goes into this fantastic dish. The beauty of this recipe is that you probably have everything sitting in your pantry right now. No fancy imported spices needed, which is why this works so well for a busy Tuesday night!
Here is what you need to gather up for four servings of incredible, juicy chicken:
- 4 boneless, skinless chicken breasts (about 6-8 oz each)
- 1 tablespoon olive oil
- 1 teaspoon salt
- 1/2 teaspoon black pepper
- 1 teaspoon garlic powder
- 1/2 teaspoon onion powder
- 1/2 teaspoon dried oregano
- 1/4 teaspoon paprika
Simple Chicken Breast Seasoning Mix Components
This spice blend is truly the heart of the flavor for our baked chicken breast. It’s the secret weapon that makes the basic version taste gourmet without any extra effort. See how few spices we use? That’s the simplicity Ellie promised!
We are keeping it classic here with just salt, pepper, garlic powder, onion powder, dried oregano, and just a pinch of paprika for color. Make sure you mix these together really well in a tiny bowl before you rub anything on the chicken. You want those flavors distributed evenly so you don’t end up with one bite tasting only like salt and the next only like oregano. A perfect mix means a consistently delicious result!
Step-by-Step Instructions for Perfect Baked Chicken Breast
Alright, let’s get cooking! This is where the magic happens, and trust me, this easy baked chicken breast recipe is so streamlined you’ll be wondering why you ever ordered takeout. We are going to move through this method quickly and efficiently. No fuss, just fantastic chicken!
First things first: Preheat your oven right away to 400°F (200°C) and get your baking dish ready. I always give mine a little spray or slip some parchment paper in there—it saves so much scrubbing later! Remember, planning ahead on timing makes all the difference in achieving that perfect, tender result.
Preparation Steps: Pounding and Seasoning the Baked Chicken Breast
This is step two, and it’s critical for success. If your chicken breasts are thick on one end and thin on the other, you are practically guaranteeing dryness. So, take a piece of plastic wrap and gently pound the thicker parts until the whole piece is about the same thickness, around 3/4 inch. This evenness ensures everything cooks at the same speed, which is essential for the best baked chicken breast experience.
Next, grab that seasoning blend you mixed up! Rub all sides of the chicken lightly with your olive oil first—that helps the spices stick beautifully. Then, sprinkle that seasoning mix everywhere, pressing a little so nothing falls off in the oven. You want that flavor locked in tight!
Baking and Checking Doneness for Tender Oven Baked Chicken
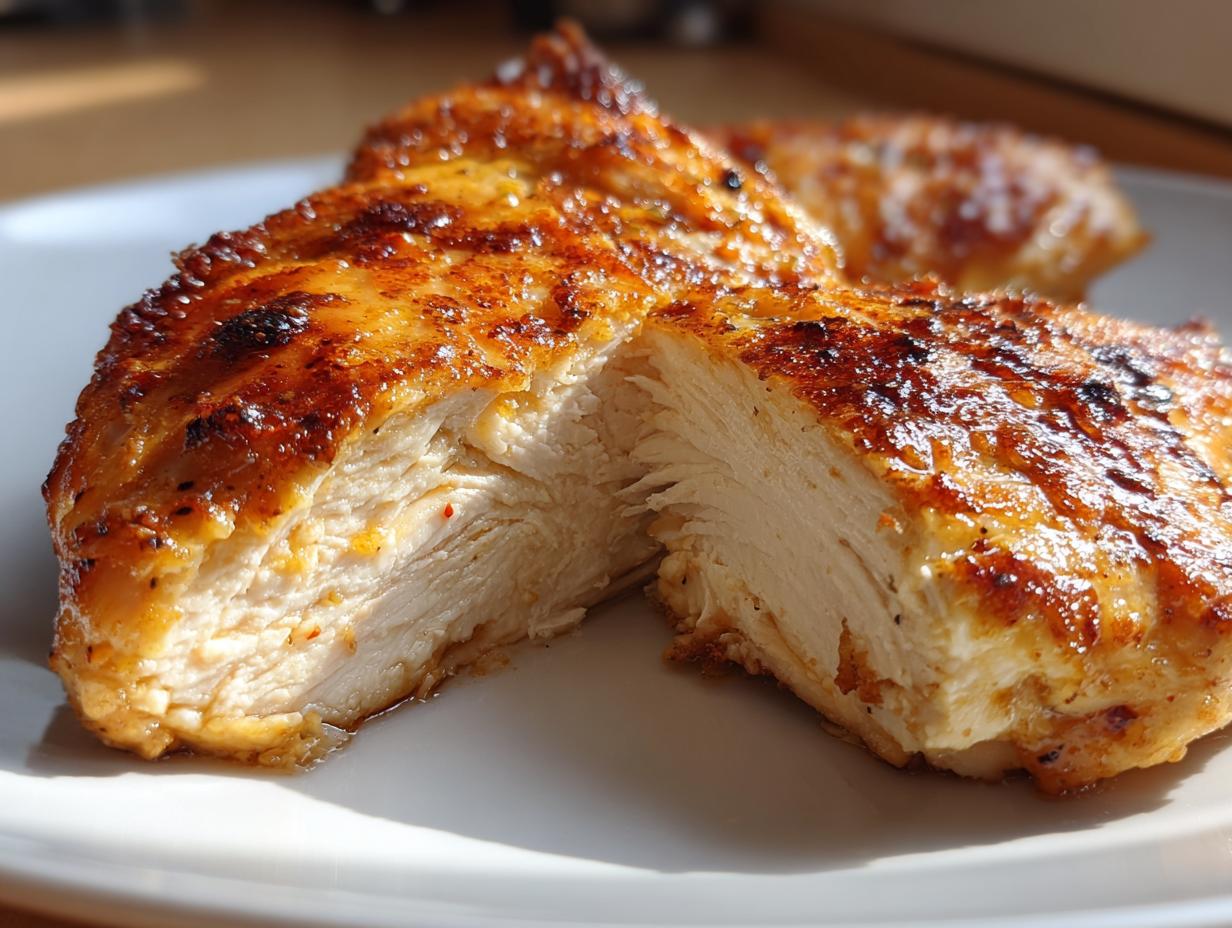
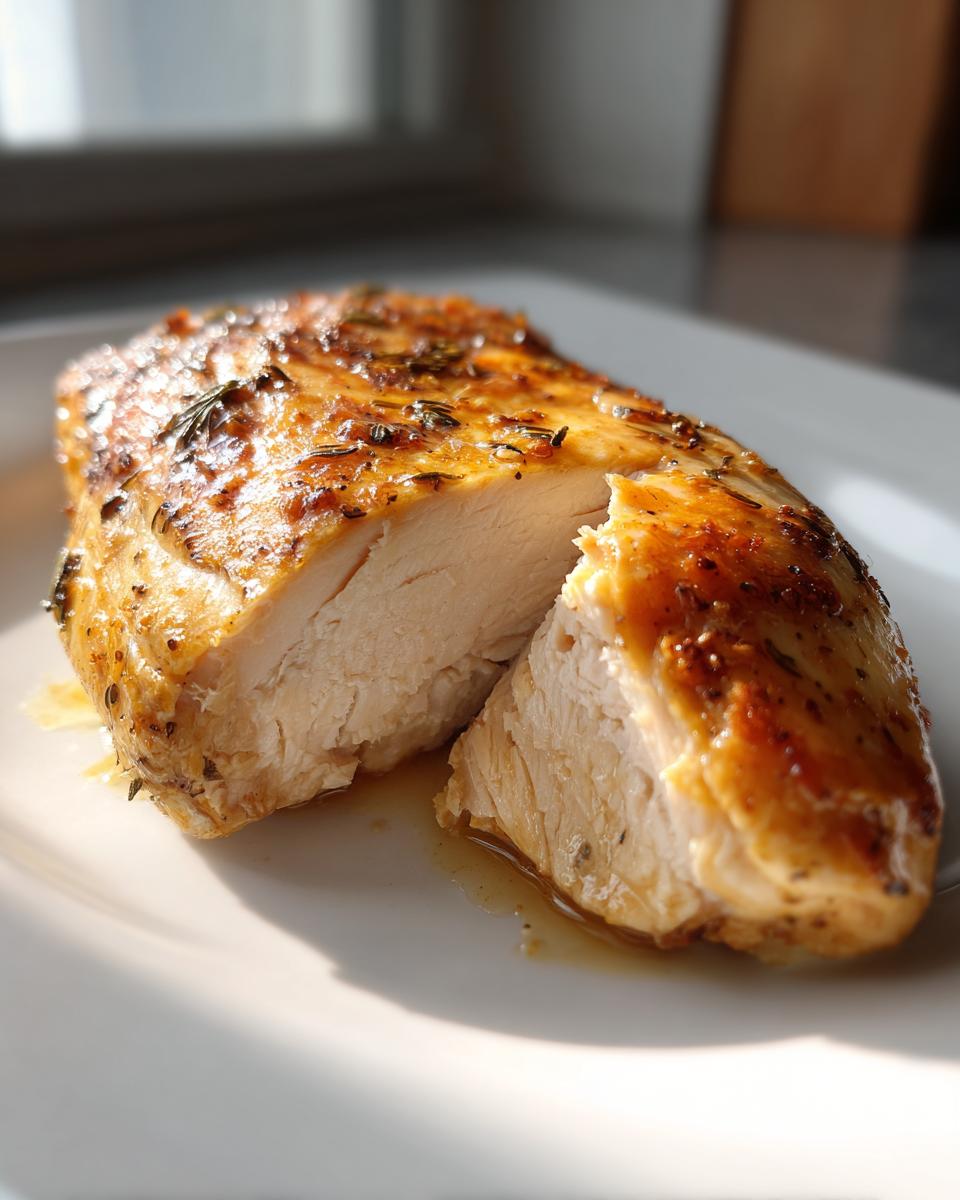
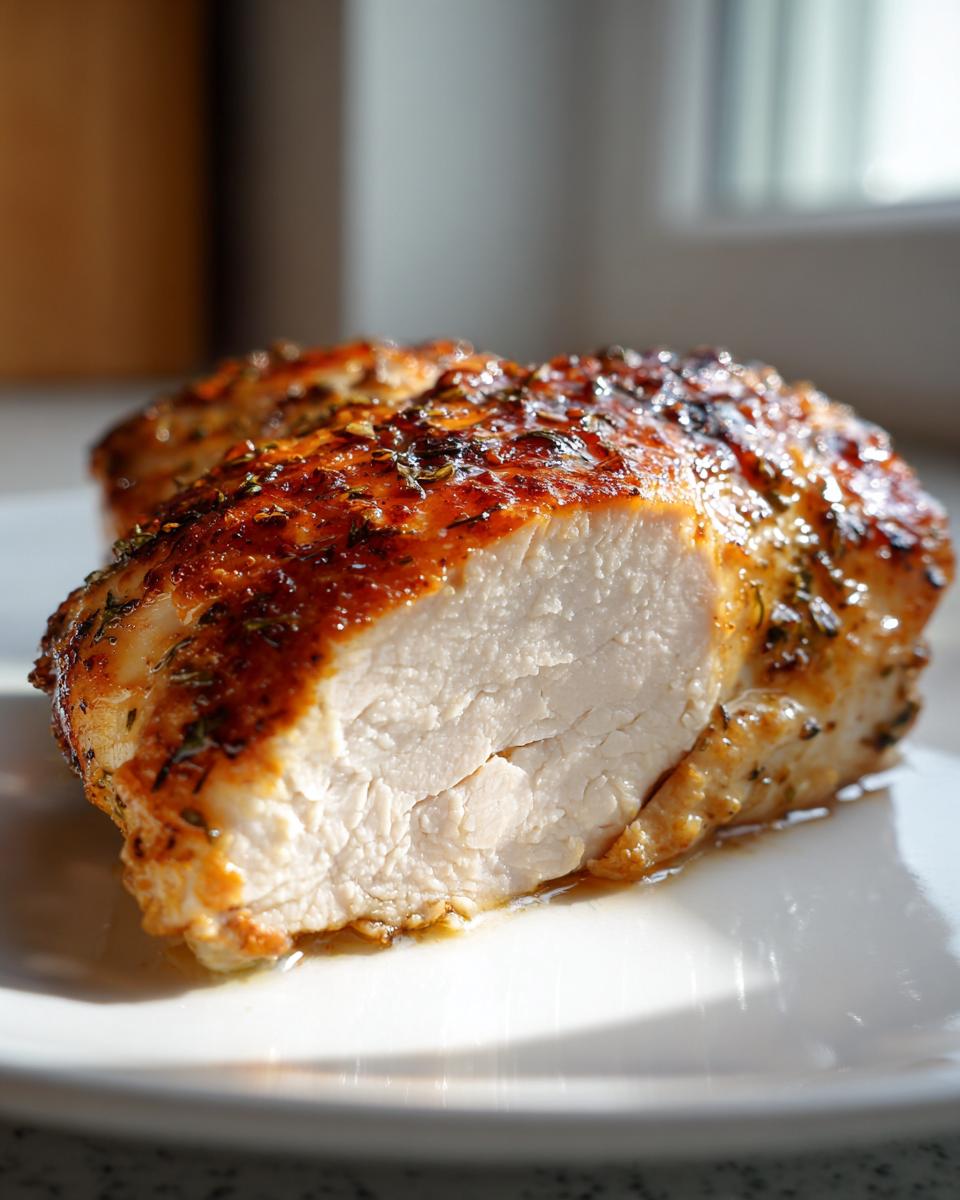
Time to get them in the heat! Place your seasoned beauties into that prepared baking dish. Now, the clock starts ticking, but don’t stare obsessively. Bake these for about 20 to 25 minutes. However, forget the timer for a second! We are looking for an internal temperature of 165°F (74°C) right in the thickest part of the meat. This is the single most important thing for getting tender oven baked chicken, because overcooking by even two minutes can ruin everything.
Once that thermometer hits the magic number, pull them out immediately. Remember what I said earlier about resting? You absolutely must let the chicken rest on a cutting board for a full 5 minutes before you slice into it. If you cut it right away, all the juices run out onto the board. Let them settle back in! If you are looking for a simple side dish to go with this, I have a great recipe for quick stovetop cheesy rice that pairs perfectly.
Flavor Variations: Beyond Simple Chicken Breast Seasoning
I absolutely love that initial simple seasoning because it’s the perfect canvas, but sometimes you just need a flavor kick, right? Don’t worry, this foolproof method for baked chicken breast handles flavor upgrades beautifully without ever sacrificing that juicy tenderness we worked so hard for!
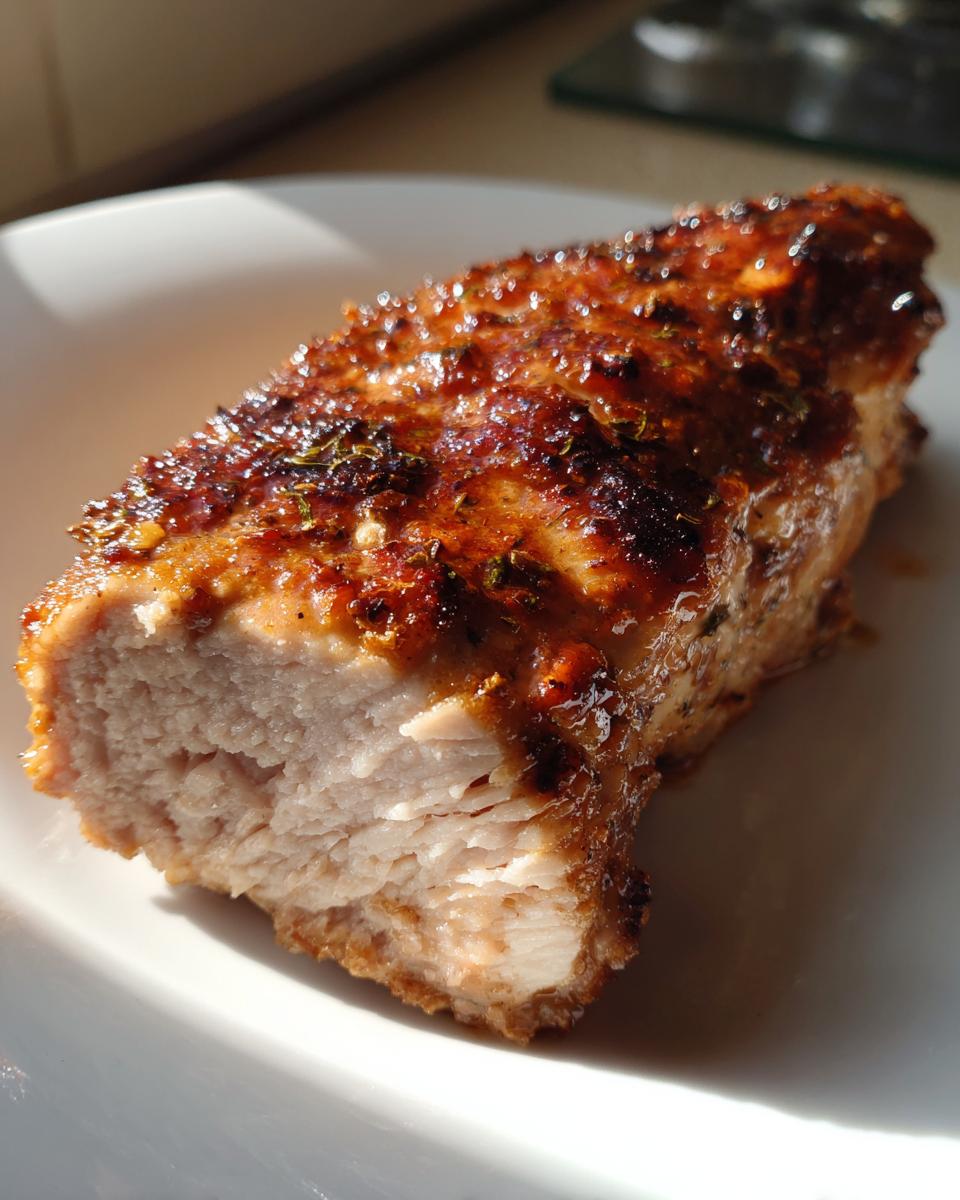
The easiest way to change things up is by adding a little fat to the surface, which does wonders for flavor infusion. My favorite little tweak is turning this into a fantastic garlic butter baked chicken. It makes the house smell incredible, and it requires almost zero extra effort!
To do this, take about 2 tablespoons of softened butter and mix in one clove of garlic that you’ve minced up super fine. Seriously, just rub that glorious mixture all over the top of the chicken breasts before they go into the oven. You get that rich, savory flavor, and the butter keeps the surface extra moist. It’s such a satisfying upgrade!
If you are looking for recipe inspiration on making killer butters, I highly recommend checking out my guide to making amazing compound garlic butter too, even though you only need a tiny bit for this chicken!
Making This Baked Chicken Breast Recipe Keto Friendly
If you are tracking carbs—and honestly, who isn’t trying to eat a little cleaner these days?—you’ll be thrilled to know this base recipe is naturally fantastic for lower-carb eating. When we stick to just our spices and olive oil, these are some truly great low carb baked chicken breasts.
Because we are avoiding sugary sauces or flour thickeners, this recipe fits right into almost any low-carb lifestyle. It’s a certified keto baked chicken recipe option! You get that massive protein punch our bodies love without worrying about hidden sugars. It makes planning for the week so much easier when you have a reliable, high-protein staple like this one ready to go.
Tips for Baked Chicken Breast for Meal Prep Success
Okay, I love making something delicious for dinner, but I *really* love knowing what I’m eating for lunch tomorrow—or even the next few days! This baked chicken breast for meal prep is one of my absolute favorites because it holds up so well.
The biggest mistake people make with meal prep chicken is putting it away while it’s still hot. Don’t do it! If you trap that steam inside a tight container, you’re basically steaming your perfectly baked chicken breast, and it gets weirdly soggy. You need to let the chicken cool down completely on the counter first. It sounds tedious, I know, but I promise it keeps the texture spot-on.
Once it’s totally cool, slice it up, or leave it whole—your choice! Then, pop it into airtight containers. I really prefer glass containers myself; they last longer and microwave so much better than plastic.

This chicken is super versatile once it’s prepped. You can chop it up for salads, shred it for tacos later in the week, or just have a solid, healthy protein ready for quick assembly. For more ideas on making your week easy, check out how I use similar time-saving methods for planning breakfasts via my easy egg muffin recipes. Having protein already done makes everything else feel simpler!
Serving Suggestions for Your Quick Weeknight Chicken Dinner
So you nailed the perfectly juicy baked chicken breast—congratulations! Now, what are you serving with this masterpiece? Since the chicken takes just a few basic spices, it is the most wonderful base for almost any side dish you want to throw together quickly.
We are aiming for speedy, cozy pairings that make this a true, ready-in-a-flash dinner. Here are my two go-to suggestions when I’m busy but still want something hearty and flavorful.
Starch Side: Butter Rice That Shines
You simply cannot go wrong with rice, but let’s make it interesting! Instead of plain white rice, try whipping up some buttered rice seasoned just lightly with a little garlic and pepper. It’s comforting, it soaks up any stray juices from the chicken, and it feels much more special than plain rice. If you want the exact ridiculously easy recipe I use all the time, it’s right here on my butter rice recipe page. Trust me, the subtle garlic notes complement the chicken seasoning perfectly.
Vegetable Side: Steamed Green Beans with Lemon
For your vegetable, keep it green and bright to cut through the richness. I just steam fresh or frozen green beans until they are crisp-tender—don’t overcook them! Right before serving, toss them with a tiny bit of the olive oil we used for the chicken, a sprinkle of salt, and a generous squeeze of fresh lemon juice. That little bit of acid wakes everything up and makes the whole plate taste fresh. It’s colorful, healthy, and takes maybe seven minutes total. Perfect for wrapping up that quick weeknight chicken dinner!
Frequently Asked Questions About Baked Chicken Breast
I get so many notes from people who try this recipe, and honestly, most of the questions circle back to the same two things: time management and texture. It happens to everyone when you’re trying to whip up a quick weeknight chicken dinner! I gathered up the most common worries so you can cook with total confidence next time.
If you’re looking for ways to make your whole week easier, you might want to bookmark some of the tips we shared in our easy weeknight dinners post too!
Can I cook this baked chicken breast recipe from frozen?
Oh, sweetie, please don’t try to go straight from the freezer to the oven with this bake! If you bake, say, a 6-ounce chicken breast straight from frozen, the outside is going to be completely cooked and probably dry by the time the center thaws enough to actually cook through. You’ll end up with that rubbery exterior we are trying so hard to avoid in our quest for the juicy baked chicken breast.
My advice? Plan ahead! Thaw it in the fridge overnight. If you are ever in a real pinch and forget to thaw it, just pop it in the microwave on the defrost setting until it’s mostly pliable, then pat it totally dry before seasoning and proceeding with the oil and spices. But honestly, thawing overnight gives you the best chance at getting that tender oven baked chicken we aim for.
What is the safest internal temperature for baked chicken breast?
This is a non-negotiable safety check, and it’s what Eleanor reminds everyone about—food safety comes before flavor, always! The USDA guidelines are very clear on this: your baked chicken breast is perfectly cooked and safe for everyone in the family when the internal temperature hits exactly 165°F (74°C) when checked at the thickest part of the meat.
It’s worth investing in a decent instant-read thermometer. Seriously, it’s the tool that separates the dry, worrisome cooks from the confident ones. Once you hit 165°F, pull it out right away and let it rest. Remember, Resting = Juice! This simple check is the key to making sure your next batch of healthy baked chicken ideas turns out safe and delicious.
Nutritional Estimates for Healthy Baked Chicken Ideas
I know so many of you out there are trying to keep things straightforward while hitting your macros or staying within certain dietary goals. That’s why I always include the basic estimates we calculated during testing. It’s good to have a ballpark idea when you’re planning out your week, especially if you’re building out those meal prep containers!
Remember, since this recipe is pretty basic—just chicken, oil, and spices—it makes fantastic healthy baked chicken ideas. These numbers are based on one serving (one 6-8 oz breast) using the simple seasoning mix we detailed above:
- Calories: 220
- Protein: 40g
- Fat: 6g
- Carbohydrates: 1g
- Sugar: 1g
Now, just a quick little heads-up from me to you: These figures are estimates, you know? They can shift a tiny bit depending on how much oil you rubbed on, or if one chicken breast was slightly bigger than the next. That’s the reality of cooking with natural ingredients! If you were swapping in that maple glaze or using way more butter for a garlic butter baked chicken variation, of course, those numbers would jump up a bit. But using our base recipe, you’ve got a super lean, high-protein cornerstone for any healthy menu!
Share Your Juicy Baked Chicken Breast Success
I’m so excited for you to try this method! If you followed along, you should have a pan full of the most beautifully tender and juicy baked chicken breast you’ve made all year. Seriously, don’t let that success stay quiet!
I really want to hear about it! Did you finally conquer the dryness issue? Did your family actually ask for seconds? Head down to the comments section below and leave me a star rating—five stars if your chicken didn’t dry out, naturally! Tell me what simple side dishes you paired with it or if you tried that garlic butter baked chicken variation!
Sharing your results helps other home cooks feel brave enough to try new things, and honestly, seeing your triumphs is what keeps Ellie motivated here at DeliceRecipe. If you loved this simple, family-focused recipe, don’t forget to tag me on social media so I can cheer you on! If you ever have any questions or want to send general feedback about the site, you can always reach out through the Contact Page. Happy cooking, friend!
PrintThe Ultimate Juicy Baked Chicken Breast: Simple Seasoning & Foolproof Method

Follow this simple method to bake chicken breasts in the oven that stay tender and juicy every time. This recipe uses basic seasoning perfect for weeknight dinners or meal prep.
- Prep Time: 10 min
- Cook Time: 25 min
- Total Time: 35 min
- Yield: 4 servings 1x
- Category: Dinner
- Method: Baking
- Cuisine: American
- Diet: Low Fat
Ingredients
- 4 boneless, skinless chicken breasts (about 6–8 oz each)
- 1 tablespoon olive oil
- 1 teaspoon salt
- 1/2 teaspoon black pepper
- 1 teaspoon garlic powder
- 1/2 teaspoon onion powder
- 1/2 teaspoon dried oregano
- 1/4 teaspoon paprika
Instructions
- Preheat your oven to 400°F (200°C). Lightly grease a baking dish or line it with parchment paper.
- If your chicken breasts are very thick, pound them to an even thickness (about 3/4 inch) to promote even cooking. This helps prevent drying out the thinner ends.
- In a small bowl, mix together the salt, pepper, garlic powder, onion powder, oregano, and paprika for your simple chicken breast seasoning.
- Rub the olive oil over all sides of the chicken breasts.
- Sprinkle the seasoning mix evenly over both sides of the chicken breasts, pressing gently so it adheres.
- Place the seasoned chicken breasts in the prepared baking dish.
- Bake for 20 to 25 minutes. The exact time depends on the thickness of the chicken.
- Use a meat thermometer to check for doneness. The internal temperature should read 165°F (74°C) at the thickest part.
- Remove the chicken from the oven and let it rest on a cutting board for 5 minutes before slicing or serving. Resting allows the juices to redistribute, keeping the meat tender.
Notes
- For a Garlic Butter Baked Chicken variation, melt 2 tablespoons of butter with 1 clove of minced garlic and brush this mixture over the chicken before baking.
- To ensure juiciness, avoid overcooking. Always rely on a meat thermometer rather than time alone.
- This recipe is excellent for meal prep; store cooled chicken in airtight containers for up to 4 days.
- This preparation fits well within a keto meal plan delivery structure due to its low carbohydrate content.
Nutrition
- Serving Size: 1 breast
- Calories: 220
- Sugar: 1
- Sodium: 350
- Fat: 6
- Saturated Fat: 1
- Unsaturated Fat: 5
- Trans Fat: 0
- Carbohydrates: 1
- Fiber: 0
- Protein: 40
- Cholesterol: 110