

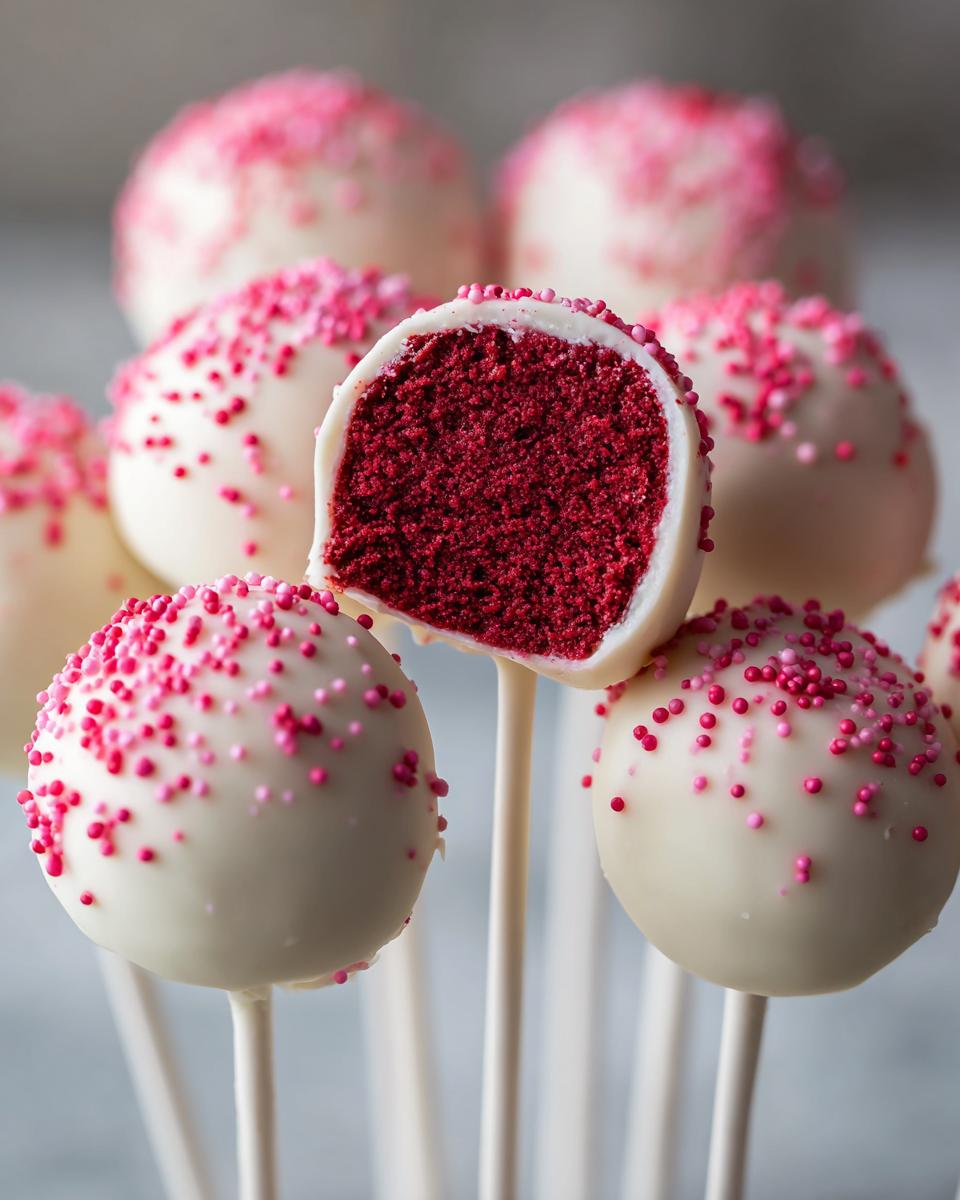
If you need a showstopper dessert that disappears the second you bring it out, stop scrolling right now! I’m talking about the ultimate party staple: red velvet cake pops. Look, I know baking for a crowd can feel like a big commitment, but I founded this site because I believe the best food should be reliably delicious, not ridiculously complicated. That’s why this recipe is my absolute favorite hack: we’re turning a simple red velvet cake mix into the most unbelievably moist red velvet cake pops you’ve ever tasted, thanks to one non-negotiable creamy binder. Trust me, these always get rave reviews!
- Why These Are the Best Red Velvet Cake Pops Recipe You Will Make
- Gathering Ingredients for Your Homemade Red Velvet Pops
- Step-by-Step Instructions for Perfect Red Velvet Cake Pops
- Tips for Success When Making Red Velvet Cake Pops
- Storage & Make-Ahead Tips for Festive Cake Pops
- Variations on These Bite Sized Red Velvet Dessert Bites
- Serving Suggestions for Your Red Velvet Cake Pops
- Frequently Asked Questions About Red Velvet Cake Pops
- Estimated Nutritional Data for Red Velvet Cake Pops
Why These Are the Best Red Velvet Cake Pops Recipe You Will Make
If you’ve ever felt disappointed by cake pops that tasted dry, or spent hours trying to get a crumbly mixture to hold its shape, I hear you! Those sad, cracked shells are the reason I spent months perfecting this particular method. This is hands-down the easy red velvet cake pops recipe you need in your back pocket for quick party prep. We ditch the fuss but keep all the flavor.
- They truly deliver the moist red velvet cake pops experience every single time.
- We start with a simple box mix, cutting down on complexity instantly.
- They look beautiful and hold their perfectly round shape after chilling.
Achieving Ultra-Moist Red Velvet Cake Pops Every Time
The real game-changer here? That block of cream cheese! Forget recipes that just smash cake crumbs with canned frosting—that often results in something too sweet and too soft. By mixing in softened cream cheese, we create a firm, rich binder that keeps the interior unbelievably creamy and moist. This method guarantees reliability for the home cook, which is always my top priority!

Gathering Ingredients for Your Homemade Red Velvet Pops
Okay, now that we know how unbelievably moist these little delights will be, let’s talk about gathering our supplies! Remember, this is an easy red velvet cake pops recipe because we are leaning on a quality box mix. I promise, nobody will ever guess! We need just a few main things for the cake itself, and then your binding agent, which is our secret sauce. Getting your ingredients ready first makes the whole assembly process so smooth, especially when you are planning these for easy dessert for parties.
Cake Base and Cream Cheese Filling Ingredients
First up, grab one standard box of red velvet cake mix—make sure it’s the 15.25 ounce size for the right ratio. You’ll also need the ingredients called for on that box, usually eggs, oil, and water. But here is where we upgrade: we need a full 8 ounce package of cream cheese, and I mean *fully* softened to room temperature, or it won’t mix right! You’ll also need about two cups of powdered sugar, sifted so you don’t get lumps, plus a little vanilla extract. If you want that deep, vibrant red that just screams Valentine’s Day, I often add in just a touch more red food coloring, but that’s totally up to you!
Chocolate Coating and Decoration for Red Velvet Cake Pops
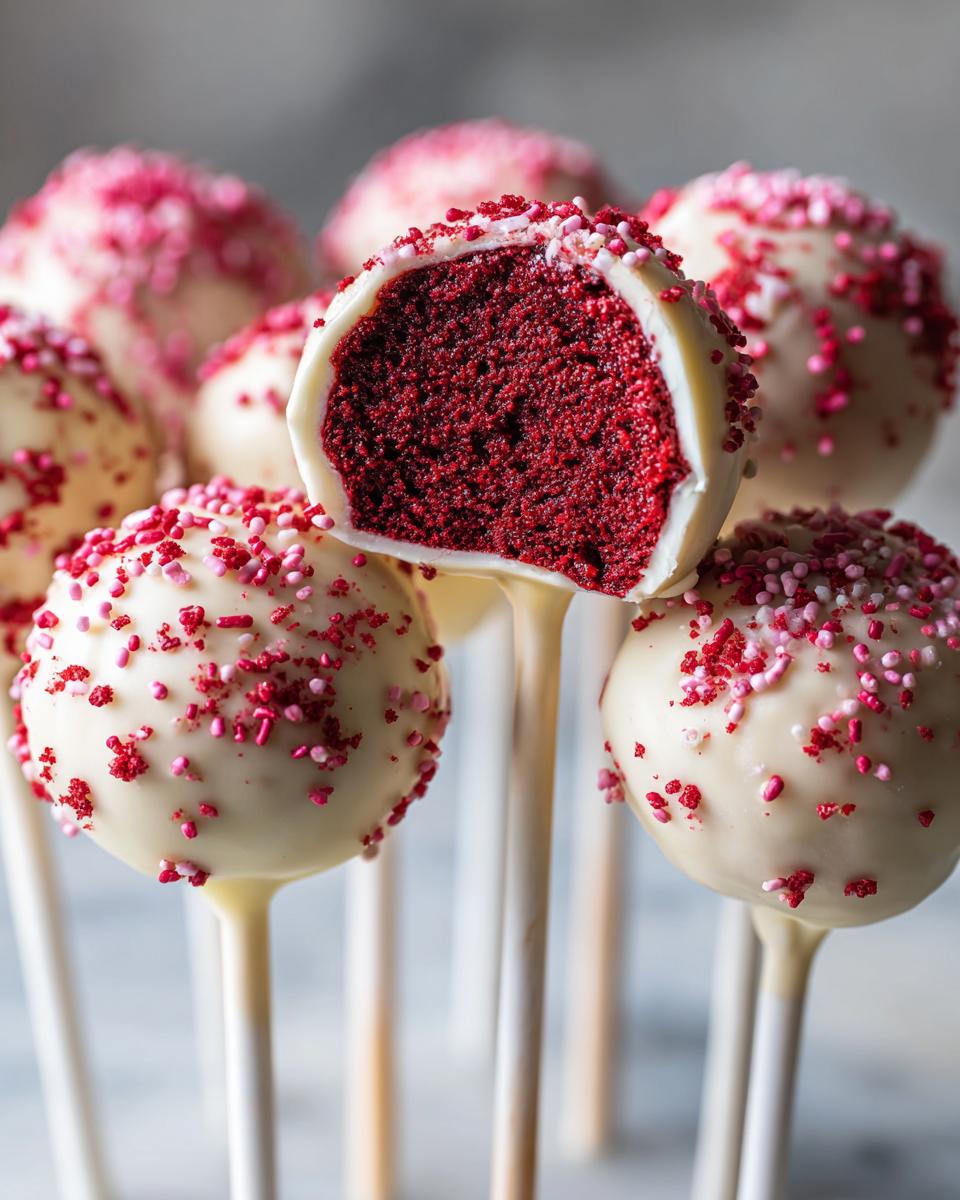
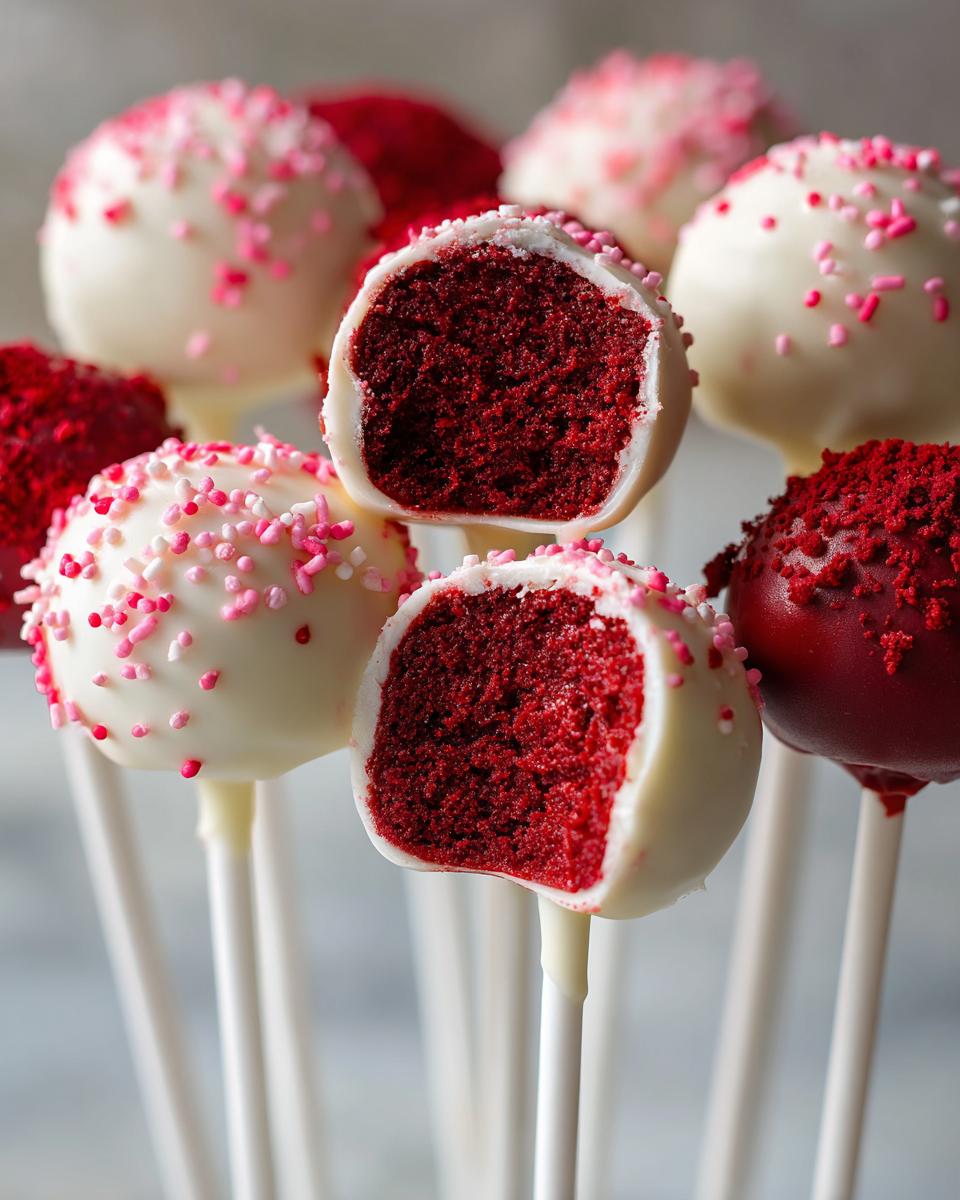
For the outer shell, skip the regular chocolate chips because they get clumpy, and grab about 12 ounces of white chocolate melting wafers. These melt like a dream! I always throw in just a few drops—maybe a teaspoon—of coconut oil or shortening. This small addition makes the melted chocolate thinner, so you get a thin, smooth coat instead of a thick, bumpy one. And naturally, you need sprinkles! I keep a jar of bright red or pink ones ready for when we make these amazing valentines day cake pops.
Step-by-Step Instructions for Perfect Red Velvet Cake Pops
Alright, deep breaths! This is where the magic happens, and I promise it is easier than assembling IKEA furniture. Getting these red velvet cake pops right depends entirely on following a simple sequence, especially when it comes to chilling. You bake the cake, and then we go into mixing, rolling, chilling, dipping, and decorating. Don’t rush the chilling time—that’s the absolute key to avoiding cracked shells. Once those cake balls are firm, preparing them for their chocolate blanket is simple. I always follow these steps exactly to ensure I get those perfectly coated, beautiful chocolate dipped cake pops for any gathering. I learned from Ellie herself that swapping water for buttermilk in the cake mix boosts the richness, so definitely try that little trick! The essential guide on how to make cake pops really highlights why chilling is number one.
Baking and Creating the Cake Ball Dough
First things first, bake your red velvet cake according to the box directions, using that buttermilk swap if you’re feeling adventurous! Once the cake is totally cool—and I mean no warmth left at all—you need to crumble it up nicely in a big bowl. Get rid of any gross, deep brown edges, since those dry bits won’t mix into our dough well. Next, beat that softened cream cheese with your powdered sugar and vanilla until it’s silky smooth. Then, it’s messy time: add the cream cheese mixture to the crumbs and use your hands to squish it all together. You are looking for a texture where the dough holds its shape firmly when you squeeze a chunk between your fingers. If it’s going to be a true success, it should feel like playdough!
Chilling and Preparing Sticks for Red Velvet Cake Pops
Now we give our dough a chance to firm up; this cannot be skipped! Roll your dough into little one-inch balls and lay them all out on parchment paper. They go into the fridge for a minimum of two hours. Seriously, go watch a movie or something! If they aren’t cold, they will wobble and crack when you dip them. While they chill, melt your white chocolate wafers gently. Once the balls are rock hard, grab a stick, dab the very tip into the melted chocolate, and poke it about halfway into the cake ball. That little bit of chocolate acts like super glue! Pop the sheet back into the fridge for about ten minutes so that initial seal sets hard.
Dipping and Decorating Your Chocolate Dipped Cake Pops
Time for the fun part! Take your chocolate bowl out. If your melted chocolate seems thick, stir in that optional bit of coconut oil—it helps tremendously with smooth coating. Hold the stick and dip the entire chilled ball into the chocolate. You need to completely submerge it, then lift it straight out. Rotate your wrist and gently tap the stick against the side of the bowl until the extra chocolate drips off. Don’t wait! As soon as that coating is just starting to look dull, shower it with your sprinkles of choice. Slide the stick into a Styrofoam block or a designated cake pop stand so they dry standing straight up. Try not to touch them until they are totally hard; patience pays off!
Tips for Success When Making Red Velvet Cake Pops
Even though this is my go-to easy red velvet cake pops recipe, sometimes things go a little sideways in the kitchen, right? That’s totally normal! My goal is to make sure your treats look like the ones on my counter every time. We’ve already talked about chilling, but let’s nail down those last few troubleshooting points. If you can keep your dough firm and your chocolate smooth, you’ve won half the battle! This is the kind of honest advice I wish I had when I first started dipping these little beauties for fun gatherings. Check out my tips below, and you’ll be set to impress your crowd. For more pointers on making these look professional, check out my tips on cake pop decorating tips.
Troubleshooting Common Red Velvet Cake Pops Issues
If your dough feels way too soft after you mix in the cream cheese, don’t panic or add more sugar—that will just make things worse! The fix is simple: just pop the whole bowl back in the fridge for another 30 minutes. That extra cold time lets the butter in the cream cheese firm up, making rolling much easier, which is crucial for nice uniform red velvet cake pops. Now, about that white chocolate dip: the number one enemy of smooth coating is water. If your chocolate starts looking grainy or thick—that’s called seizing—it means a tiny drop of water got in there. When that happens, you can sometimes save it by stirring in a teaspoon of vegetable oil or shortening, but honestly, if it’s too far gone, just melt a fresh batch. Always use completely dry bowls when melting your coating!
Storage & Make-Ahead Tips for Festive Cake Pops
The best part about making these red velvet cake pops? You absolutely can make them ahead of time, which is a lifesaver when you’re prepping for big events! For those birthday party dessert ideas or special treats for a holiday, getting them done early saves so much stress. Once they have completely hardened after decorating, just place your finished pops into a sturdy, airtight container. I always put a piece of parchment paper between layers just in case they stick, though usually they don’t. They keep beautifully in the refrigerator for up to a week. Just pull them out about 30 minutes before serving so the chocolate casing warms up just a tiny bit. They are always a hit! You can even check out my guide on other great make-ahead desserts for more inspiration.
Variations on These Bite Sized Red Velvet Dessert Bites
While the classic white chocolate coating is just gorgeous, don’t feel like you have to stick to it! If dipping feels like too much work one day, you can totally skip the sticks and just roll these into tight rounds. Voila—you have quick red velvet cake balls! They are just as delicious, maybe even faster, and perfect for tucking into little candy cups. If you want a richer look on that stick, try melting dark chocolate wafers instead of white; the deep brown really pops against the red velvet inside. I also love using milk chocolate sometimes for a sweeter alternative. Experimenting with coatings is half the fun of making these bite sized red velvet dessert bites!
Serving Suggestions for Your Red Velvet Cake Pops
Once these beauties are set, how you display them can really make them shine! For a big event, skip the standard styrofoam block and try arranging them artfully in a galvanized bucket filled with red or pink coordinating sprinkles—it looks super festive. They make the most thoughtful little gifts wrapped up two or three at a time in cellophane tied with a nice ribbon. Honestly, they are perfect alongside a simple cup of hot coffee for an afternoon treat, but most often, I use them as the star of various easy dessert for parties tables!
Frequently Asked Questions About Red Velvet Cake Pops
I know when you look at a recipe like this, you start having a million little internal questions pop up! That’s okay! That’s why I want to cover the most common things I get asked about making these moist red velvet cake pops, especially when people are trying to make them for the first time for a big event. We want these to be simple, right? So let’s clear up any confusion about ingredients and logistics so you can feel totally confident about making these stunning little treats for your next celebration. If you’re looking for other easy make-ahead ideas, you might enjoy my post on no bake red velvet treats!
Can I skip the cream cheese and use regular frosting for my red velvet cake pops?
You certainly *could*, but I really, really wouldn’t recommend it for this specific recipe! Many traditional cake pop recipes rely solely on canned frosting, which is mostly sugar and oil. That tends to make a very soft, almost sticky ball that crumbles apart easily when you dip it. Since these are cream cheese cake pops by design, that cream cheese gives us the perfect density—it’s structured but still incredibly moist. If you skip it, you risk making very delicate red velvet cake balls that might not survive the chocolate coating process!
How do I transport these easy red velvet cake pops to a party?
Transporting these amazing little treats requires a little planning, especially if you are driving across town! The key word here is *chilled*. Once your pops are fully set, put them back into that airtight container we talked about. You want to keep them cold right up until you get to the venue. If it’s a really hot day, bring a small cooler bag with an ice pack, but make sure the ice pack isn’t sitting directly on the pops, as condensation can make the chocolate sweaty. As soon as you arrive, find a cool spot, and place them straight into a sturdy stand or a simple floral foam block so they stand tall and safe!
Estimated Nutritional Data for Red Velvet Cake Pops
Now, I always feel a little weird posting this because these are treats, not everyday diet food! But for those of you who like to keep track, here is what I estimate for one of these gorgeous red velvet cake pops. Remember, because we are starting with a cake mix and adding cream cheese and chocolate coating, these are meant to be an indulgence. Treat yourself! These numbers are just an estimate, of course, and will change based on the specific brand of white chocolate wafers you use. If you are trying to keep track of intake while planning meals, check out my guide on the best ways to handle meal planning.
- Serving Size: 1 pop
- Calories: 250
- Sugar: 28g
- Fat: 14g
- Protein: 3g
ULTRA MOIST Red Velvet Cake Pops: The Perfect Party Treat (Easy Cream Cheese Filling!)

Make moist, rich red velvet cake pops using this easy recipe. These bite-sized treats use cream cheese for the perfect texture and are coated in smooth chocolate, ideal for parties or gifts.
- Prep Time: 45 min
- Cook Time: 30 min
- Total Time: 155 min
- Yield: 24 pops 1x
- Category: Dessert
- Method: No Bake (after cake baking)
- Cuisine: American
- Diet: Vegetarian
Ingredients
- 1 box (15.25 oz) red velvet cake mix
- Ingredients listed on cake mix box (usually eggs, oil, water)
- 1 package (8 oz) cream cheese, softened
- 2 cups powdered sugar, sifted
- 1 teaspoon vanilla extract
- 1/4 cup red food coloring (optional, for deeper color)
- 12 ounces white chocolate melting wafers
- 1 tablespoon coconut oil or shortening (optional, for smoother dip)
- Red or pink sprinkles for decoration
Instructions
- Prepare the red velvet cake according to the package directions, substituting water with milk if desired for extra richness. Bake the cake in a 9×13 inch pan. Let the cake cool completely.
- Crumble the cooled cake into a large bowl, removing any burnt edges. Discard the sticks or hard edges.
- In a separate bowl, beat the softened cream cheese, powdered sugar, and vanilla extract until smooth. If you want a deeper red color, mix in the red food coloring now.
- Add the cream cheese mixture to the cake crumbs. Mix thoroughly with your hands until a uniform, thick dough forms. This dough should hold its shape when squeezed.
- Roll the dough into small, uniform balls, about 1 inch in diameter. Place the balls on a parchment-lined baking sheet.
- Chill the cake balls in the refrigerator for at least 2 hours, or until firm. This step prevents cracking when dipping.
- Prepare the white chocolate: Melt the white chocolate wafers according to package directions, adding the coconut oil or shortening if using to thin the chocolate slightly.
- Dip the tip of a lollipop stick into the melted chocolate, then insert the stick about halfway into a chilled cake ball. Return the sheet to the refrigerator for 10 minutes to set the chocolate seal.
- Hold the stick and dip the entire cake ball into the melted chocolate, rotating to coat completely. Tap the stick gently against the side of the bowl to remove excess chocolate.
- Immediately decorate the wet chocolate coating with sprinkles.
- Place the finished cake pops upright in a styrofoam block or cake pop stand to dry completely before serving.
Notes
- For the moistest result, use the ingredients listed on the box but substitute water with an equal amount of buttermilk.
- If your cake dough seems too soft after mixing, chill it for an extra 30 minutes before rolling.
- To prevent the chocolate coating from seizing, use microwave-safe bowls and stir every 30 seconds during melting. Do not let water get into the chocolate.
- If you are looking for easy dessert for parties, making these ahead of time and storing them in an airtight container in the refrigerator works well.
Nutrition
- Serving Size: 1 pop
- Calories: 250
- Sugar: 28
- Sodium: 150
- Fat: 14
- Saturated Fat: 8
- Unsaturated Fat: 6
- Trans Fat: 0.5
- Carbohydrates: 30
- Fiber: 1
- Protein: 3
- Cholesterol: 25