
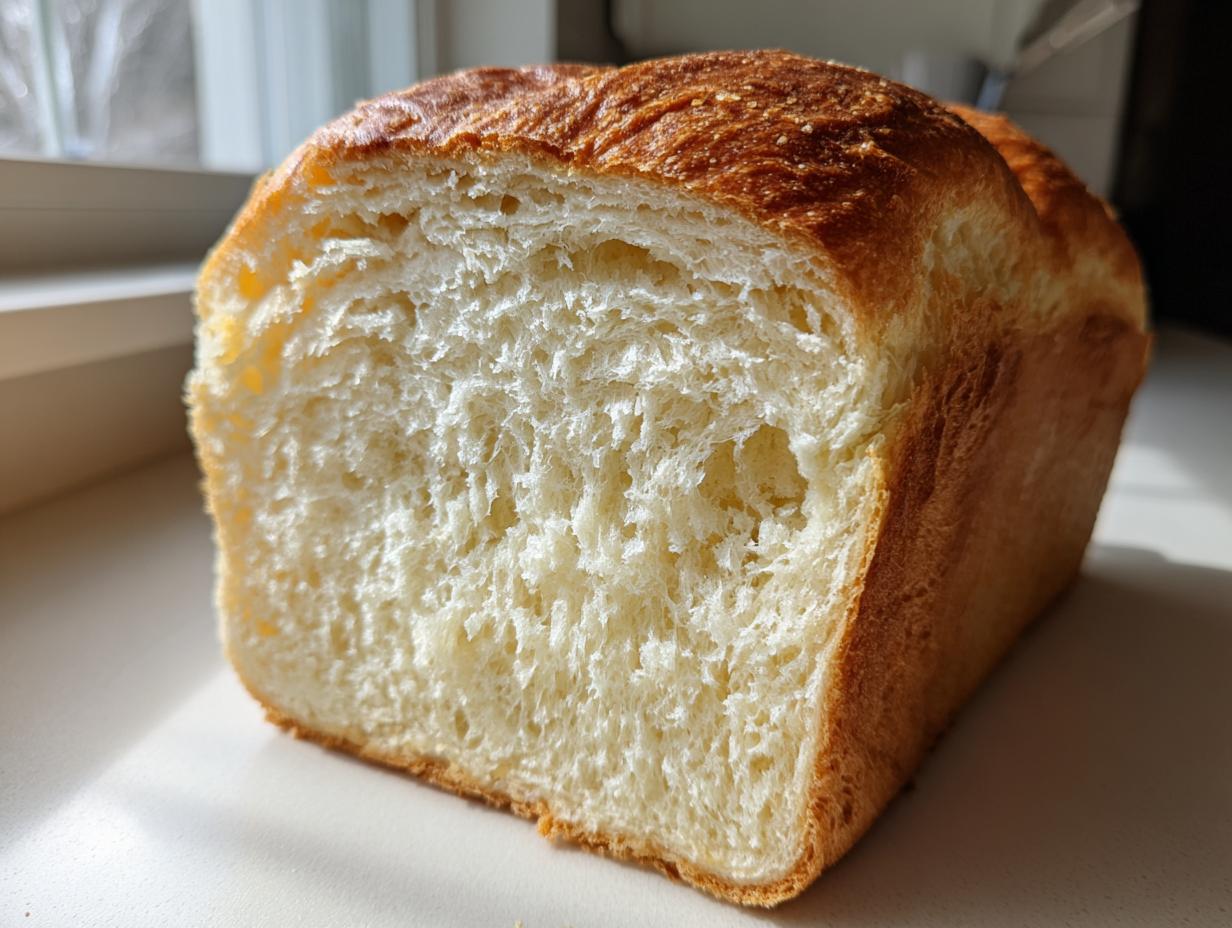
Oh, friends, have you ever just closed your eyes and imagined the softest slice of bread you’ve ever tasted? That pillowy, cloud-like texture that just melts when you bite into it? That’s what we are chasing today with this incredible milk bread recipe. Forget those intimidating Asian bakery loaves that make you feel like you need a chemistry degree; this recipe, true to the DeliceRecipe philosophy, delivers that unbelievable softness reliably, perfect for your everyday toast and sandwiches.
When I started this whole recipe project, echoing what Ellie Vance always believes here at the site—that great flavor should never mean complicated work—I knew we needed a foolproof, go-to loaf. This method skips the fancy starter techniques but keeps all the richness. Trust me, once you pull this homemade milk bread out of the oven, you’ll wonder why you haven’t been making it every week.
If you want to hear more about our commitment to simple, real-deal home cooking, you can always check out our story!
- Why This Simple Milk Bread Recipe Works So Well (Expert Tips)
- Ingredients for Your Homemade Milk Bread Loaf
- Step-by-Step Instructions for Perfect Milk Bread
- Ingredient Notes and Substitutions for Milk Bread
- Making Japanese Milk Bread Variations (Beyond the Basic Loaf)
- Tips for Success When Baking Milk Bread at Home
- Storing Your Homemade Milk Bread for Maximum Freshness
- Frequently Asked Questions About Milk Bread
- Serving Suggestions for Your Fresh Milk Bread
- Nutritional Estimates for This Milk Bread Loaf
- Share Your Homemade Milk Bread Creations
- Serving Suggestions for Your Fresh Milk Bread
- Nutritional Estimates for This Milk Bread Loaf
- Share Your Homemade Milk Bread Creations
Why This Simple Milk Bread Recipe Works So Well (Expert Tips)
You bake this loaf once, and suddenly, regular white bread just tastes… sad. It’s not magic, promise! The sheer richness of this milk bread is what sets it apart from everything else you’ve made. We are relying heavily on milk and butter here, which pump up the fat and protein content way more than just using water.
That’s the key to that amazing, cozy texture. It’s all about that lovely tenderness that makes this an absolute Soft Milk Bread favorite. I know everyone raves about the Japanese versions, but honestly, you don’t need to fuss with making a separate starter dough for this recipe to be wonderful. It’s delicious without all the extra steps!
The Secret to Fluffy Bread Recipe Texture
So, why is it so much softer than, say, a standard dinner roll recipe? It comes down to liquids! Milk contains higher fat and protein than water. When that fat coats the flour particles, it literally shortens the gluten strands that form when you mix and knead. Shorter gluten means a less chewy and much more tender crumb. That’s the basic science behind why this fluffy bread recipe is different. While folks making Tangzhong Bread achieve amazing elasticity using a cooked paste, we get near-pantry-level softness just by swapping out water for warm milk. Easy, right?
Achieving the Best Milk Bread Loaf for Sandwiches
If you want that perfect, tall, beautiful square when you cut it, two things matter most, even in this easy recipe. First, your egg needs to be room temperature. Cold eggs shock the yeast and slow down that initial rise. Second, you cannot rush the kneading! You need that gluten fully developed—look for that smooth, slightly tacky surface—so the dough can capture all the gases from the yeast. That perfect structure is what keeps your Sandwich Bread Homemade from collapsing while baking and cooling. It’s worth the 10 minutes of kneading, I swear!
Ingredients for Your Homemade Milk Bread Loaf
Okay, pulling together your ingredients is the first hurdle, and honestly, it uses such standard stuff! I keep these ingredients stocked at all times now because I find myself wanting to make this homemade milk bread constantly. Seriously, this loaf is fantastic with leftover chicken from easy weeknight dinners—it makes the best grilled cheese!
Remember what I said earlier about temperature? Pay close attention to those small details, and you’ll get that amazing texture. Here is exactly what you need:
- 1 cup Milk, warmed slightly
- 3 tablespoons Granulated Sugar
- 1 teaspoon Salt
- 2 1/4 teaspoons Active Dry Yeast
- 1 large Egg, room temperature
- 3 tablespoons Unsalted Butter, softened
- 3 1/2 cups All-Purpose Flour, plus more for dusting
Just make sure that butter isn’t melted or greasy—softness is the goal! And please, don’t let that warm milk get hot, or you’ll kill your yeast before it even gets a chance to do its bubbly job.
Step-by-Step Instructions for Perfect Milk Bread
Alright, the exciting part! Rolling up our sleeves and turning liquid into that stunning, fluffy loaf. Don’t get intimidated by the list; we’re just taking it one logical step at a time. This is how we guarantee that melt-in-your-mouth texture every single time. These directions mean business, so grab your pan and let’s get started on what will become your favorite easy breakfast idea!
Activating Yeast and Mixing the Milk Bread Dough
First things first: we wake up the yeast! Pour your milk in—just nice and warm, maybe elbow temperature, not hot!—then dissolve your sugar right in there. Sprinkle that yeast on top and walk away for about 5 to 10 minutes. If you come back and it’s all foamy and bubbly on top, congratulations, your yeast is happy! Now, stir in your room-temperature egg and the softened butter. Make absolutely sure that butter is soft, not liquid. Melted butter will make the dough greasy, and we want *soft*, not slick. Then, start mixing in your flour slowly until it looks like a messy, shaggy ball.
Kneading and First Rise for Pillowy Soft Bread
Time to get messy! Turn that dough out onto your lightly floured counter. Now you need to knead—and I mean *really* knead—for about 8 to 10 minutes. Keep going until the dough stops sticking aggressively to your hands and looks smooth and stretchy. A good windowpane test is what you’re looking for! Once it’s gorgeous, put it into a lightly oiled bowl, flip it over so the top gets a little coating, and cover it up tight. Let this rest in a warm place for 1 to 1.5 hours, or until it’s pleasantly doubled in size. Patience here gets you that pillowy soft bread!
Shaping and Final Proofing of the Milk Bread Loaf
Gently punch that air out—it feels strangely satisfying, doesn’t it? Now we shape it. Roll or press it into a rough rectangle, then carefully roll it up tightly into a log. Place that log seam-side down right into your greased 9×5 inch loaf pan. Cover it again loosely and let it have its second nap for about 45 to 60 minutes. You’re watching for it to rise about an inch over the rim of the pan—that means you nailed the proofing! While that’s happening, go ahead and preheat that oven to 350°F (175°C).
Baking and Cooling Your Fluffy Bread Recipe
Time for the heat! Slide that beautiful loaf in and let it bake for 30 to 35 minutes until the top is that gorgeous golden brown we dream about. If you want to be absolutely sure—and I always do—tap the internal temp; you want it right around 200°F (93°C). That’s the secret to knowing it’s done all the way inside without drying out the edges! The most important part? Get it out of that pan immediately! Let this fluffy bread recipe cool completely on a wire rack, no peeking, before you even think about slicing it. Cutting it hot ruins that perfect interior structure.
Ingredient Notes and Substitutions for Milk Bread
Even with a simple recipe like this, the ingredients you choose can make or break how truly soft your milk bread ends up. Since this doesn’t use a complicated starter, the quality of the basic building blocks really shines through. Think of this as our little expert chat about ingredient excellence!
First, let’s talk milk. Use whole milk if you can, okay? Full-fat milk gives us that rich mouthfeel we are aiming for. Skim or reduced-fat milks just don’t have the fat content necessary to really tenderize the crumb the way we want. If you absolutely must substitute, water works in a pinch, but you lose that signature richness, and it pulls closer to a standard white bread texture. It won’t be bad by any means, but it won’t be *that* heavenly soft milk bread cloud.
Next, flour! I’ve got this down with All-Purpose, but if you really want to get into the weeds of bread science, using a bread flour will give you a slightly stronger gluten structure, which is great for taller loaves. However, A.P. flour works beautifully here because we are deliberately trying to *shorten* the gluten with all that fat from the butter and milk, keeping things tender. If you used bread flour, you might need to knead just a minute or two longer to develop the structure needed to hold up to that richness.
Here’s one substitution idea that I love when I’m out of butter: you can swap in an equal amount of good quality coconut oil for the butter. Now, that changes the flavor profile slightly—you get a very subtle tropical note—but the high-fat content mimics the butter perfectly in terms of texture. Just make sure the oil is solid or semi-soft when you mix it in, just like the butter!
Making Japanese Milk Bread Variations (Beyond the Basic Loaf)
Now, I know what some of you expert bakers are thinking: “Ellie, this is lovely, but I really want that famous, almost elastic, ‘pull-apart’ texture you see in authentic Japanese Milk Bread.” And that’s fair! If you’ve seen those unbelievable photos of incredibly high-rising loaves, that’s usually thanks to a specific technique.
The real secret to earning the title of Hokkaido Milk Bread often lies in using either the Tangzhong or Yudane method. Both involve cooking a small portion of the flour and liquid together first to make a thick paste. This paste essentially pre-gelatinizes the starch, allowing the dough to hold way more moisture than our simple recipe can. It’s what gives those specific loaves that incredible, almost ‘mochi-like’ softness that seems to last forever!
While we are keeping things simple today because I believe in approachable home baking, I wanted to give you a nod to those amazing techniques. If you want to see what I’m talking about and maybe want to tackle that next level of fluffiness sometime, you can check out a great deep dive on how the Yudane method works. Sometimes you just need that level of complexity for a special weekend project, especially if you are whipping up something for quick, healthy lunch recipes later in the week!
Ideas for Sweet Bread Recipe Twists
You don’t need the Tangzhong magic to have some fun with this loaf, though! If you want to boost the sweetness factor, especially if you’re skipping toppings later, try swirling in some glorious additions. My favorite for a weekend bake is spreading the dough with softened butter, sprinkling it heavily with cinnamon and brown sugar right before you roll it up for the second proofing—it makes the entire house smell divine!
You can also adapt our ideas from the Condensed Milk Bread recipes floating around. Instead of using sugar, try swapping in sweet condensed milk for part of your liquid component. You’ll get a slightly denser, richer crumb, but the sweetness is built right in. Just remember that condensed milk is thick, so if you add too much, you’ll end up with a very thick dough that needs extra patience while kneading. A little bit goes a really long way in turning this into a delightful sweet bread recipe!
Tips for Success When Baking Milk Bread at Home
Now that you have the recipe and you know the basics, let’s talk about the little things that separate a ‘good’ loaf from a ‘wow, I can’t believe I made this’ loaf. These are the guardrails I use every time I bake this, and they help fight off the biggest home baker’s fear: density! If you follow these little habits, your milk bread will always be soft and fluffy.
My first big tip, and I can’t stress this enough, is yeast freshness. You might skip checking the date on the packet when using it for pasta sauce, but for baking, it matters! If your yeast doesn’t foam up in Step 1, throw it out and start over—it probably means your first rise is going to be weak, leading to a flat, dense result. We want lift, not sadness!
Secondly, the pan matters for browning. This recipe is perfect for a standard 9×5 inch loaf pan, which gives us that classic shape. But if you notice the sides are cooking too fast before the middle is done, you can try wrapping the pan loosely in a slip of aluminum foil about halfway through baking. This shields the edges just enough to let the center catch up, ensuring you get that even golden color everywhere. Think of it as giving your loaf a little sun hat!
Here’s a tip directly from the notes about keeping things moist: If you plan to eat this bread over several days (which you will, because it’s amazing!), brush the top with a tablespoon of melted butter right when it comes out of the oven. It seals in some moisture and keeps that top crust incredibly soft and slightly shiny. It’s part of why this makes such a great meal planning staple!
Finally, when you punch down the dough after the first rise, be gentle! Those air bubbles created by happy yeast are your texture insurance. Don’t beat the life out of it; just gently deflate it before shaping. Remember, this bread is all about tenderness, not toughness.
Storing Your Homemade Milk Bread for Maximum Freshness
Okay, you pulled that perfect loaf out, and it smells like heaven. Now, here’s the critical part people often mess up: storage! You want this homemade milk bread to stay as soft and pillowy as possible, and storing it wrong is the fastest way to turn that cloud into a brick.
First rule: Do not put this in the refrigerator. I know, I know, we refrigerate lots of things to make them last, but for enriched breads like this one, the cold just accelerates staling. It might not mold as fast, but it gets hard! Keep your loaf snug on the counter. You need an airtight environment. I use a large, good-quality zip-top bag, or if I slice it first, I use a container with a very tight lid.
If you wrap it while it’s still slightly warm—and I mean *slightly*, just cooled to room temp, not hot—the residual steam helps keep the crust soft. If you wait until it’s totally cold, just wrap it tightly right away. Stored this way, this bread will stay wonderfully soft for about three days. Honestly, it never lasts that long at my house.
Now, what about those last couple of slices you stashed away? If you want to revive that ‘just baked’ softness, reheating is your best friend. Simple slicing and toasting is one option, but if you want it truly reborn, try this: Wrap your slice or a quarter loaf in aluminum foil. You can warm it quickly in a 300°F oven for about 5 minutes, or microwave it for just 15 seconds! That little burst of heat brings back the moisture.
This revived bread is absolutely sensational. It’s the best bread for making French toast, or if you’re feeling adventurous, you could toast it really nicely and try it with some of those easy cinnamon sugar pecans I shared last week! But for everyday use, it’s still the king of toast and the dreamiest foundation for a simple sandwich.
Frequently Asked Questions About Milk Bread
I always get questions after people try making my staple recipes—and that’s the best part because it means you’re actually baking! Here are a few common things I hear about this incredible loaf. If you’re looking for more general tips on getting started, check out my guide on Easy Bread Baking!
Can I make this milk bread without kneading?
Well, you *can*, but I really wouldn’t recommend it if you’re chasing that signature soft texture. This recipe relies on developing enough gluten structure during the 8-to-10-minute knead so it holds all that rich milk and butter without collapsing. If you skip the kneading entirely, you are getting into the realm of **No Knead Milk Bread**, and those usually require much wetter doughs and longer, specialized resting times that aren’t covered here. If you absolutely must skip the machine or the counter time, at least mix the dough until it just comes together, cover it, and let it rest for 30 minutes before you try shaping it. It won’t be quite as fluffy, but it’ll still be tasty!
What is the best use for leftover milk bread?
Leftover? What is that? But okay, hypothetically speaking, if you somehow have a heel or two left that isn’t devoured by the end of day three, you have to make French toast or bread pudding. This bread is miles better than standard sandwich bread for those applications because of the fat content. When you soak it, it gets this incredible custard interior. If you are looking for a great traditional use, you should try making a simple milk bread pudding—the sweetness is already built in, so it’s perfect!
Why is my Shokupan Recipe attempt dense?
This is usually down to one of two things, and it happens to everyone, even when following a fantastic Shokupan Recipe guide. Nine times out of ten, it’s the yeast. If your yeast wasn’t foamy when you added it to the milk in Step 1, it means it was dead or dormant, and your dough never developed the strength to rise properly. The other big culprit is under-proofing. Did you let it double the first time? Did it clear that 1-inch rise over the pan rim the second time? If you rush either rise, you trap the gas, and the final bake results in a nice, heavy brick instead of a cloud.
Serving Suggestions for Your Fresh Milk Bread
Honestly, the moment this loaf comes out of the oven and cools just enough so you don’t burn your fingers, it demands to be eaten. It’s fantastic just sliced thick and slathered with good salted butter—seriously, that’s all it needs to sing! It’s the perfect canvas for almost anything you need it for.
For breakfast, it makes the most unbelievable toast. It toasts up perfectly golden while still managing to stay somewhat tender on the inside, unlike crusty sourdough which dries out completely. Keep it simple with just a sprinkle of salt, or go sweet!
Because this is such a classic American-style loaf, it’s wonderful alongside savory breakfasts too. If you are making something creamy and rich, like my favorite fluffy and creamy scrambled eggs recipe, a slice of this milk bread is the perfect vehicle to scoop up every last bit of richness. You’ll never go back to using the plastic-wrapped stuff, I promise!
Nutritional Estimates for This Milk Bread Loaf
I always want to give you guys an idea of what you’re working with, nutrient-wise, though remember these are just estimates! We’re using real butter and sugar here because we believe in flavor first, so keep that in mind. These numbers can shift wildly depending on the brand of flour or if you swap out butter for oil, so take it as a general guide for the recipe as written.
Nutrition facts are based on an estimate of 14 servings per loaf:
- Serving Size: 1 slice
- Calories: 140
- Sugar: 3g
- Sodium: 180mg
- Fat: 3g
- Saturated Fat: 2g
- Unsaturated Fat: 1g
- Trans Fat: 0g
- Carbohydrates: 25g
- Fiber: 1g
- Protein: 4g
- Cholesterol: 25mg
It’s important to note that because we are using fresh ingredients and whole milk, the fat content here contributes significantly to the amazing texture we talked about earlier! This is real food baked in a real kitchen. Please remember that these figures change based on what exactly you put in your bowl!
Share Your Homemade Milk Bread Creations
That’s it—you’ve baked the softest, most satisfying loaf of milk bread you’ve ever made, and I am so excited for you! Now, please tell me how it went! Did it rise beautifully? Did your family fight over the heel?
I absolutely live for reading your success stories. Head over to the comment section below and drop a rating and tell me what you paired your first slice with. Did you use it for toast, or did you make an epic sandwich? If you snapped a picture of that gorgeous golden top, please share it with us! Seeing your bakes brightens my day and helps other bakers trust the recipe.
If you have any burning questions I didn’t cover here, or if you want to provide some feedback on the process, feel free to reach out through the contact page. Happy baking, friends!
PrintSimple Homemade Soft Milk Bread Loaf
Bake a soft, fluffy loaf of classic milk bread perfect for everyday sandwiches and toast. This recipe focuses on simplicity for tender results.
- Prep Time: 20 min
- Cook Time: 35 min
- Total Time: 2 hours 45 min
- Yield: 1 loaf 1x
- Category: Baking
- Method: Kneading and Baking
- Cuisine: American
- Diet: Vegetarian
Ingredients
- 1 cup Milk, warmed slightly
- 3 tablespoons Granulated Sugar
- 1 teaspoon Salt
- 2 1/4 teaspoons Active Dry Yeast
- 1 large Egg, room temperature
- 3 tablespoons Unsalted Butter, softened
- 3 1/2 cups All-Purpose Flour, plus more for dusting
Instructions
- Pour the warm milk into a large bowl. Stir in the sugar until dissolved, then sprinkle the yeast over the top. Let it sit for 5 to 10 minutes until foamy.
- Add the egg and softened butter to the yeast mixture. Mix until just combined.
- Add the salt and about half of the flour to the wet ingredients. Mix until a shaggy dough forms.
- Gradually add the remaining flour, mixing until the dough comes together.
- Turn the dough out onto a lightly floured surface. Knead the dough for 8 to 10 minutes until it is smooth and elastic.
- Place the dough in a lightly oiled bowl, turning to coat. Cover the bowl with plastic wrap or a clean towel and let it rise in a warm place for 1 to 1.5 hours, or until doubled in size.
- Gently punch down the risen dough. Shape it into a log and place it seam-side down into a greased 9×5 inch loaf pan.
- Cover the pan loosely and let the dough rise again for 45 to 60 minutes, or until it has crowned about 1 inch above the rim of the pan.
- Preheat your oven to 350°F (175°C).
- Bake for 30 to 35 minutes, or until the top is golden brown and the internal temperature reaches 200°F (93°C).
- Remove the bread from the pan immediately after baking and let it cool completely on a wire rack before slicing.
Notes
- For an extra soft crust, brush the top of the loaf with melted butter immediately after it comes out of the oven.
- If you are planning your weekly meals, this bread pairs well with simple recipes often found through meal planning services.
- If you are looking for alternatives to traditional baking, consider how recipes from weight loss programs might adapt this bread for lower sugar content.
Nutrition
- Serving Size: 1 slice
- Calories: 140
- Sugar: 3
- Sodium: 180
- Fat: 3
- Saturated Fat: 2
- Unsaturated Fat: 1
- Trans Fat: 0
- Carbohydrates: 25
- Fiber: 1
- Protein: 4
- Cholesterol: 25