
Oh, sometimes you just need chocolate, right? But the thought of turning on the oven, especially when it’s already warm outside or you’re just plain tired, sends shivers down my spine. That’s why I’m obsessed with desserts that let the refrigerator do all the heavy lifting! And trust me, when it comes to cool, creamy comfort, nothing beats this recipe I’ve perfected over the years. We are talking about the ultimate, easy, layered brownie refrigerator cake.
This is the dessert I bring to every single potluck, casual gathering, or last-minute family visit. It looks incredibly fancy with its distinct layers, but I promise you, it’s so foolproof that even if you’ve never made a layered dessert before, you’ll nail this. It’s reliable comfort food, and those layers are just divine once they set up. You’re going to love how simple it is to prepare this beautiful delicious dessert!
- Why This Brownie Refrigerator Cake is Your New Go-To Make Ahead Chocolate Cake
- Gathering Ingredients for Your Layered Brownie Refrigerator Cake
- Step-by-Step Assembly of the Brownie Refrigerator Cake
- Tips for Success with Your Brownie Pudding Dessert
- Storage and Reheating Instructions for this Decadent Chilled Brownies
- Serving Suggestions for this Chocolate Dessert Recipes for Parties
- Frequently Asked Questions About the No Bake Brownie Cake
- Nutritional Estimate for the Brownie Refrigerator Cake
- Share Your Experience with This Brownie Refrigerator Cake
Why This Brownie Refrigerator Cake is Your New Go-To Make Ahead Chocolate Cake
I know how busy life gets, and honestly, my kitchen shouldn’t be a source of stress! This brownie refrigerator cake is my secret weapon when I need something spectacular without the oven heat. It’s truly reliable, which is everything to me, and the flavors meld so beautifully overnight.
Here is why I keep coming back to this recipe again and again:
- It is a fantastic make ahead chocolate cake; the flavors only get deeper the longer it chills.
- The assembly is truly no-bake once you have your brownies ready. Pop it together, and let the fridge do the rest of the magic!
- It’s layered perfection. You get fudgy brownie, tangy cream cheese, smooth pudding, and light whipped cream all in one forkful.
- It travels like a dream, making it an ideal easy chocolate refrigerator dessert for any gathering or potluck.
If you need a showstopper that lets you relax the day before the party, you absolutely need to save this one. Find some inspiration for other quick meals when you’re busy here: Easy Weeknight Dinners.
Gathering Ingredients for Your Layered Brownie Refrigerator Cake
Alright, let’s talk ingredients! Since this brownie refrigerator cake relies on distinct layers, it’s super important that you have everything measured out before you start assembling. I like to keep my pantry stocked for quick dessert emergencies, and this list is honestly pretty standard stuff. We need to bake the brownies first, of course, but after that, it’s pure, exciting assembly! We are setting ourselves up for a truly creamy layered chocolate dessert here, so don’t skip anything.
For the Baked Brownie Base
You’ll need the base layer to be sturdy enough to hold up all those lovely toppings. I normally bake my own, but feel free to use your favorite high-quality boxed brownies if that saves you time—no judgment here!
- 1 box (18.4 ounces) fudge brownie mix, and whatever ingredients the box calls for to make it for a 9×13 pan.
For the Creamy Filling and Chocolate Pudding Layer
This section is where the magic happens! This combination of cream cheese and pudding creates the best texture that sets up perfectly firm in the fridge. This gets us that amazing, decadent texture we’re looking for.
- 8 ounces cream cheese, make sure it’s softened completely—this is key!
- 1 cup powdered sugar
- 1 teaspoon vanilla extract
- 1 cup cold milk (don’t use warm milk for the pudding, please!)
- 2 packages (3.9 ounces each) instant chocolate pudding mix
- 2 cups cold heavy whipping cream
- 1/2 cup powdered sugar (for the whipped cream)
- 1 teaspoon vanilla extract (for the whipped cream)
- 1 cup mini chocolate chips, just for sprinkling on top!
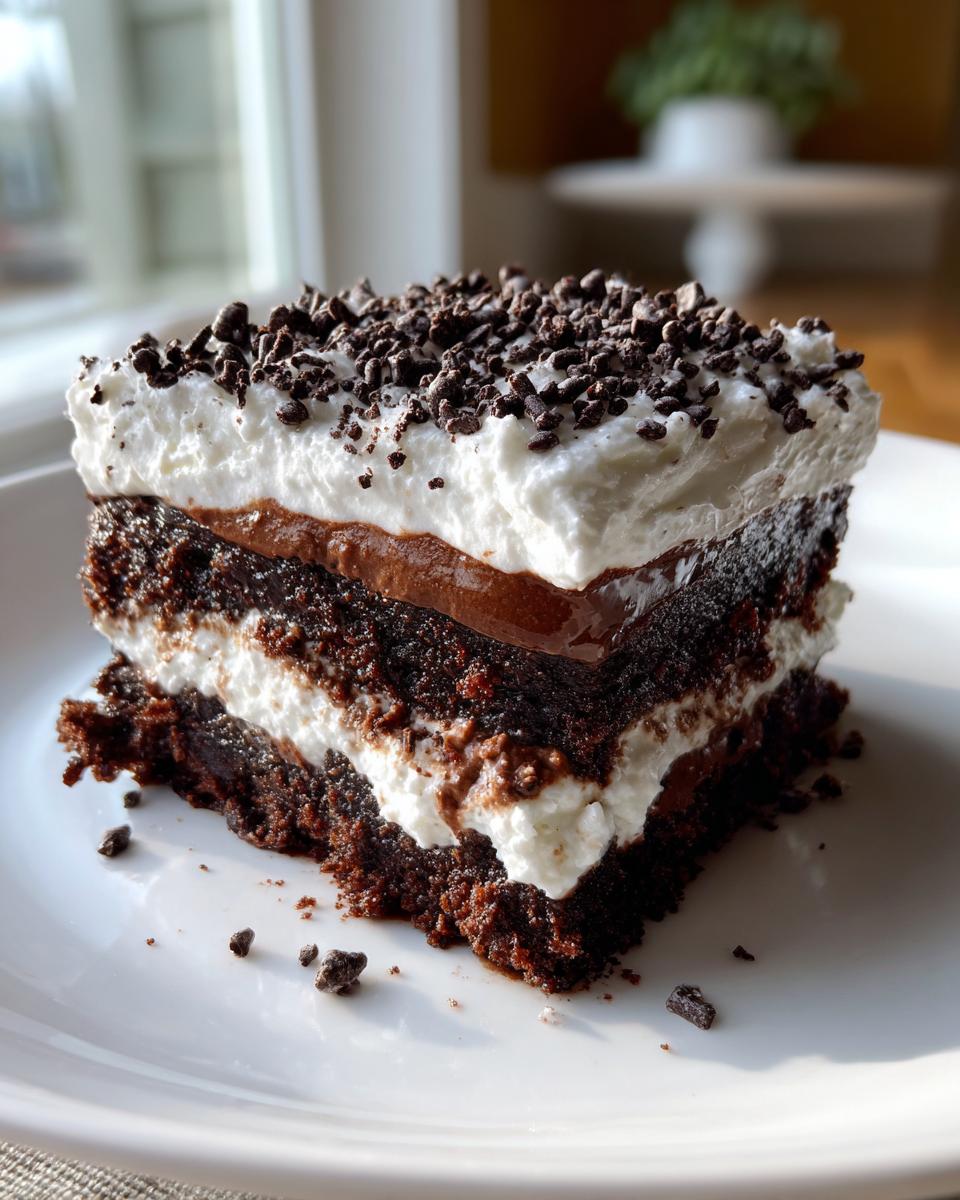
Step-by-Step Assembly of the Brownie Refrigerator Cake
Okay, now comes the fun part—we get to build this magnificent brownie refrigerator cake right in the dish! Since this is essentially a very decadent, fudgy, no-bake assembly (even if we bake the base), timing is crucial. You can’t rush the cooling, dear reader, trust me on this one. If you try to layer soft cream cheese onto warm brownies, you’ll end up with a soupy mess instead of distinct layers. We want clean separation!
Bake and Prepare the Brownie Foundation
First things first, you need your foundation. Follow the box instructions for your fudge brownie mix in that 9×13 inch pan. Once they are baked through, the absolute biggest hurdle is patience: you must let them cool completely. I mean, completely cool to room temperature. I usually bake mine the night before and just leave them on the counter, covered loosely.
Once they are cool, take a sharp knife and cut them into even squares or rectangles. If you’re using a springform pan for presentation, cut them slightly smaller than the pan base so they nestle in nicely. This careful cutting makes serving so much easier later!
Creating the Cream Cheese and Pudding Layers
While the brownies are chilling out (literally or figuratively!), we whip up the creamy layers. For the cream cheese layer, just beat that softened cream cheese with the powdered sugar and the first teaspoon of vanilla until it’s smooth as silk. No lumps allowed!
Next up is the chocolate pudding. This is instant pudding, so it sets fast. You whisk together those two packages of pudding mix with exactly one cup of *cold* milk. I really stress the cold part here—if the milk is even lukewarm, the pudding won’t firm up right. Whisk it until it starts getting thick, maybe two or three minutes, and then let it sit on the counter for five minutes while you make the topping.
For that glorious top layer, whip your heavy cream with the other 1/2 cup of powdered sugar and the final teaspoon of vanilla extract until you get those beautiful stiff peaks that hold their shape. That’s the sign of a perfect topping!
Assembling the Simple Layered Icebox Cake
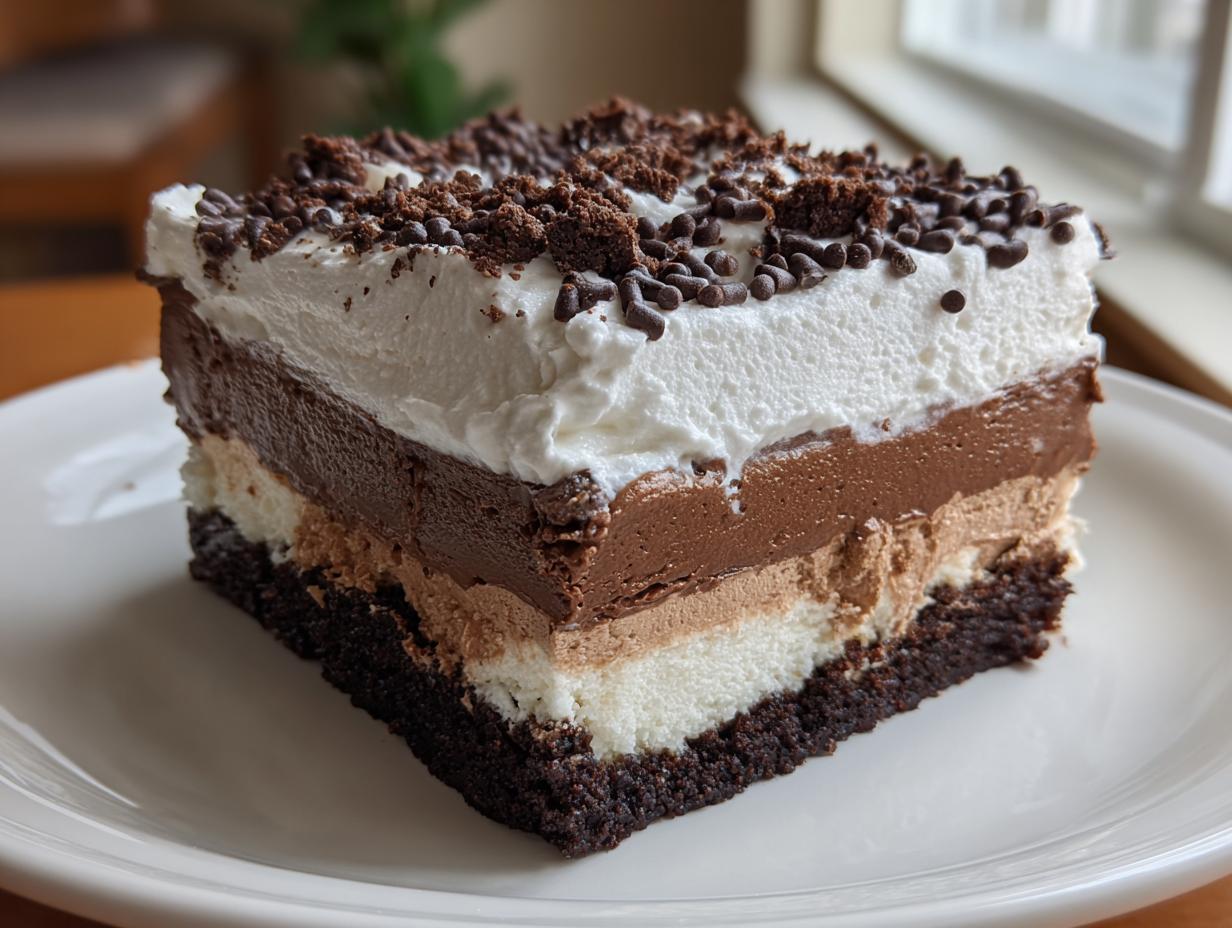
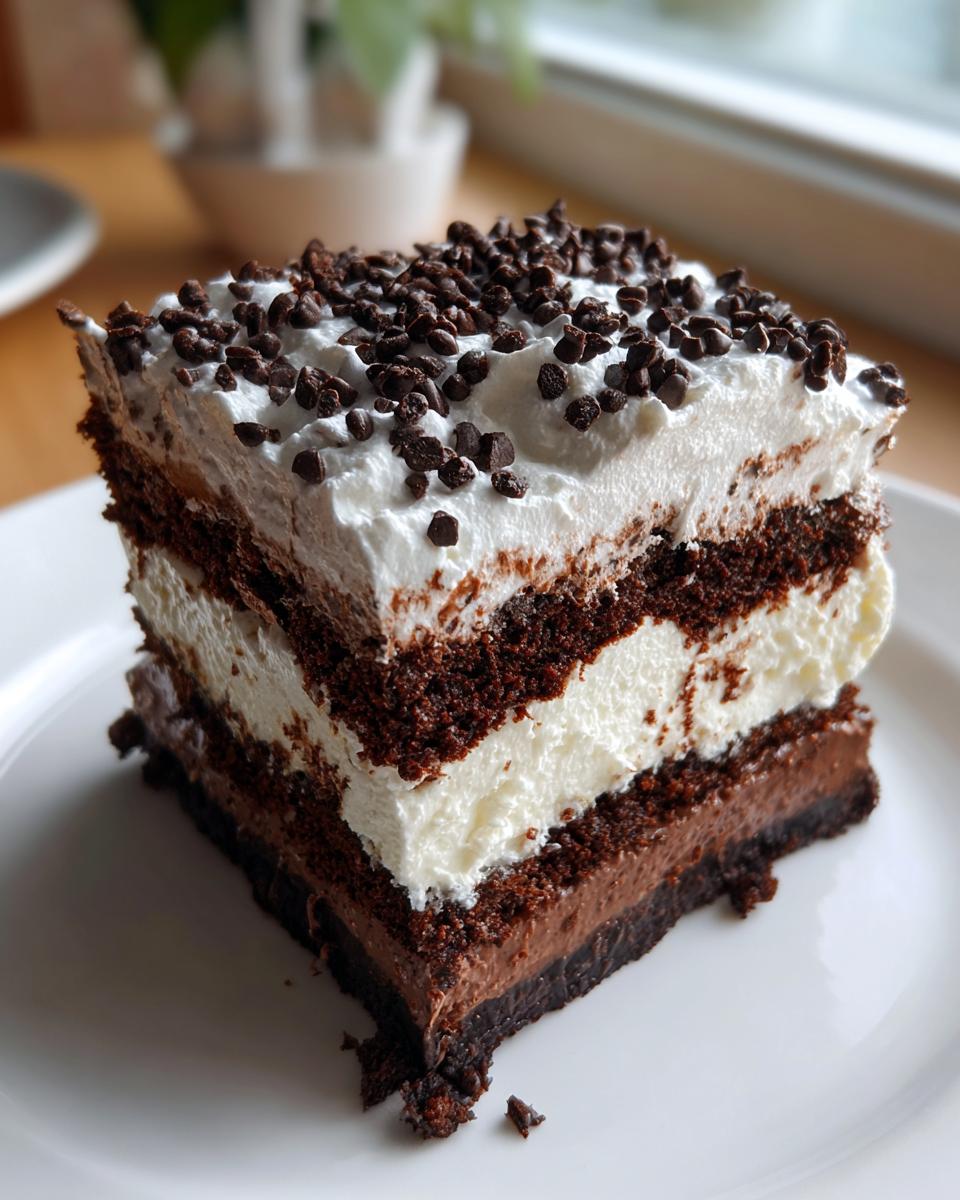
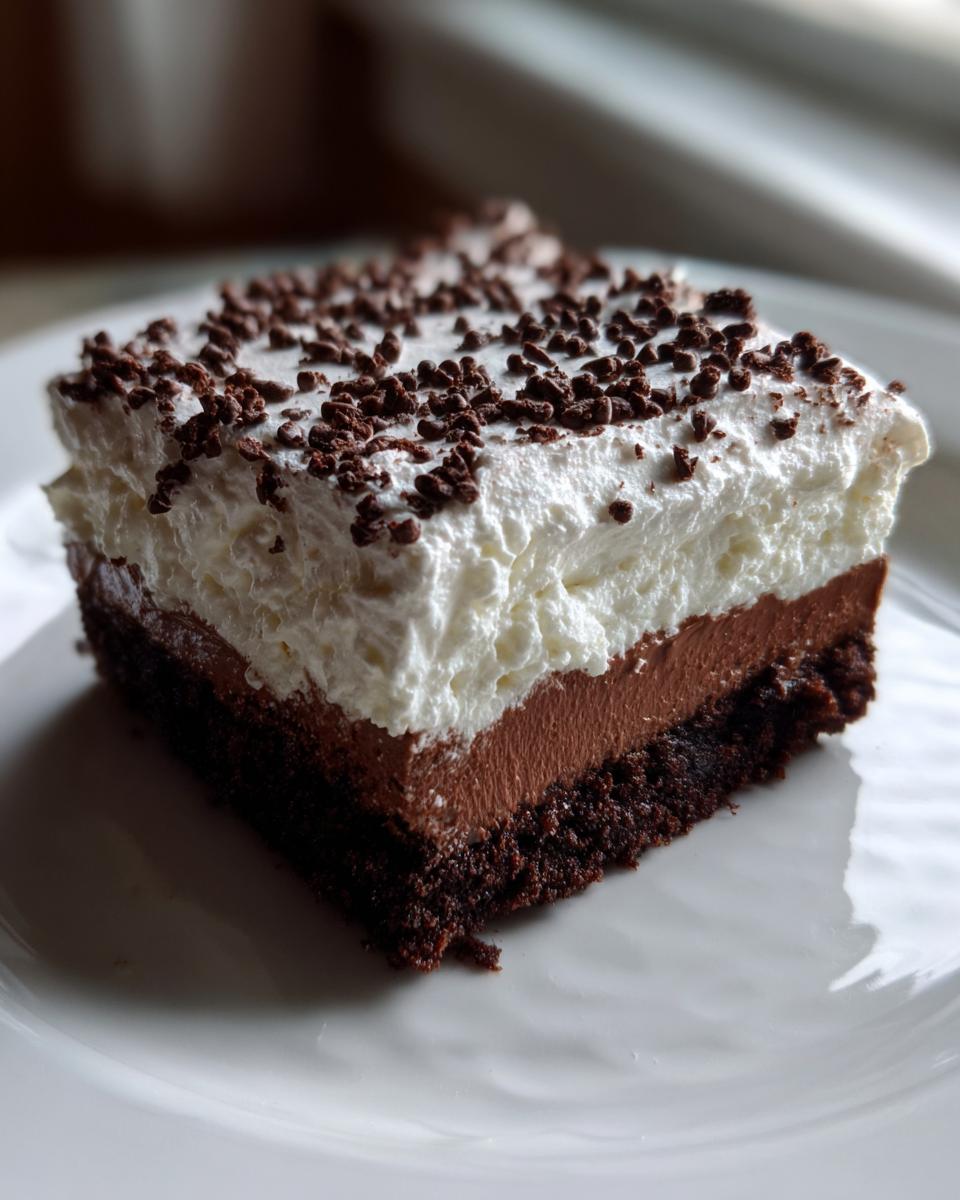
Time to build our masterpiece! Grab your 9×13 dish or springform pan. First, arrange your first layer of cooled brownie pieces tightly on the bottom. Don’t be shy; you want complete coverage.
Next, follow the order strictly: Spread that heavenly cream cheese mixture evenly over the brownies. Over that, spoon out the chocolate pudding mixture and smooth it into an even layer. It’s starting to look gorgeous!
Now, lay down the second layer of brownie pieces gently on top of the pudding. Finally, spread your freshly whipped topping right over the top of the second brownie layer. Use an offset spatula to make it look nice and rustic.
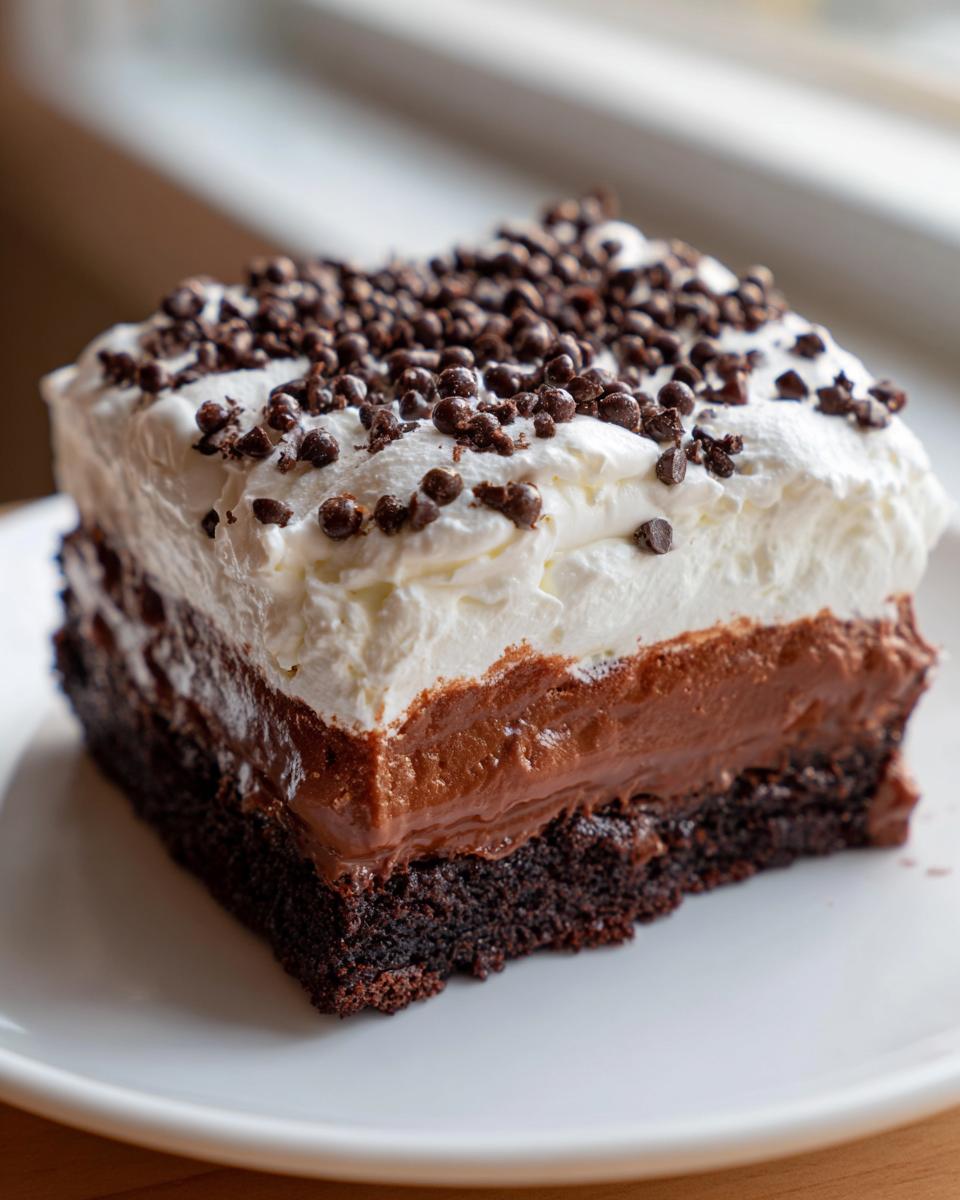
Finish this simple layered icebox cake by sprinkling those mini chocolate chips liberally all over the whipped topping. Once decorated, pop it into the fridge. This needs that long chill time—at least six hours, but frankly, overnight is when this dessert really shines!
Tips for Success with Your Brownie Pudding Dessert
When you’re making this amazing brownie refrigerator cake, a few small tweaks can take it from good to absolutely unforgettable. Since we need this all to set up firmly in the cold, timing and texture preparation in each layer are just vital. Don’t stress, though; these are just little insights I picked up after making a few sloppy versions myself!
First, let’s talk about those base brownies. If you are using store-bought brownies, that’s totally fine! It bumps this right into the realm of a true ‘quick chilled dessert recipe.’ Just make sure they are nice and dense, like a fudgy block, before you start cutting them. Thin, crumbly brownies don’t hold their shape well between the layers, so pick the thickest ones you can find.
Next, when you are whipping that heavy cream for the top layer, you need excellent technique to get those stiff peaks. Make sure your bowl and your whisk attachment are chilled beforehand—yes, really! A colder start means faster, firmer whipping. If you over-beat it even a little, it looks like cottage cheese, and we definitely don’t want that ruining our beautiful topping.
And finally, the chilling time. This is non-negotiable, sweet friend. You need that minimum of six hours, but I’m telling you now, make ahead desserts that chill overnight are superior. Why? Because the moisture from the pudding and cream cheese layers slightly softens the brownies where they touch, melding the whole thing together into a cohesive slice that doesn’t fall apart when you cut it. Patience truly is the final, secret ingredient for this entire recipe. If you’ve mastered icings, you might enjoy reviewing this easy cookie icing recipe that hardens perfectly for some other dessert inspiration!
Storage and Reheating Instructions for this Decadent Chilled Brownies
Now, this is a tricky one because, as glorious as this brownie refrigerator cake is right out of the fridge, we have to talk about leftovers! Who am I kidding? There are never leftovers, but just in case you manage to save a slice or two, proper storage keeps these decadent chilled brownies tasting exactly as they should.
Since this dessert relies heavily on those whipped cream and cream cheese layers, you absolutely must keep this covered and cold. Never leave this out on the counter for more than an hour or two, especially if your kitchen runs warm. Food safety first, always!
The best way to store any leftovers is to cover the entire dish tightly. If you used a springform pan, you might have a lid, but if you used a 9×13 dish, tightly wrapped plastic wrap pressed gently against the top layer (or just over the whole dish) works perfectly fine. It will stay delicious for about three to four days in the refrigerator.
Can you freeze it? Yes, you can, but I always advise caution with layered, cream-based desserts like this. If you want to freeze it—maybe you made it for a holiday weeks ahead—I suggest freezing it *before* you put that final whipped topping on. Cover the layered structure extremely well in plastic wrap, then maybe a layer of foil, and freeze it for up to a month.
When you decide you need a slice, let it thaw overnight in the refrigerator. Once fully thawed, *then* you can add the fresh whipped cream and chocolate chips topping. If you freeze it already topped, the whipped cream texture can get a little grainy when it thaws—and we want smooth perfection, not grainy chaos, right?
Serving Suggestions for this Chocolate Dessert Recipes for Parties
Because this brownie refrigerator cake is so inherently rich—I mean, what’s not to love about fudge, cream cheese, and pudding all chilling out together?—you need pairings that cut through that richness rather than adding more weight. When I serve this at a party crowd, I always try to balance the decadence with something light and bright on the side.
Honestly, the best accompaniment is a really strong, dark cup of coffee. It just goes so perfectly with that deep chocolate flavor. If you need some ideas for making that coffee special, check out my guide to some easy coffee recipes. It makes the whole dessert feel much more elegant!
If you’re serving it during the daytime or during a summer gathering, a little burst of fresh fruit is wonderful. Think simple raspberries or sliced strawberries. Their tartness just lifts the whole bite. You don’t need a complicated sauce; a quick rinse and plate works wonders.
For visual appeal on the serving platter, a final, whisper-light dusting of unsweetened cocoa powder right before you carry it out to your guests can look stunning. It adds a matte contrast to that glossy, whipped top. You can also dust on a little powdered sugar if you prefer a softer look. The goal here is elegance without effort, which is exactly what this chocolate dessert recipe for parties delivers every single time!
Frequently Asked Questions About the No Bake Brownie Cake
I always get a million questions about this brownie refrigerator cake because people can’t believe how easy it is to get such a rich result! I’ve gathered up the most common ones here, hoping to save you a trip to my email inbox. It’s all about building confidence in this simple layered icebox cake so you can make it whenever that chocolate craving hits!
Is this truly a no oven desserts chocolate recipe?
That’s a great question, and one I hear often! Technically, you do have to *bake* the brownie base itself, but the entire magic, the assembly that makes this a true brownie refrigerator cake, happens with absolutely no oven involved. We are assembling the layers cold, relying on the fridge to do the setting. So, if you use store-bought brownies, then yes, it is 100% a no oven desserts chocolate recipe. If you bake the base, it’s mostly a chilling dessert, which is what most people really mean when they ask!
Can I substitute the cream cheese layer?
You could, but honestly, that slightly tangy cream cheese layer is what balances the intense richness of the fudge and the pudding. If you absolutely cannot do cream cheese, you could try making a stabilized pastry cream instead, but it won’t have that signature slight tartness. You’d also need to reduce the sugar in the next layer slightly. For a true fudgy layered dessert experience, I’d stick with the cream cheese layer—it’s what pairs so well with the chocolate pudding!
How firm should the pudding layer be before adding the next layer?
This matters a lot when you are building this brownie pudding dessert! You want that instant pudding mixture to have visibly thickened before you spread it onto the cream cheese layer. If it’s still runny, it will seep right into your cream cheese layer and ruin the clean separation we worked so hard for. I usually let it sit on the counter for about five minutes after whisking, just until it holds soft peaks when you lift the whisk. It will continue to firm up in the cold, but it needs a good head start before it sits on top of the cream cheese.
What is the best way to cut clean slices of this brownie pudding dessert?
Here is my absolute number one trick for getting those gorgeous, clean slices that look perfect on a plate—especially important when you’re serving this for parties! You need a very sharp, long knife, and you must keep it clean. Dip the knife into a glass of very hot water—the hotter the better—and wipe it completely dry on a clean kitchen towel. Then, make your slice.
You repeat that process—hot water, wipe dry, slice—for every single cut you make. It melts just enough of the chilled fats as it passes through, giving you a stunning presentation of all those layers. This keeps your slices looking neat and tidy, even if you used homemade brownies for the base! For more helpful baking techniques, you can check out my post on easy super moist pumpkin bread recipe, as knife skills are important there too!
Nutritional Estimate for the Brownie Refrigerator Cake
Now, I’m going to be totally upfront with you: making a brownie refrigerator cake this rich and delicious means we aren’t exactly winning any calorie-counting contests! This dessert is pure indulgence, and that’s okay sometimes. We deserve a treat, especially when it’s a crowd-pleaser like this one.
Please remember that these numbers are just an estimate. How much fat and sugar you end up with totally depends on the brand of brownie mix you choose, the fat content of your milk, and even how thick you spread those creamy layers. This estimate is based on 12 generous servings, which seems pretty fair for a slice of this layered goodness!
Here is a general breakdown for one serving:
- Serving Size: 1 slice
- Calories: Around 450
- Fat: About 25g (I told you it was rich!)
- Saturated Fat: Around 14g
- Trans Fat: Tiny amount, about 0.5g
- Carbohydrates: Roughly 55g
- Sugar: I estimate about 45g – it’s a chocolate cake, after all!
- Protein: About 5g
- Sodium: Around 280mg
- Fiber: About 2g
See? It’s decadent but totally worth it for those unbelievable layers you build up in the pan. Enjoy every single bite!
Share Your Experience with This Brownie Refrigerator Cake
Now that you have all the steps for making the absolute best brownie refrigerator cake—the layers, the chilling secrets, everything!—I really want to hear from you. There’s nothing I love more than knowing one of my trusted recipes ended up on your family table and made someone’s day a little sweeter.
If you make this layered brownie icebox cake, please take a moment to drop a comment below! Tell me how it turned out. Did you make it for a big gathering? Did you sneak a slice after the kids went to bed? I’m always curious about your little tweaks. Maybe you added espresso powder to the pudding layer, or perhaps you used different kinds of brownies—tell me everything!
And if you have a moment, leaving a star rating really helps other home cooks find this recipe. Every rating confirms that this is a reliable, delicious dessert that works for everyone. We are building this community kitchen together, one no-bake layer at a time. If you need to reach out directly for any personalized advice or have questions that aren’t covered in the FAQs, feel free to send a note through my contact page. Happy chilling, and enjoy every rich spoonful!
PrintThe Ultimate No-Bake Brownie Refrigerator Cake with Cream Cheese & Chocolate Pudding Layers

Make this rich, layered brownie refrigerator cake without turning on your oven. This easy, make-ahead dessert combines fudgy brownies, creamy filling, and chocolate pudding for a decadent chilled treat perfect for parties.
- Prep Time: 30 min
- Cook Time: 35 min
- Total Time: 405 min
- Yield: 12 servings 1x
- Category: Dessert
- Method: No-Bake/Chilling
- Cuisine: American
- Diet: Vegetarian
Ingredients
- 1 box (18.4 ounces) fudge brownie mix, prepared according to package directions for a 9×13 pan
- 8 ounces cream cheese, softened
- 1 cup powdered sugar
- 1 teaspoon vanilla extract
- 1 cup cold milk
- 2 packages (3.9 ounces each) instant chocolate pudding mix
- 2 cups cold heavy whipping cream
- 1 teaspoon vanilla extract
- 1/2 cup powdered sugar
- 1 cup mini chocolate chips, for topping
Instructions
- Prepare the brownie mix according to package directions for a 9×13 inch pan. Bake until done. Let the brownies cool completely, then cut them into uniform squares or rectangles.
- Prepare the cream cheese layer: In a medium bowl, beat the softened cream cheese, 1 cup powdered sugar, and 1 teaspoon vanilla extract until smooth and creamy. Set aside.
- Prepare the chocolate pudding layer: In a separate large bowl, whisk together the cold milk and the two packages of instant chocolate pudding mix for about 2 minutes until the mixture begins to thicken. Let it sit for 5 minutes.
- Prepare the whipped topping: In a clean bowl, beat the heavy whipping cream, 1/2 cup powdered sugar, and 1 teaspoon vanilla extract until stiff peaks form.
- Assemble the cake in a large serving dish or springform pan (at least 9×13 inches): Arrange a single layer of cooled brownie pieces across the bottom of the dish, cutting pieces to fit snugly.
- Spread the cream cheese mixture evenly over the first layer of brownies.
- Spoon the chocolate pudding mixture over the cream cheese layer and spread it out evenly.
- Top the pudding layer with a second layer of brownie pieces.
- Spread the prepared whipped topping evenly over the second brownie layer.
- Sprinkle the mini chocolate chips over the top layer of whipped topping.
- Cover the dish tightly with plastic wrap and refrigerate for at least 6 hours, or preferably overnight, to allow the layers to set firmly.
- Slice and serve this easy chocolate refrigerator dessert cold.
Notes
- If you want a quicker assembly, you can use store-bought, pre-made fudge brownies instead of baking your own.
- For an extra rich flavor, substitute the milk in the pudding layer with half-and-half or whole milk.
- You can use a chocolate whipped topping instead of making your own for a time-saving step.
Nutrition
- Serving Size: 1 slice
- Calories: 450
- Sugar: 45g
- Sodium: 280mg
- Fat: 25g
- Saturated Fat: 14g
- Unsaturated Fat: 11g
- Trans Fat: 0.5g
- Carbohydrates: 55g
- Fiber: 2g
- Protein: 5g
- Cholesterol: 55mg